<Concept of our website “More Freedom with Python”>
This site aims to automate troublesome daily tasks and improve efficiency using Python, currently the most popular programming language. The goal is to introduce a variety of useful libraries (modules) in each issue.
Why? Why Python…
・Python provides a variety of libraries (modules) that allow us to manipulate and automate familiar applications.
It is a well-balanced scripting language that is easy for beginners to understand, yet has a full-fledged object-oriented aspect.
What? Automate…
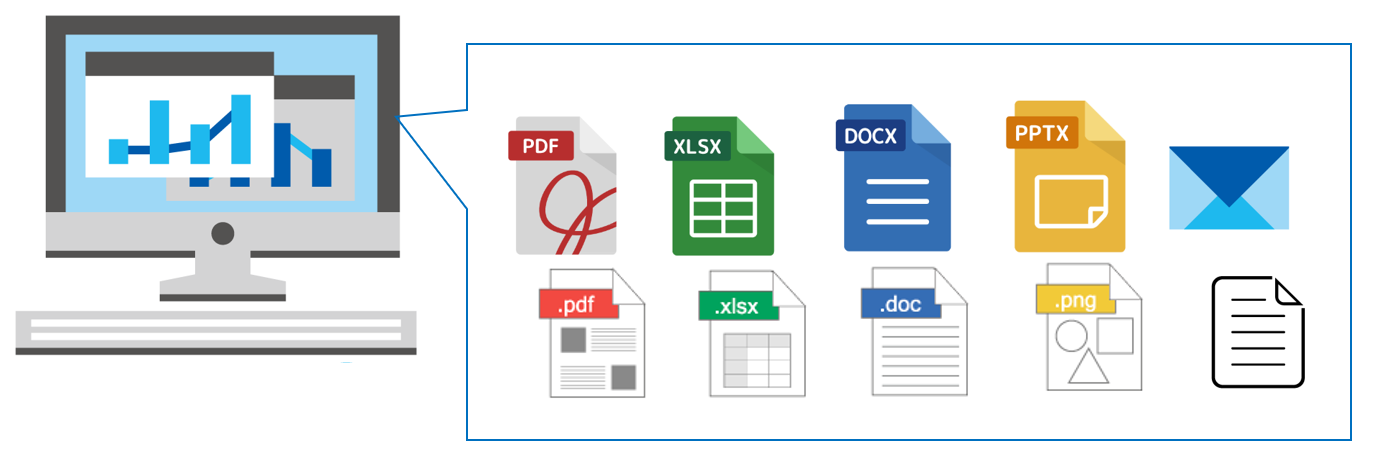
When we think of the most familiar applications used in the business scene, the first ones that come to mind are probably MS-Office’s 「Excel」「Word」and「PowerPoint」.
Because they are “standard indispensable tools” that are used daily, the impact of automating and improving the efficiency of these related tasks can be extremely large.
Therefore, in this series of articles, we would like to introduce an external library for operating the Office document creation software “Word” with “Python“.
In addition to the “Creating Text“, Word can be used to “Insert Images, Figures and Tables” “Set up Headers/Footers” “Define styles” and much more.
Therefore, it is not possible to provide a comprehensive explanation of everything in this article alone. It will be explained in detail with illustrations over a series of multiple articles divided into the following themes.
In this first installment of the series, we will focus on the essential parts of using Word: “Creating and Saving Document files” and “Creating sentences“.
Please stay with us until the end of this article as you will be able to “do and understand” the following.
Now, from the next section, we will introduce the library and explain how to install it.
1. Manipulate Word with「python-docx」library

There are two libraries for manipulating Word from Python: “pywin32” and “python-docx“.
Both are provided as external (third-party) libraries, not as part of the standard Python library. The features and differences between the two are summarized below.
<pywin32:>
Ability to operate all Office software, not just Word. The classes and methods used have a syntax structure similar to that of C#, VB (Visual Basic) and VBA (VB for Application), which are Windows-compliant programming languages.
Therefore, the Office Developer Center reference is a good reference for coding.
For more information on pywin32 and the Office Developer Center, please visit the following official sites
Official Pywin32 documentation
https://pypi.org/project/pywin32/
Office Developer Center VBA Reference
https://docs.microsoft.com/ja-jp/office/vba/api/overview/
<python-docx:>
Python library dedicated to Word manipulation. Unlike pywin32, classes and objects are not compatible with other languages.
Therefore, for those who have some knowledge of VBA, pywin32 may be a good choice.
However, one advantage of using this python-docx is that “the code is relatively simple and intuitive to understand”.
The following official references are also organized. You will be able to create a reasonable amount of documentation just by tracing code examples for your purposes.
Official python-docx documentation
https://python-docx.readthedocs.io/en/latest/
In summary, the above is as follows.
・“pywin32” can do everything to the point
・python-docx” is a dedicated library for Word that can be easily coded
Each has its own advantages and characteristics. Please refer to them and use them accordingly.
This article describes the “python-docx” library.
The usage of various classes and functions introduced in this article is only an example. Optional arguments are omitted, so please refer to the official documentation above for details and clarifications as necessary.
1.1 Install and Check operation
Install “python-docx” and check its operation. This library is not pre-installed on “Anaconda” and must be installed separately. Type and run the pip command from the Python library management tool at the Anaconda prompt to install.
pip install python-docxAlternatively, you can download the package (installer) and install it manually using “setup.py“. In that case, also make sure that the dependency “lxml 2.3.2 or more” has been installed. On the other hand, the pip command will automatically perform dependency checking and installation.
Python setup.py installThen we will check the operation: just import the “Document class” that manages the Word document entity from the Python-docx module(doc), and run it.
from docx import DocumentIf no error messages or other warnings appear at this point, the installation was successful.
The development environment and version information that was confirmed to work in the article is as follows. Please keep this in mind when using the different environment or version of the library.
・JupyterNotebook 6.0.3
・Python3.7.6(64bit)
・python-docx 0.8.10
・lxml4.5.0
2. Hierarchical Structure of Object

In python-docx, which adopts an object-oriented approach, the object has various functions (methods) and attributes (properties) under it, and Word files are manipulated by linking and associating multiple objects.
This section shows the hierarchical structure of related objects for sentences (text), which are the main contents of Word documents, as a basic matter. Please check how it is managed in the python-docx library.
It also explains the basics of document operations such as “Create New“, “Load Existing File” and “Save“.
2.1 Object for Paragraph and Sentence
The main content of Word is text. The largest units that make up a sentence are the “page” and “paragraph,” followed by the “sentence” and “word”. The same is true when manipulating sentences in python-docx, each unit is managed by its own object.
Therefore, it is extremely important to first understand the hierarchical structure of the objects involved in the text.
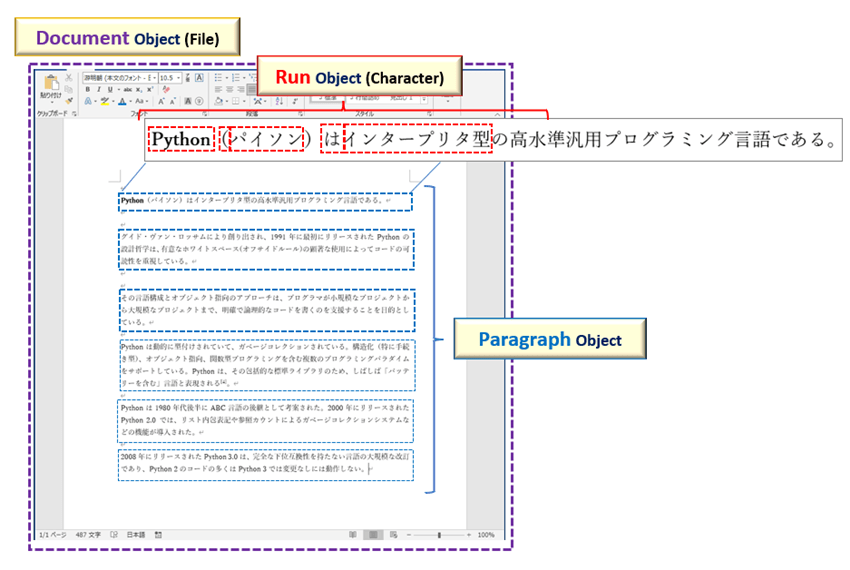
The Word document itself is managed as the Document object. This Document object is the top-level object and manages all the objects under it.
Generally, sentence is composed of several paragraphs.
There seem to be two patterns of Japanese paragraphs: “Formal Paragraph” and “Semantic Paragraph“.
「Formal Paragraph」…Paragraphs that begin with indent (some media do not indent)
「Semantic Paragraph」…Collection of sentences that have the same purpose (meaning) within a formal paragraph
Quote:<編集力を必要とするすべての人に>
A paragraph managed by the Document object is the “Formal Paragraph”. It can be a single sentence or a series of sentences without an intentional line break in the middle.
In python-docx, paragraphs are managed by the Paragraph object.
A Document can have multiple paragraphs. In other words, it manages multiple paragraphs as the collection whose elements are Paragraph objects.
In addition, paragraph (sentence) can be “broken down into letters (words)” or “new letter (word) can be added to the end of the paragraph”. This is made possible by the Run object assigned to each letter(word).
Paragraph also manages multiple characters (words). In other words, it takes the form of collection (iterable) whose elements are Run objects.
The hierarchical structure of objects related to “text creation” up to this point and “other Word functions” is summarized below. (Fig3)
In addition to “Create Text” which will be explained in this article, Word has “Image” “Table” “Define Style” and “Define Section” all of which are placed directly under the Document object. These will be explained in detail in another article.

This is an overview of the objects managed by python-docx.
The next section will provide an in-depth explanation of the main topic of this article, “Writing”.
3. Create and Save Documents

To manipulate Word with python-docx, you must first get the Document object. As mentioned above, this object is a Word file itself, and is located in the top level class of the object hierarchy.
3.1 Create new Document and Load file
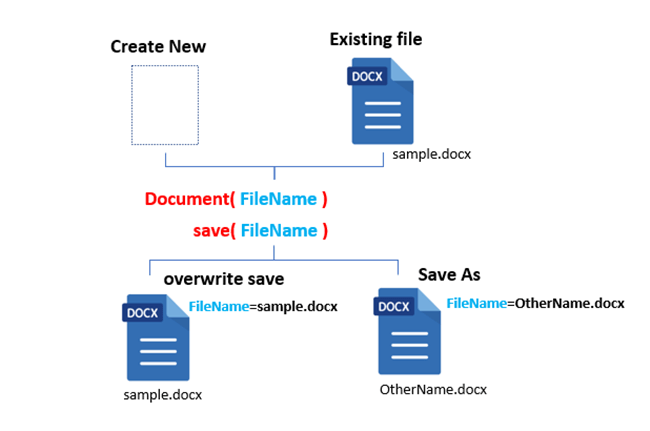
There are two ways to obtain the Document object: by “loading an existing Word file” or by “creating a new file“. In either case, Instance is created from the Document class using the following format.
from docx import Document
Document(docx)
arg: docx: Specify the name of the document
(If argument is omitted, create new file)
return: Document object
To read and edit an existing file, specify the file name in the arg:docx (including its path if it is not in the current directory). When creating a new file, it is generated without specifying any arguments.
3.2 Save Document (Overwrite/Save As)
To save the created document, use the save() methods under the Document object with the following format.
Document object.save(path_or_stream)
arg: path_or_stream: Specify file name to save
(When overwriting, specify the same file name as the loaded file.)
In the case of “save as“, specify the desired file name in the arg:path_or_stream and execute the save() method. In the case of “Save Overwrite,” the same file name is specified without omission.
As an example, the code to load an existing file (sample1.docx) and save it as a new file with an alias (otherName.docx) is as follows
# Import Document class from docx library
from docx import Document

# Create an instance by specifying a file to be read
doc = Document('sample1.docx')

# Confirm that it is the Document object
print(type(doc)) # >> <class 'docx.document.Document'>

# Specify the file name as the argument of the save method
doc.save('OtherName.docx')
4. Add “Paragraph” for Sentence Contents

This section describes the Paragraph object, which is the framework for arranging the “Text contents” of the Word document.
This section covers the basic operations of adding paragraphs and setting up sentences, as well as the formatting of paragraph blocks.
4.1 Add the Paragraph(Paragraph Object)
To add new paragraph to the document, use the add_paragraph() method under the Document object with the following format.
Document object.add_paragraph(text, style)
arg: filename: Specify the text to be set (optional)
arg: style: Specify paragraph style (optional, default: None)
return: Paragraph object
The arg:text specifies the text to be set when adding paragraph. Even if you do not specify otherwise, the add_paragraph method will add only empty paragraph (Paragraph objects). The text can also be set later with the text property (see below).
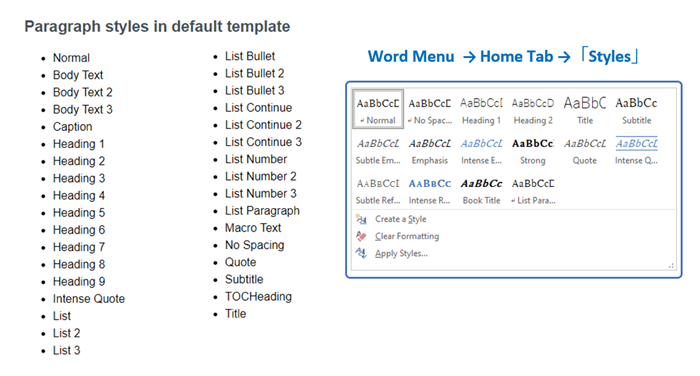
On the other hand, the arg:style can be set to any of the various text styles registered in Word. Fig5 shows a list of pre-registered style formats. Some also appear in the UI of Word’s Menu(“Home”) -> “Styles”
Specify title (“Title”), heading (“Heading *”), list (“List **”) and so on as string (with single or double quotes).
Next, we will discuss the acquisition of added paragraphs. Document object can contain multiple paragraphs and they are managed as collections (Iterable object) whose elements are Paragraph object.
To get all the paragraphs contained in the Document file, use the following paragrahs property. You can also specify index to retrieve only the desired paragraph.
<Get all paragraphs>
Document object.paragraphs property
return: Iterable object (collection) whose elements are Paragraph object
<Get by specifying paragraph>
Document object.paragraphs[index] property
arg: index: Specify the paragraph index
return: Paragraph object
There are many methods, properties, and attributes under the Paragraph object as well, but we cannot introduce all of them. Here are three of particular importance.
The first is the text property, which sets the text in the paragraph, and the second is the paragraph_format property, which sets the paragraph format (*). Finally, there is the add_run() method that adds the Run object to manage character (word) units.
※ Formatting at the character (word) level is handled by the Run object described below.
| 【Paragraph object】 | 【Functions】 | 【Other/Details】 |
|---|---|---|
| text property | Get and Set paragraph string(Text object) | |
| paragraph_format property | Get the ParagraphFormat object | Format paragraph (see below) 【ParagraphFormat object】 |
| add_run(text, style) | Get the Run object arg: text: Specify string to be set arg: style: Specify style (default: None) | Manage individual characters (see below) 【Run object】 |
The ParagraphFormat object, which can be obtained with the paragraph_format property, provides a variety of properties related to paragraph-level formatting (indentation, spacing, etc.). Below is a list of the major ones.
| 【ParagraphFormat object】 | 【Functions】 | 【Other/Details】 |
|---|---|---|
| alignment property | Specify the horizontal alignment of paragraph | 【WD_ALIGN_PARAGRAPH class】 Ex) left-justified, right-justified |
| left_indent property | Specify left indent spacing | Specify in units of Inches, etc. |
| page_break_before property | Add paragraph to the top of new page | True:valid / False:invalid |
| widow_control property | Ensure that paragraph do not cross pages | True:valid / False:invalid |
| space_before property | Specify the spacing from the previous paragraph | Specify in units of Pt/Inchies, etc. |
| line_spacing property | Specify spacing between lines | Specify numerical value by Pt or by【WD_LINE_SPACING class】definition |
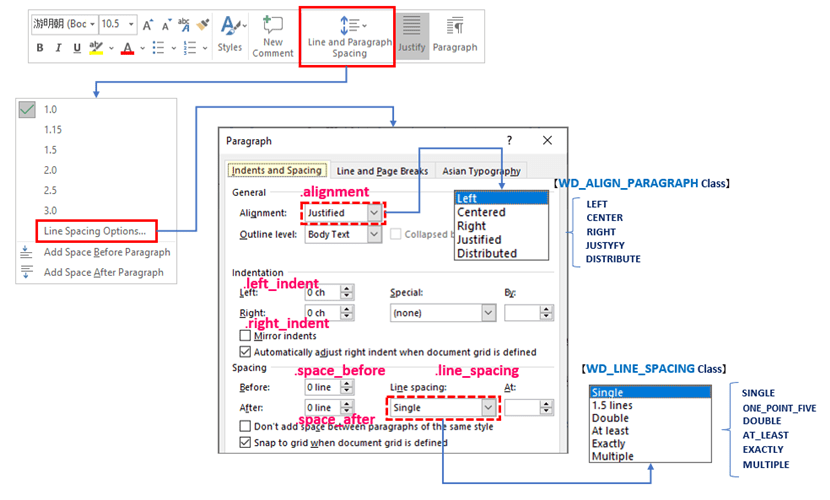
The following shows the correspondence between the MS-Word UI and various properties. (Fig.6,7)
Alignment is handled by the alignment property. Specified by the Enum defined in the “
WD_ALIGN_PARAGRAP class”. Indentation” is handled by the left(right)_indent property.
The spacing between lines is specified by the line_spacing property, and the unit and spacing value are specified from the “WD_LINE_SPACING class”.
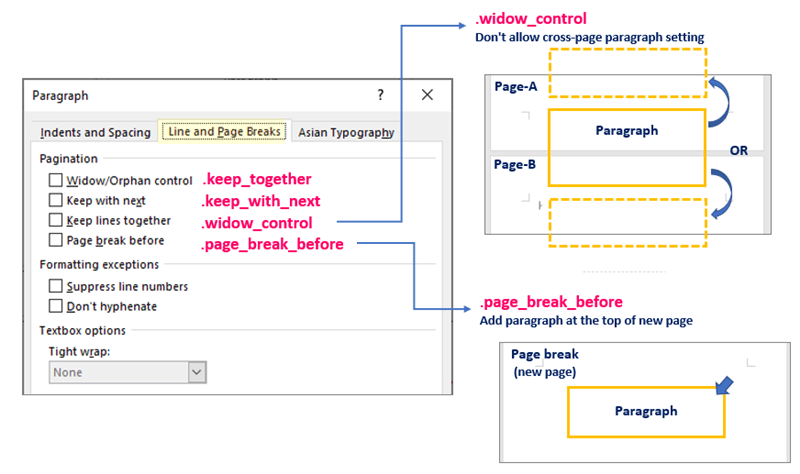
Paragraph “Page Break” are also supported at the same level as in MS-Word, and four properties are provided as follows.
For example, if paragraph straddles pages, you can use the widow_control property to move the entire paragraph to page break, or the page_break_before property to insert paragraph at new page when adding paragraph.
There is another method, add_page_bread() that adds new page break. But this method needs to be used separately for adding paragraph.
【SAMPLE (1)】
This is the end of the explanation about paragraphs (Paragraph object). This is a bit long, so let’s check how to use it with a sample code.
The code summary is to add paragraph with the style format (Title/List Number) applied. It is also an example of setting text by properties and applying formatting (alignment) at the paragraph level.
from docx import Document                     # Import Document class
from docx.enum.text import WD_ALIGN_PARAGRAPH # Import paragraph position definition class

sentence = ['Python is an interpreted high-level general-purpose programming language',
            'Python was released in the late 1980s as a successor to the ABC language',
            'Python is a dynamically typed language',
            'Python embraces object orientation']

# Get the Document oject
doc = Document()

# Add Paragraph object (Title)・・・(A)
doc.add_paragraph('Working with Word in python-docx', style='Title')

for i in range(0, len(sentence)):

    # Add Paragraph object (List number)・・・(B)
    doc.add_paragraph(sentence[i], style='List Number')


# Add Paragraph object (Default)・・・(C)
paragraph_1 = doc.add_paragraph(style='Title')

# Add text with text property
paragraph_1.text = 'Paragraph positioning (Centered)'

# Set paragraph position with alignment property (Centered)
paragraph_1.paragraph_format.alignment = WD_ALIGN_PARAGRAPH.CENTER

# Check the number of Paragraph objects with the paragraphs property.
print(len(doc.paragraphs)) # >>6


doc.save('Paragraph_usage_List2.docx')
Now, let me explain the key points of the code.
The add_paragraph() method is used to add paragraph. Specify the text as the first argument and the style type (“Title” in this case) as the second argument.
Add a paragraph in the same way. Now append a list of four paragraphs with For statement, specifying the “List” style as the second argument of the add_paragraph() method. Paragraph indexes are automatically incremented when paragraphs are added.
Set the text in paragraph with the text property. In addition, the alignment property of the ParagraphFormat object is used to specify “Center” alignment within paragraph.
The optional constants are selected from the Enum of the WD_ALIGN_PARAGRAPH class imported at the beginning of <List1>.
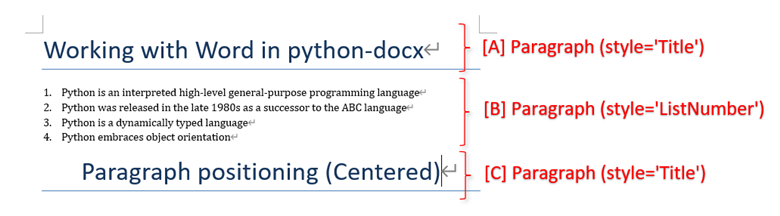
The execution result of is as follows (Fig8)
Paragraphs with Title and List Number have been added, and support for text setting (by argument or by property) and alignment.
The execution result file (.docx) of <List2> can be downloaded from
【SAMPLE (2)】
Here is another example code.
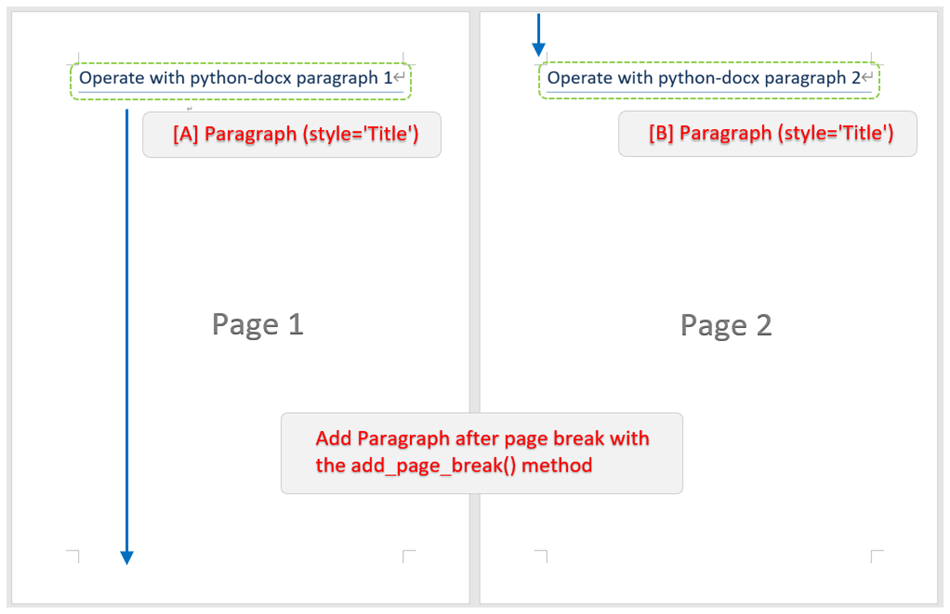
In Python-docx, paragraphs are added in order from the top of the page if nothing is specified, but it is possible to “add a new page” and “add sentences (paragraphs) from the next page” as in the following code example.
from docx import Document

# Get the Document object
doc = Document()

# Add a Paragraph object [A]
doc.add_paragraph('Operate with python-docx paragraph 1', style='Title' )

# Page Break
tmp=doc.add_page_break()

# Add a Paragraph object [B]
doc.add_paragraph('Operate with python-docx paragraph 2', style='Title')

doc.save('Page_break_List3.docx')
Now, let me explain the key points of the code.
Page break is performed. There are several methods, but this time the add_page_break() method under the Document object is used. After Page break, add Paragraph and set Content using the add_paragraph() method in the same way as before.
The add_page_break() method only moves the cursor to the beginning of page break. Note the difference from the page_break_before property, which moves the paragraph to page break.
<Page break (no additional paragraph)>
Document object.add_page_break()
arg: none
return: none (Only move the cursor to the beginning of page break)
<Page break (Insert the current paragraph into page break)>
Paragraph object.page_break_before property
(True: Add paragraphs to page breaks.)
The execution result of is as follows. (Fig.9)
The cursor is moved to the second page after a page break from the paragraph at the beginning of the first page, and a new paragraph is added.
The execution result file (.docx) of <List3> can be downloaded from
Now that you understand the importance of adding and manipulating the Paragraph object in order to place “Text Content” in the documentation.
By the way, formatting at the text level. For example, how do you set font settings such as “make text larger”, “Bold”, “Italic”, “Text Color” etc.?
These can be handled by a new layer called Run object, which will be explained later.
5. Add Character(Run object) and Format Setting

The sentences that make up paragraph can be broken down into words or character units. In python-docx, the smallest delimited unit of text is managed by the Run object. The Run object provides a number of properties for adjusting the Font, Bold, Underline, Italic, Text Color, and so on.
Paragraph object.add_run(text, style)
arg: text: Specify character to be set (Optional)
arg: style: Specify style (Optional, default “None”)
return: Run object
The arg:text is the character (word) to be set when the Run object is added, and the arg:style is the name of registered style. There are also the following types of default (built-in) styles for characters, which are specified by strings as well as paragraph styles.

Methods (properties) related to character-level operations include.
| 【Run object】 | 【Functions】 | 【Other/Details】 |
|---|---|---|
| add_break(break_type) | Line Break | Select Type of the Line Break(6types) Ex) WD_BREAK.LINE, WD_BREAK.PAGE |
| add_picture(image_path, width, height) | Inserte image in text | arg: image_path: Image file path arg: width: width arg: height:lengthwise-width |
| add_tab() | Insert a tab | |
| add_text() text property | Get/Set character/word |
To set the font and format of character, connect the Font object obtained by the font property with the properties under it.
| 【Font object(property)】 | 【Functions】 | 【Other/Details】 |
|---|---|---|
| color. rgb property color. theme_color property | Set font color | 【RGBColor class】 Ex) RGBColor(0xff, 0x99, 0xcc) Select from【MSO_THEME_COLOR_INDEX class】 |
| size property | Set font size | Specified in point(pt) |
| name property | Set font name | Ex) Calivri’など |
| underline property | Set underline | True(valid(SINGLE)) / False(Invalid) Other linetype is selected from【WD_UNDERLINE】definition |
| bold property | make text bold | True(valid)/False(Invalid) |
| italic property | make text italic | True(valid)/False(Invalid) |
【SAMPLE (3)】
That’s all for the character (Run object). Let’s see how to use it concretely with the sample code.
The code outline is to add Run object to the paragraph (Paragraph object) while setting the formatting and font for each individual character(word).
from docx import Document
from docx.shared import Pt, RGBColor        # Shared classes with defined ”Unit” and ”Colors”
from docx.enum.dml import MSO_THEME_COLOR   # Enumerations class with various definitions
from docx.enum.text import WD_UNDERLINE

doc1= Document()

doc1.add_paragraph('Creating Word documents with "python-docx"', style='Title')
doc1.add_paragraph('You can use the Python external library "python-docx" \
to manipulate Word, and you can get the Run object \
and set various properties to decorate various text.')

doc1.add_paragraph('Documentation Basics', style='Heading 1')


#---------------------------------------------------------------------------------
# Run object related methods/properties [A]
p1 = doc1.add_paragraph('You can set up such things as ')

p1.add_run('Bold Text').bold = True                # Specifying bold text with the bold property
p1.add_run(' Or, ')

p1.add_run('Italic').italic = True                # Italics with italic property
p1.add_run(' Or, ')

p1.add_run('UnderLine(DEFAULT)').underline = True    # Underlining with the underline property
p1.add_run(' Or, ')

p1.add_run('UnderLine(DASH)').underline = WD_UNDERLINE.DASH
p1.add_run(' Within the document')


#----------------------------------------------------------------------------------
# Font object related properties [B]
p2 = doc1.add_paragraph()

# Specify font size
p2.add_run('Font size "12 Point"').font.size = Pt(12)
p2.add_run().add_break()
p2.add_run('Font size "15 Point"').font.size = Pt(15)
p2.add_run().add_break()

# Specify font color
p2.add_run('Red ').font.color.rgb = RGBColor(255,0,0)
p2.add_run('Blue ').font.color.rgb = RGBColor(0,255,0)
p2.add_run('Green ').font.color.rgb = RGBColor(0,0,255)

p2.add_run().add_break()
p2.add_run('MSO_THEME_COLOR.ACCENT_1').font.color.theme_color = MSO_THEME_COLOR.ACCENT_2

p2.add_run().add_break()
p2.add_run('MSO_THEME_COLOR.FOLLOWED_HYPERLINK').font.color.theme_color = MSO_THEME_COLOR.FOLLOWED_HYPERLINK


doc1.save('RunObj_List4.docx')
Now, let me explain the key points of the code.
At the beginning of the code, the classes needed to set text color and underlines are imported. (RGBColor, WD_UNDERLINE class)
The add_run() method is used to add the Run object to the “variable p1” that contains the paragraph (Paragraph object). (The character is passed directly as argument.)
Bold text is set with the bold property, italic text with the italic property, and underline with the underline property, each of which is enabled/disabled (True/False).
As shown in this example, the properties are vertically connected to simplify the code.
Add new paragraph (stored in variable p2) and add the Run object in the same way. Now we get the Font object via the font property, and set the font size with the size property and the color with the color property.
Specifying colors is a bit more complicated and can be done in two ways. One is to specify colors using the RGBColor object, which represent colors in RGB Hex (hexadecimal) notation. The other is to select theme color built-into Word from the Emun definition of the MSO_THEME_COLOR class.
In addition, in line 39, etc., the add_break() method is used to insert a line break within the paragraph.
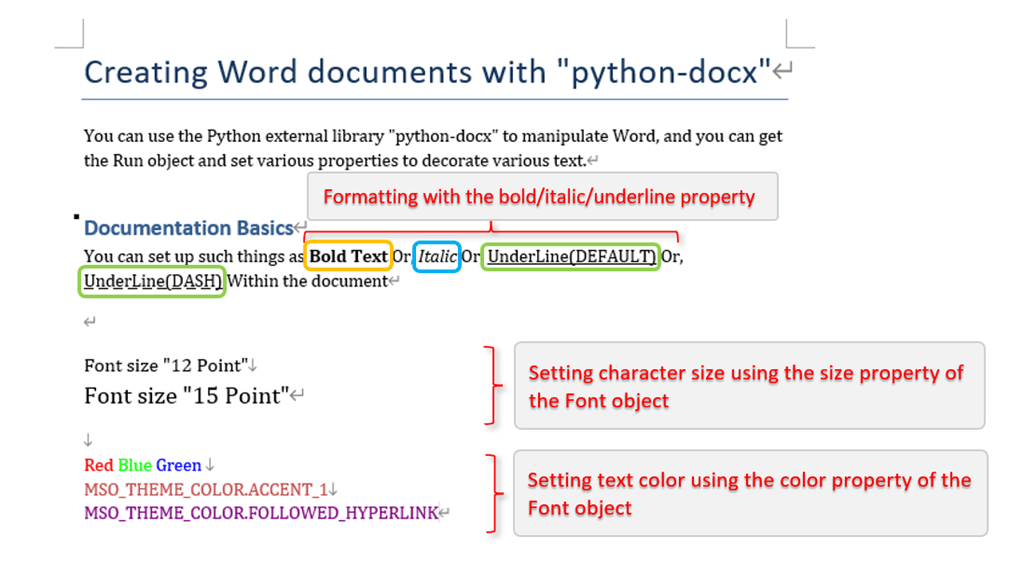
The execution result of <List4> is as follows.
Formatting (Bold, Italic, Underline) and font settings (Size, Color) are applied to each character.
The execution result file (.docx) of <List4> can be downloaded from
The above is how characters (words) are handled by the Run object.
6. Summary

How was it?
In this article, we have taken up the “python–docx” library that operates MS-Office’s Word, and have explained the basics of ”Document creation”.
If you have used Word to create text, you may have realized that you can code intuitively from object names and method/property names.
If you are creating new content from scratch, you may not need to go through Python. However, it is effective when “there are certain default document styles” or when “a large amount of editing work is required at once“.
We hope you will find it useful in improving your work efficiency.
Let us summarize the points at the end.
➀. There are two libraries, “pywin32” and “python–docx,” that provide functions to manipulate ”MS-Word” from Python. Each has its own characteristics, advantages and disadvantages, and should be used according to its intended purpose. We recommend the “python-docx” library for ease of use, especially for beginners.
➁. When writing in python-docx, it is essential to always be aware of the existence of Paragraph and Run object when coding.
➂. Paragraph formatting is set using the Paragraph object, and character formatting is set using the Run object. Covers most of the text creation features of MS-Word.
In the next article, we will explain “how to insert Images and Tables” and “how to set page detail, Header and Footer by Section” as an application of python-docx.
We hope you will read this as well.↓
Thank you for reading to the end.