
This article describes the “python-docx” library for operating MS-Office “Word” with Python.
In addition to “Creating text” Word can be used to “Insert image, Shapes and Table” and “Set up Header/Footer“, “define style” and much more. For this reason, the articles are explained as a series of multiple articles on each theme, as shown in the following table of contents.
In this second article of the series, we will explain “How to insert images and tables into a Word document” and “Setting up headers and footers” as examples of how to use sections.
Although the main content of Word Document is text, effective use of Images and Tables can enhance its appeal and credibility. This is especially essential content for official, well-written documents such as thesis and commentaries.
For larger documents, you should also consider implementing sections, which are page management units.
“python-docx” can do all of this and more.
Please stay with us until the end of this article, as you will be able to “do and understand” the following
The usage of various classes and functions introduced in this article is only an example. Optional arguments are omitted, so please refer to the official documentation above for details and clarifications as necessary.
<Official Site>https://python-docx.readthedocs.io/en/latest/
Now, from the next section, we will explain how to use the “python-docx” library.
1. Insert Image into Document

This section describes the procedure for inserting image into the document.
Image can be placed in paragraph (Paragraph object). It can also be embedded in the text (Run object) that makes up paragraph.
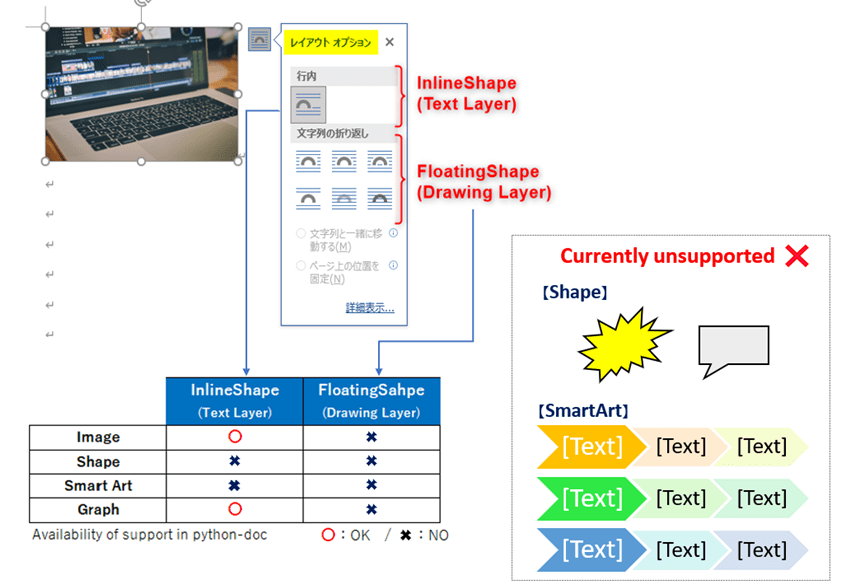
The python-docx can handle image and graph in Word documents as long as they are InlineShape(Picture)[Text Layer], but FloatingShape[Drawing Layer] is not supported as described in the following official documentation.
Inline (TextLayter) means to embed in paragraph or part of sentence, and refers to a hierarchy in which character and image interfere with each other in terms of line height, width, and line breaks.
Floating (Drawing Layer), on the other hand, distinguishes the placement layers for paragraphs and images, allowing free placement of images and graphs without interfering with each other.
Understanding pictures and other shapes
At the time of writing, python-docx only supports inline pictures. Floating pictures can be added. If you have an active use case, submit a feature request on the issue tracker.
https://python-docx.readthedocs.io/en/latest/user/shapes.html
Also, I am very sorry to say that “python-docx” does not seem to support the manipulation of shapes and SmartArt, even with InlineShape. Expect future updates along with support for Floating (Drawing Layer).
The following is a summary of the current status of support for images and graphics. (Fig1).
As a supplement, there are two ways to set and retrieve shapes and SmartArt [Inline/Floating Shapes]. You can use “python-docx” and “pywin32” according to your purpose.
Now, from the next section, we will explain the classes and methods to insert images into paragraph.
1.1 Insert Image into paragraph(Paragraph object)
The image can be set to a paragraph. If you only want to insert a image into a newly added paragraph, use the add_picture() method under the Document object with the following format.
Document object.add_picture(img_path, width, height)
arg: img_path : Specify image file name with path (jpg/png…)
arg: width : Set image width (optional)
arg: height : Set image height (optional)
return: InlineShape object
Image files are supported in jpg/png format, with width/height arguments to specify the image size (both optional). Units are specified in mm (millimeter) or Inch, but if omitted, the original size is applied.
If only one of them is specified, the same aspect ratio is automatically adjusted.
【SAMPLE (1)】
Let us show you how to use it with sample code.
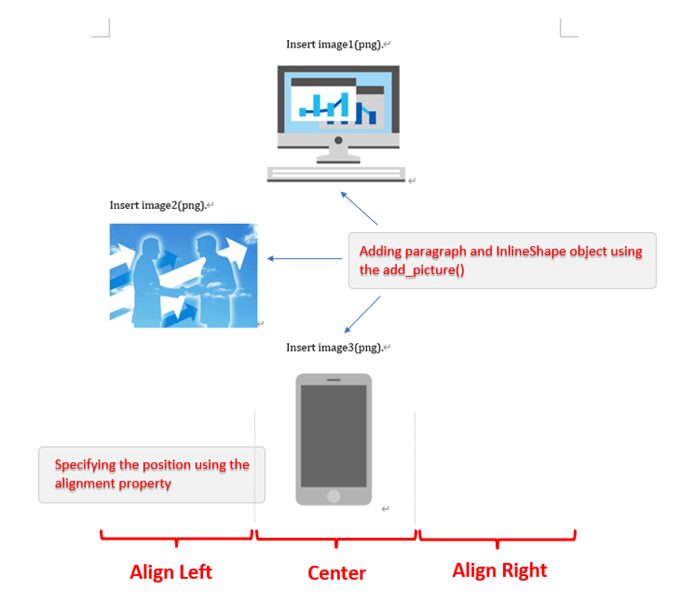
The code summary is that three images are pasted by the add_picture() method. Notice that a new paragraph is added and an image is inserted.
from docx import Document
from docx.enum.text import WD_ALIGN_PARAGRAPH # Paragraph position definition
from docx.shared import Mm                    # Definition of unit and color

doc1=Document()

# Paragraph "1"
p1 = doc1.add_paragraph('Insert image1(png).')
# Insert png image (50mm width) in paragraph "2”
doc1.add_picture('./picture/picture1.png', width=Mm(50))

# Paragraph "3"
p3 = doc1.add_paragraph('Insert image2(png).')
# Insert jpeg image (50mm width) in paragraph "4”
doc1.add_picture('./picture/picture2.jpg', width=Mm(50))

# Paragraph "5"
p5 = doc1.add_paragraph('Insert image3(png).')
# Insert png image (50mm width) in paragraph "6”
doc1.add_picture('./picture/picture3.png', height=Mm(50))

print(len(doc1.paragraphs)) # >>6 Find out the number of paragraph

for p_index in [0, 1, 4, 5]:
    # The image is recognized as InlineShape object, and the insertion position
    # can be roughly specified with the alignment property.

    doc1.paragraphs[p_index].paragraph_format.alignment = WD_ALIGN_PARAGRAPH.CENTER

doc1.save('InsertImage_List1.docx')
The execution result of is as follows. Three images are inserted and the number of paragraphs is six, including those added by the add_picture() method.
You can also check that the paragraph formatting is applied by centering the alignment in the alignment property of the paragraph (Paragraph object).
The execution result file (.docx) of <List1> can be downloaded from
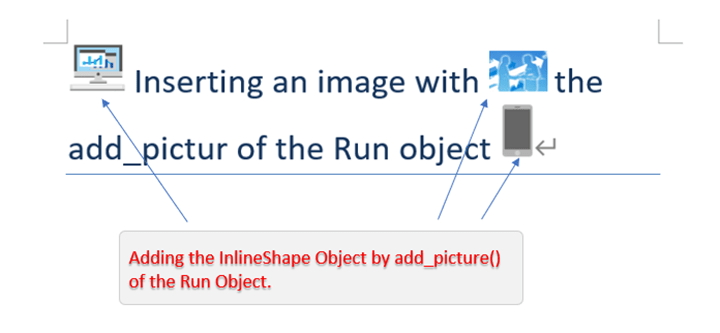
1.2 Insert Image in the Sentence
Images can also be inserted anywhere in the text. Sentences (words and characters) are managed by the Run object, but the add_picture() method is also provided under the Run object. The format is exactly the same as that under the Paragraph object.
Document Object.add_picture(img_path, width, height)
arg: img_path : Specify image file name with path (jpg/png…)
arg: width : Set image width (optional)
arg: height : Set image height (optional)
return: InlineShape object
The usage is also the same as when placing it in paragraph. An InlineShape object is inserted on the same line as the text content.
【SAMPLE (2)】
Here is another example of using the add_picture() method with sample code.
from docx import Document
from docx.shared import Mm

doc1=Document()

# Paragraph "1"
p1 = doc1.add_paragraph(style='Title')

# Inserting image in the middle of sentence with the add_picture method
p1.add_run().add_picture('./picture/picture1.png', width=Mm(15))
p1.add_run(' Inserting an image with ')

p1.add_run().add_picture('./picture/picture2.jpg', width=Mm(15))
p1.add_run(' the add_pictur of the Run object ')

p1.add_run().add_picture('./picture/picture3.png', height=Mm(15))


doc1.save('InsertImage2_List2.docx')
The execution result of <List2> is as follows.
For the paragraph with ‘Title style”, ‘Text’ and ‘Image’ are inserted alternately while adding the Run object.
The execution result file (.docx) of <List2> can be downloaded from
2. Insert Table(Table Object)

Table can be inserted in documents.
Table is managed as Table object in python-docx. The Table object gets the add_table() method of the Document object in the following format.
Document Object.add_table(rows, cols, style)
arg:rows: Specify the number of rows in the table
arg:cols: Specify the number of columns in the table
arg:style: Specify the style to be set for the table (optional)
return: Table Obejct
The number of rows and columns in the table are specified in the arg:rows/cols, respectively.
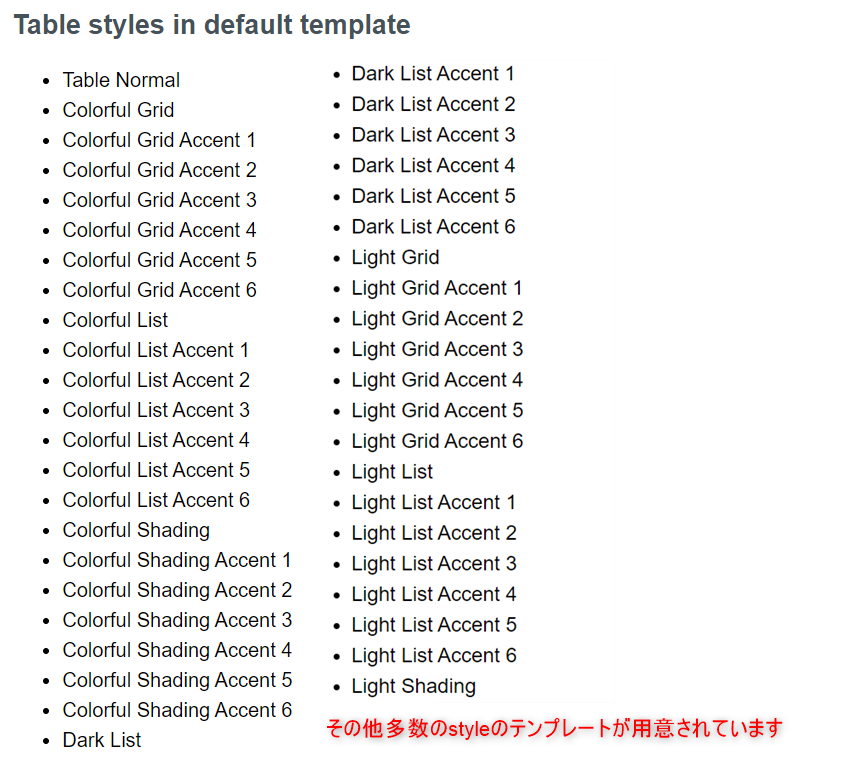
The template (built-in style), such as the tints and image of the entire table, can be specified in the arg:style as string.
The built-in style provides the following. (Fig4)
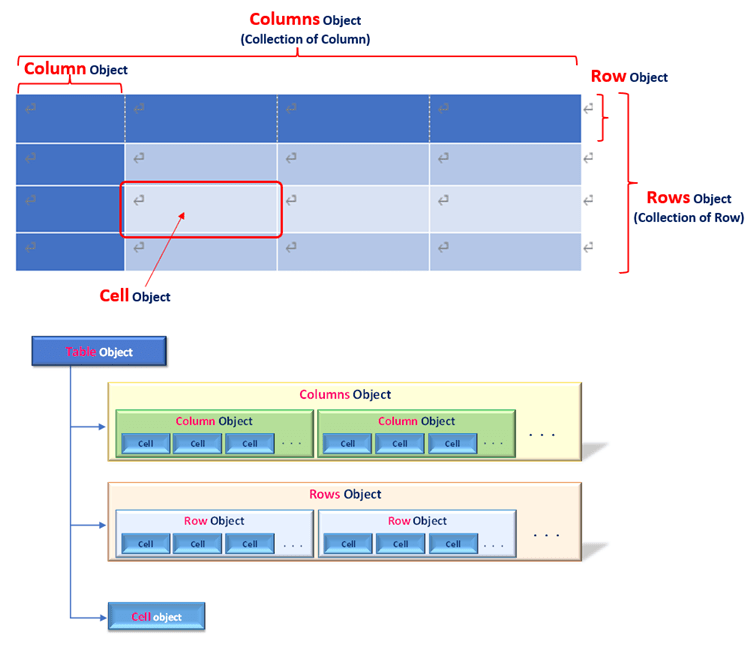
The Table object further consists of Column(s) object, Row(s) object, and Cell(s) object. (Fig5)
The Table object is a collection of rows, columns, or cells, and a Columns/Rows object is also a collection of cells. Thus, the higher-level object can iterably get the lower-level element.
There are many related methods and properties under the Table object. The main ones are as follows.
<Add Column to right end>
Table object.add_column(width)
arg:width: Specify column width
return: Column Object / Add to Columns collection
<Add Row to the bottom edge>
Table object.add_row()
return: Row Object / Add to Rows collection
<Get Collection of column (Columns)>
Table object.columns property
return: Columns Collection
(It is also possible to specify specific column as index, columns[index])
<Get Collection of rows (Rows)>
Table object.rows property
return: Rows Collection
(It is also possible to specify specific row as index, rows[index])
<Get Cell (Cell Object)>
Table object.cell(row_idx, col_idx)
arg: row_idx: Specify the row number of the acquisition cell. A1 cell is (0, 0) standard
arg: col_idx: Specify the column number of the acquisition cell. A1 cell is (0, 0) standard
return:Cell Object
Other main properties related to Row, Column, and Cell object include the following. The Cell object has many other attributes. You can also add a Paragraph object to a cell to do the same thing as the body text. (For paragraph, please refer to the first article in this series.)
| 【Row/Column/Cell Object 】 | 【Functions】 | 【Other/Detail】 |
|---|---|---|
| Column object.width property | Set column width | |
| Row object.height property | Set row height | |
| Cell object.text property | Set/Get value to cell | |
| Cell object.add_paragraphs(text, style) | Add paragraph | Similar to paragraph of text |
【SAMPLE (3)】
Here is a sample code to set up Table in the document.
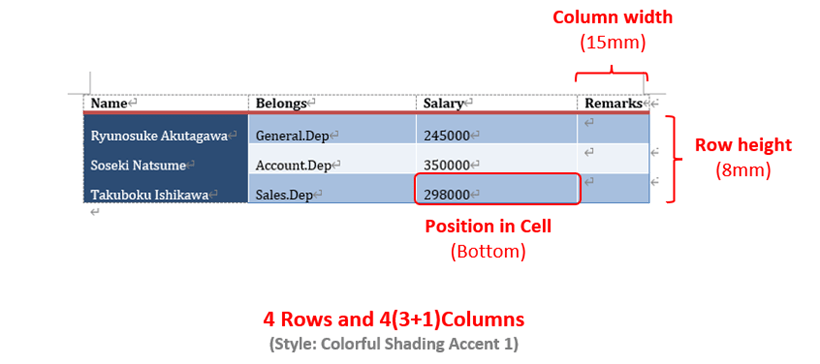
Here is an overview of the code. First, let’s start with Define a table with 4 rows and 4 columns of cells. Then, each Cell object is accessed and its values and formatting are set.
from docx import Document
from docx.enum.table import WD_ALIGN_VERTICAL # Definition of placement location
from docx.shared import Mm  # Definition of unit and color

# Define column labels
col_names = ['Name', 'Belongs', 'Salary']

# Definition of data contents
data = [['Ryunosuke Akutagawa', 'General.Dep', '245000'],
       ['Soseki Natsume', 'Account.Dep', '350000'],
       ['Takuboku Ishikawa', 'Sales.Dep', '298000']]

doc1 = Document()

#(A)---------------------------------------------------------------------------------------------------------------
# Obtain a 1-row, 3-column Table object
tb1 = doc1.add_table(rows=1, cols=len(col_names), style='Colorful Shading Accent 1')

#(B)---------------------------------------------------------------------------------------------------------------
# Set the column name to the cell in the first row
for i, cell in enumerate(tb1.rows[0].cells): # Get collection of Cell objects
    cell.text = col_names[i]                  # Set value to Cell object

#(C)---------------------------------------------------------------------------------------------------------------
# Set values while adding rows (Row objects)
for d in data:
    row = tb1.add_row()   # Add Row Object
    row.height = Mm(8.0)  # Specify row height as 8mm

    for i, cell in enumerate(row.cells): # Obtaining Cell object
        cell.text = d[i]                  # Set value to Cell object
        cell.vertical_alignment = WD_ALIGN_VERTICAL.BOTTOM  # Set placement position in the cell

#(C)---------------------------------------------------------------------------------------------------------------
# Add column (Column object)
tb1.add_column(Mm(15.0))       # Add row 15 mm wide
print(tb1.columns[3].width.mm) # >>14.993

tb1.cell(0, 3).text = 'Remarks'   # Set titles for additional column


doc1.save('InsertTable_List3.docx')
Now, let me explain the key points.
Prepare the dataset for the table in lines 6 and 9.
The add_table() method creates a Table object with 1×3 dimension. Set the built-in table style to the arg:style, and store the Table object in the variable tb1.
The Cells collection obtained with the cells property is expanded with For statement. Then, Cell object is getted. Then, set a label to each cell with the text property of the acquired Cell object.
The required number of rows (Row objects) are added using the add_row() method. The height property also specifies the height of the row.
Expand from Row object to Cell object with For statement and set the value of the List.
At the same time, the vertical_alignment property specifies bottom alignment in the cell.
Finally, add a Coloumn object with the add_column() method to add the “Remarks” column, completing the 4×4 table.
The execution result of <List3> is as follows.
The style, size, width, height, and other dimensions were specified and good looking table was inserted.
The execution result file (.docx) of <List3> can be downloaded from
3. Implement Section (page management)

In this section, we will explain how to manage pages by sections. python-doc provides section function.
3.1 What is Section?
The “Section” in Word is page management unit. Specifically, it allows you to set page size, margins, paper direction, headers/footers… for each page or page range.
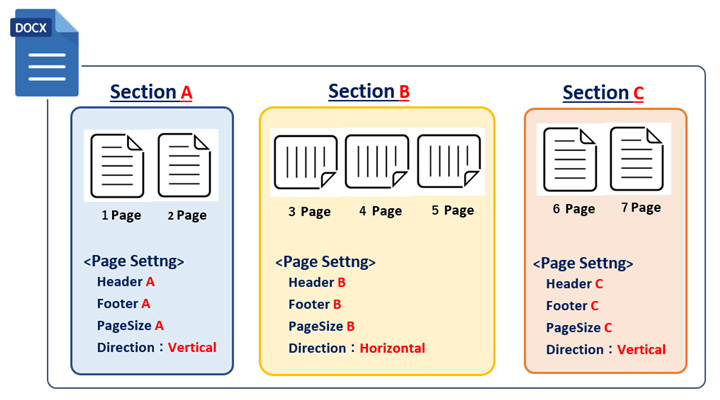
For example, Fig7 shows a case in which all 7 pages of Word Document are classified into 3 sections (A, B, and C) for page management. You can set and change page information such as header and footer information and paper direction for each page range in this way.
In python-docx, sections are managed by the Section object.
3.2 Get and Set Section(Section Object)
To add new Section object or get an existing object, use the add_section() method and sections property under the Document object, respectively.
<Add new Section>
Document object.add_section(start_type)
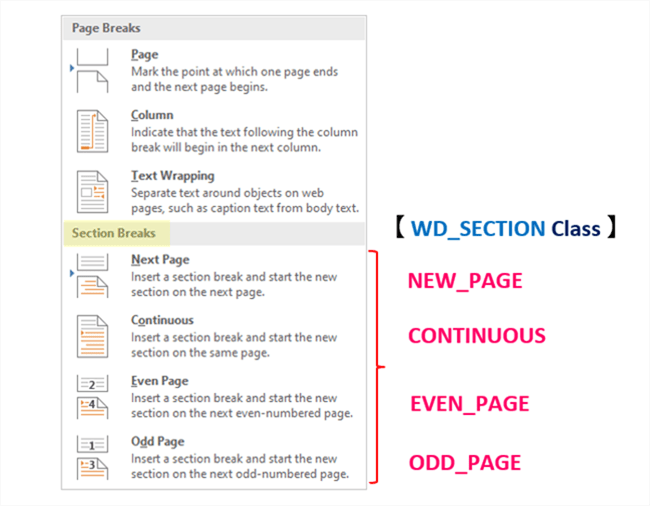
arg:start_type: Select the type of Section to be added from the “WD_SECTION_START class” definition.
return: Section Object
<Get Sections>
Document object.sections property
return: Collection of the Section Object
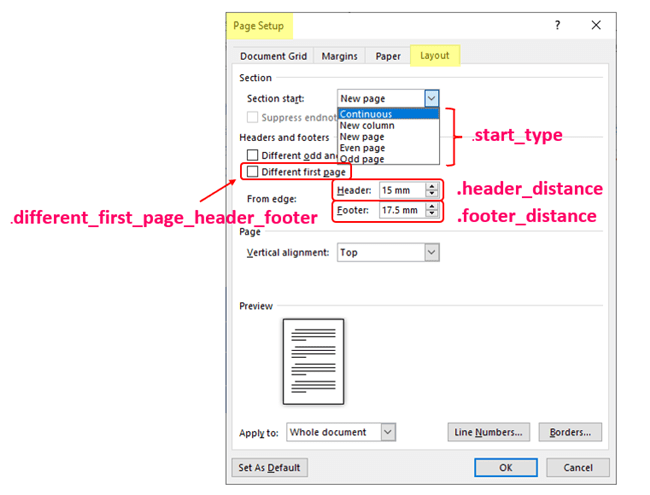
The arg:start_type of the add_section() method specifies an Enum defined in the WD_SECTION_START class. The correspondence to the Word UI is shown in Fig8.
(“Layout Menu” -> “Page Setup Tab” -> “Separations”)
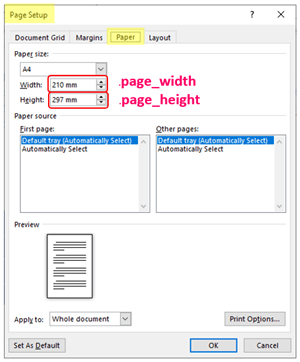
The related attributes of the Section object allow “Page Setup” to be specified in detail for each Section. Refer to the figure below to see which attributes are supported by the setting items on the “Page Setup Dialog” in the Word UI.
<Margin Setting>
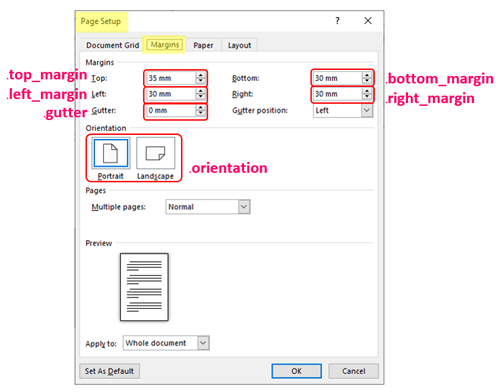
<Paper Setting>
Here is one thing to note about the Section object. Multiple Section objects can be defined in a single Document, but in the default configuration, they are all in an inherited (linked to each other) relationship.
This means that the current section may not be configured as intended, because the current section has definition up to one previous section.
To prevent this, the following is_linked_to_previous property must be used to explicitly break the inheritance relationship (set to False). (* Note that this is not True.)
<Section Inheritance>
Section Object.is_linked_to_previous property
True: Inherit previous section information
False: Reflect only the settings of the current section
As an example of the use of Section, the next discusses how to apply “Header/Footer”.
3.3 Use of Section (Set Header/Footer)
The purpose of utilizing section is often found in the “Header and Footer” settings of the page. This section provides specific examples of “Header and Footer” settings.
The Header and Footer object are obtained from the header and footer property of the Section object.
Section Object.header property
return: _Header Object
Section Object.footer property
return: _Footer Object
To add contents to the obtained _Header(_Footer) object, add paragraph using the add_paragraph() method as when creating the body text. Please refer to <here> for more information on paragraph and writing the text.
Other main methods and other attributes related to Header (Footer) are as follows.
| _Header(_Footer) Object | 【Functions】 | 【Other/Details】 |
|---|---|---|
| add_paragraph(text, style) | Add paragraph | Paragraph Object |
| add_table(rows, cols, width) | Add table | rows:number of rows, cols:number of columns, width:width |
| is_linked_to_previous property | Whether or not the previous header (footer) information is inherited | True:Valid/False:Invalid |
【SAMPLE (4)】
Here is one example of code using the Section object.
Page formatting (paper size, margins, print orientation) and header and footer are checked and set for each section.
from docx import Document
from docx.enum.section import WD_SECTION

from docx.shared import Mm  # Defined unit and color
from docx.enum.section import WD_ORIENT # The page orientation is defined

from docx.enum.text import WD_ALIGN_PARAGRAPH


# Create new Document
doc1 = Document()

# Specify "-1" for index to get current section
sec1 = doc1.sections[-1]

# Check the current section type
# Newly created document contain one section (NEW_PAGE) by default
print(sec1.start_type) # >>NEW_PAGE (2)

#-------------------------------------------------------------------------------------
# Examine the format of page in Section1

# Section1 page setup (page orientation, width, height)
print(sec1.orientation, sec1.page_width.mm, sec1.page_height.mm) # >>PORTRAIT (0) 215.9 279.4

# Section1 Page Setup(Margin(Left), Margin(Right))
print(sec1.left_margin.mm, sec1.left_margin.mm) # >> 31.75 31.75

# Section1 Page Setup (Margin(Top), Margin(Bottom))
print(sec1.top_margin.mm, sec1.bottom_margin.mm) # >> 25.4 25.4

#-------------------------------------------------------------------------------------
# Set the header and footer for section1

# Get the Header object
hd1 = sec1.header

# Add a paragraph(Header)
hd1_pg = hd1.add_paragraph('CONFIDENTIAL_マル秘')

# Get the Footer object
ft1 = sec1.footer

# Add a paragraph(Footer)
ft1_pg = ft1.add_paragraph('株式会社 Pythonでもっと自由を')

# Set paragraph position to right end
ft1_pg.paragraph_format.alignment = WD_ALIGN_PARAGRAPH.RIGHT


#-------------------------------------------------------------------------------------
# Add section2 to format the page

# Add a new section (NEW_PAGE)
sec2= doc1.add_section(WD_SECTION.NEW_PAGE)

print(sec2.start_type) # >>NEW_PAGE (2)

# Change the print orientation to landscape
sec2.orientation = WD_ORIENT.LANDSCAPE

# Set the width of section2
sec2.page_width = Mm(279.4)

#  Set the height of section2
sec2.page_height = Mm(215.9)


#-------------------------------------------------------------------------------------
# Set the header and footer for section2

hd2 = sec2.header
ft2 = sec2.footer

# Can cite the header footer of the previous section


hd2.is_linked_to_previous = False # Do not cite Section1 Header

ft2.is_linked_to_previous = True # Cite the footer in Section1

doc1.save('InsertSection_List4.docx')
Now, let me explain the key points.
The sections property is used to retrieve all section objects (Collection) in the document. Indexing allows you to retrieve individual Section objects. In addition, specifying [-1] will get the current page section. (For a newly created document like this one, The Section (NEW_PAGE) has been prepared in advance.)
The attributes of the Section object check the formatting information of the page. The orientation property checks the page orientation, the page_* property checks the page size, and the *_margin property checks the margins. Units are converted to millimeters with the mm attribute.
The Header and Footer are set for the Section object. Objects are acquired using the header and footer properties, respectively. Contents is managed in the same way as body text, using Paragraph object. It can be composed of multiple paragraphs, and other usages are treated the same. It can be composed of multiple paragraphs, and other usages are treated the same.
Another section is added in lines 55~66 (var:”sec2″). Since the type is set to “NEW_PAGE”, this section will be applied to the second and subsequent pages.
Setting up the header and footer for the second Section (sec2). When multiple sections exist, it is important to pay attention to the inheritance relationship (link) between Sections.
The is_linked_to_previous property allows you to choose whether to quote the header and footer information from one previous section. In this example, the header is set to “False” so that it is not quoted (sec2 is applied) and the footer is set to “True” so that the previous footer information is quoted.
*Please note that it is easy to confuse the two.
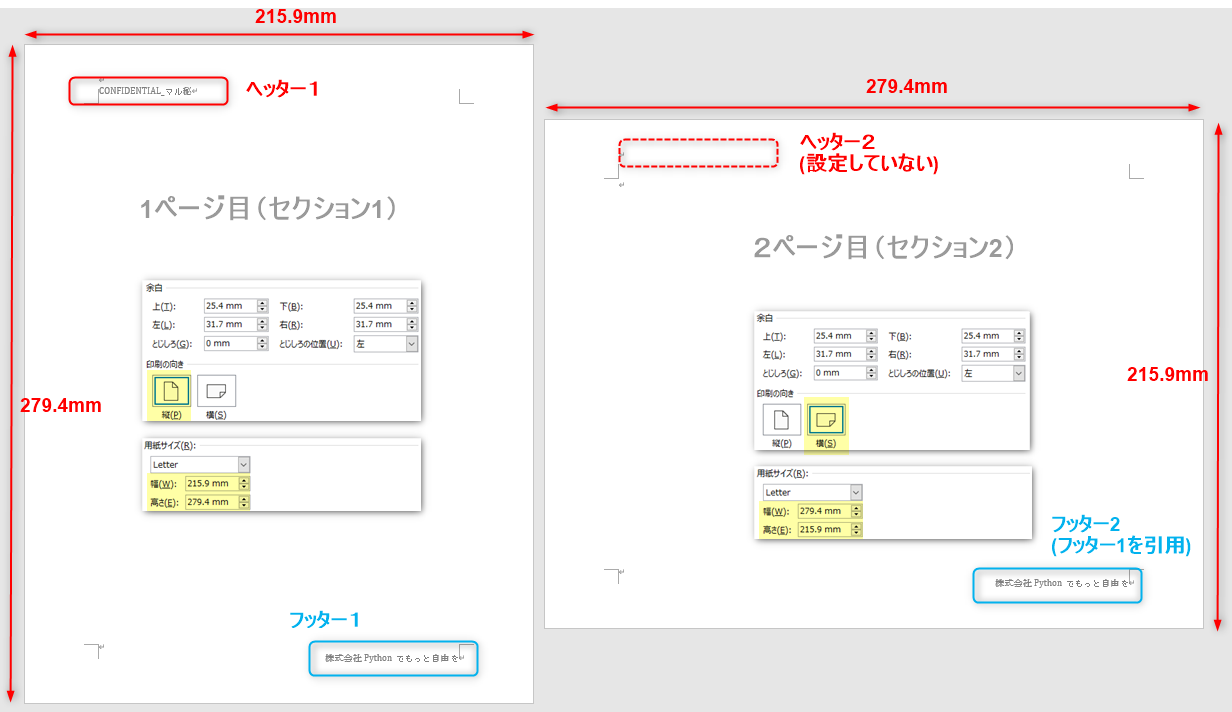
The execution result of <List4> is as follows
Page formatting (paper size, margins, paper orientation), Header and Footer can be set for each section (page).
- Page1 (Section1): with Header/Footer, vertical orientation
- Page2 (Section2): Footer (link to Section1), horizontal orientation
4. Summary

How was it?
In this article, we have explained how to use the “python-docx” library to insert images and tables, and how to manage pages by Section.
Although the main contents of “Word” is the Body (text), “Shapes” and “Tables” can be used to increase appeal and credibility. This is especially true for official, well-written documents such as article papers, commentaries, etc.
Also, by automating section management, it is possible to “Batch edit a large number of Documents at once”.
We hope you will make use of Python to improve the efficiency of your “Word work”.
Finally, let me summarize the main points of this article.
Now, in the next issue, we will discuss how to apply “Style” to documents.
There are various purposes for creating text in Word. It may be for “Official and Formal writing” “Essay-style writing” or “Informal and friendly colloquialisms“…
Thus, depending on the purpose, the style of writing (fonts, headings, headers) and writing style are usually determined to some extent in advance.
By registering this “sentence type” as a fixed style in Word, it can be used repeatedly and efficiently.
So, in the next issue, we will explain how to utilize the “Style”. Please look forward to it!
The link will be here. ↓

Thank you for reading to the end.