
How is your Python development environment set up?
There are several options, such as combining official Python with a code editor (VSCode etc…) or using the “JupyterNotebook” from the “Anaconda Distribution”.
Especially the latter “Jupyter” is an easy-to-use tool for beginners for the following reasons.
It allows you to enter and execute code and display the results interactively in a web browser. In other words, if you want to try out a little code easily, you won’t feel any inconvenience.
For more information about Jupyter, please refer to the following article.

In fact, “Jupyter” can be used in the environment of “Google Colaboratory“ a cloud service provided by Google, Inc.
The same things can be done, but with “Colaboratory” you can enjoy the following advantages.
These are not only for those who “want to start Python development easily” but also for those who “want to implement machine learning and AI APIs (which require a high workload)”.
When you need to repeat huge and complex calculations, Jupyter running on the local CPU of your personal PC is a bit underpowered.

On the other hand, “Colaboratory” is a free service, but it has some limitations (disadvantages). (*There are no limitations in the paid version.)
So this time, I would like to explain “Colaboratory” (hereinafter called Colab), which has the same appearance and operability as Jupyter, but is “easy and convenient” and performs “high-speed arithmetic processing“.
This article will explain all about Colab’s “How to Access” “Basic Operation” and “Useful Usage (GPU/Session Storage/Share data with Drive)”.
1. Access to the Colaboratory

Colaboratory is a cloud development environment for Python provided by Google, and anyone can use it for free as long as you have a Google account.
This section describes the procedure for starting Colab.
There is no need to install anything or perform any special operations or settings. Simply login to your Google account and access the web site.
There are two ways to access Colab: “Direct access to Colab URL” and “Create environment from Google’s application list (Google Drive)“.
1.1 Access from Colab’s URL
First, how to access directly from Colab’s URL.
The URL of Colab is as follows. Please log in to your Google account before accessing Colab.
Google Colaboratory: https://colab.research.google.com/
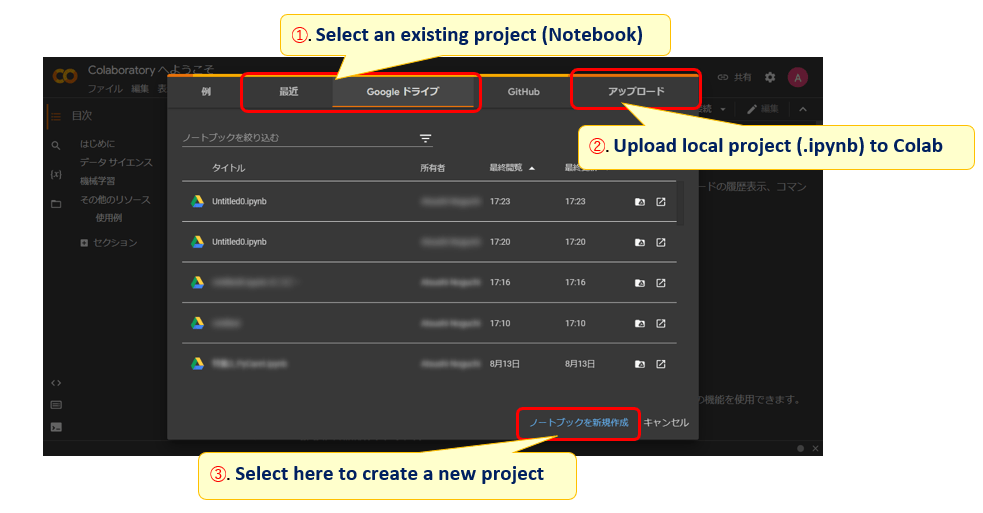
The menu screen shown below (Figure 2) will then appear. To resume existing project (Notebook **.ipynb), select the desired one from the history in the “Recent” and “Google Drive” tabs (➀).
From the “Upload” tab, you can also load a book (.ipynb) created in JupyterNote (➁). To create a new book, select “Create new notebook” (➂).
1.2 Access Colab from Google Drive
Another way is to create a book from Google Drive.
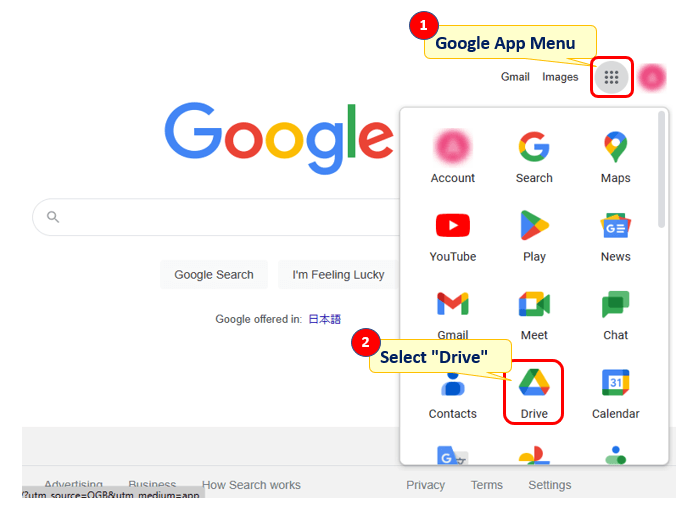
Go to “Drive” from the list of applications on the top page (https://www.google.co.jp) (Figure 3. ➀,➁). *Colab will create and save projects in Google Drive.
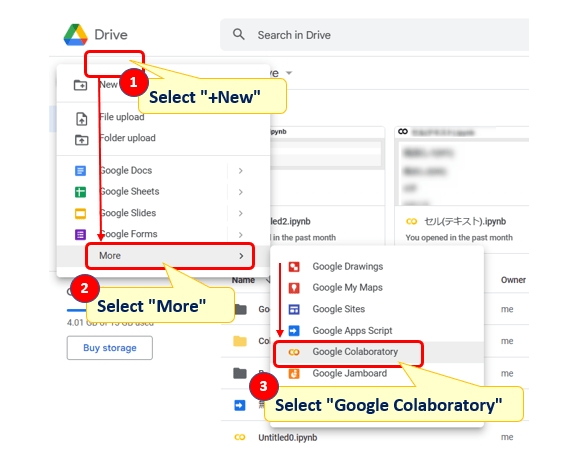
In addition, from the Google Drive menu, go to “New” > “Other” and select “Google Colaboratory” from the list of applications. (Figure 4. ➀,➁,➂)
(*The same is applied by right-clicking anywhere in the “My Drive” folder.)
Of course, existing projects can be selected and launched in the drive.
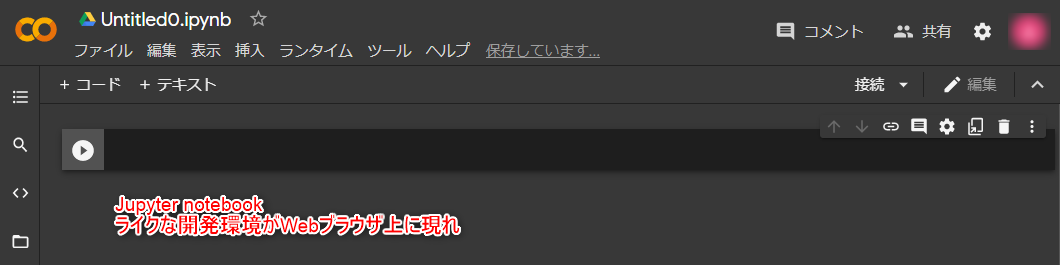
When you start Colab, the main window (Notebook) will appear as shown in Figure 5.
When you save the notebook (e.g., with Ctrl+S), it is automatically saved in the drive, but you can check the destination by selecting “File” in the menu, then “Search by Drive”.
In the next section, basic operations of Colab will be explained in detail.
2. Python Development with Colabratory

This section describes basic Colab operations that are useful to know at a minimum.
The GUI of Colab is shown in Figure 6 and consists mainly of a central cell area (code/text), a taskbar at the left end and a main menu at the top.
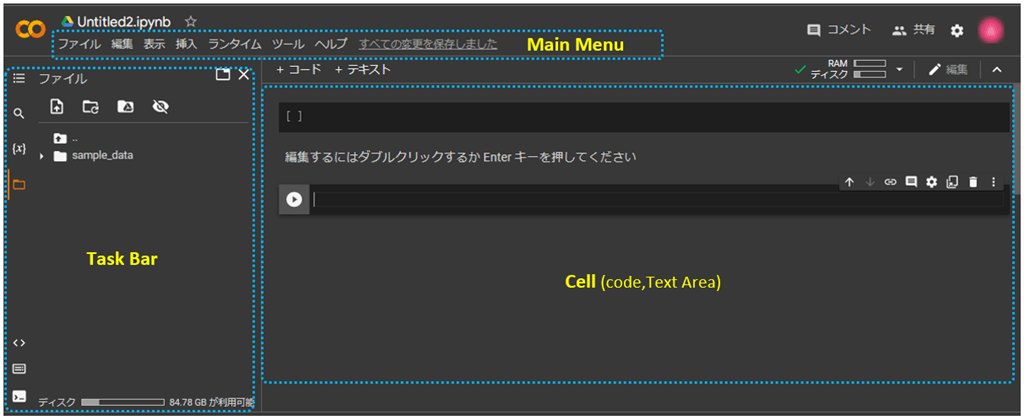
Program development will be done primarily in cells area. Therefore, this section introduces “Code Cells” and “Comment Cells” in the Cell Area and explains how to use “Session Storage” with them.
2.1 Cell (Code Area)
In Colab(Notebook), you write code in sections called “Cells” and execute it. Cells can be added as needed and are added using “+code” or the shortcut Ctrl + MB(MA).
To delete an unwanted cell, right-click on it and select “Delete” or use the shortcut Ctrl + MD.
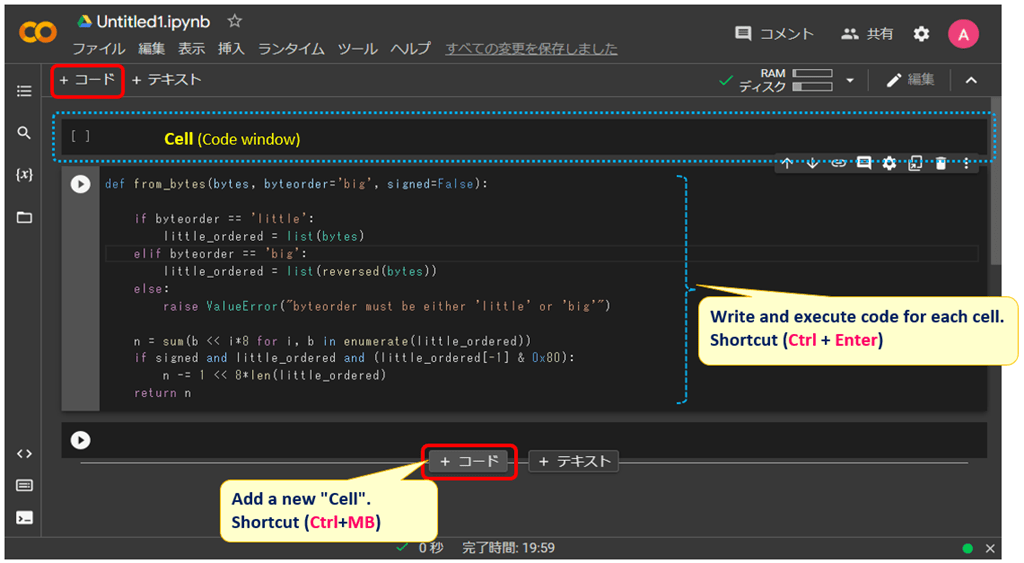
To execute the code, right-click “Run Current Cell” or use the shortcut keys Ctrl + Enter.
Also, Ctrl + F9 key is useful to execute all cells in a notebook.
Python makes heavy use of indentation (Tab), but unnecessary indentation is returned by pressing Shift + Tab. Commenting can also be done with the Ctrl + / keys.
The result of the execution is displayed below the code area, so you can check it immediately.
It can display text as well as diagrams and images.
The seamless transition between coding and reviewing results is what makes notebooks so great.
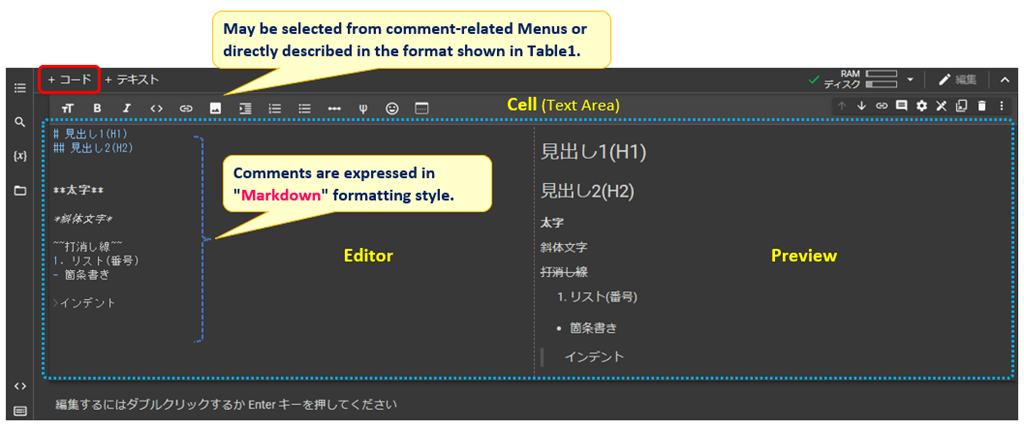
2.2 Cell (Text Area)
Cells can contain text as well as code. It is useful to leave code titles, descriptions and notes, etc.
Text cells are added with 「+Text」 as well. The style of the text is “Markdown” format.
Markdown is a make-up language that allows you to specify sentence structure and can display plain text with easy-to-read decorations.
| Functions | Styles | Usage examples |
|---|---|---|
| headline | # | #(header1), ##(header2), ###(header3) |
| line to break | — | |
| Bold | **String** | ** More Freedom with Python** |
| Italic | *String* | * More Freedom with Python* |
| Strike-through line | ~~String~~ | ~More Freedom with Python~~ |
| List (number) | ○. | 1., 2., 3., … |
| List (bulleted) | – | |
| Indent | > | >, >>, >>> Indentation can be stacked like this |
2.3 Session-Storage (File Management System)
”Session Storage” is accessed from “File” on the ”Taskbar”. It is a file system for managing data used in notebooks.
This session storage can be used for data transfer, such as machine learning data sets. (Fig.9)
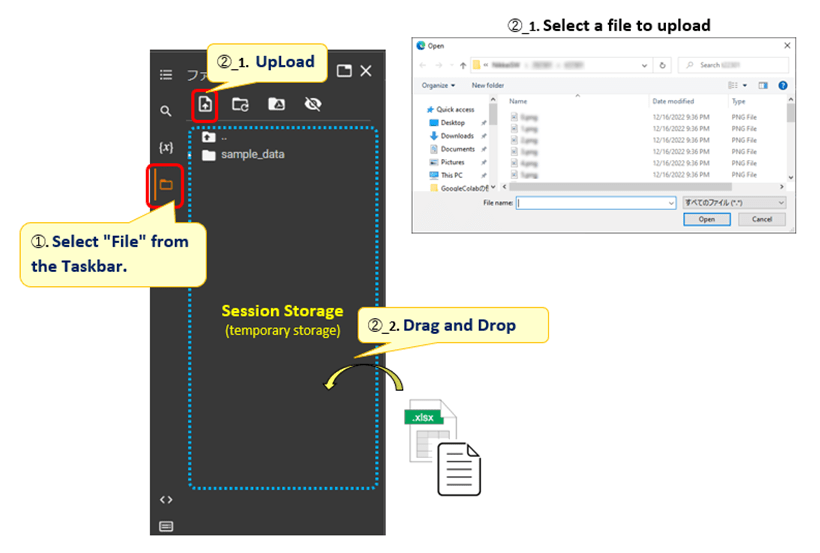
Note is that storage will be initialized if the session is interrupted. To avoid this, you need to share data with Google Drive by selecting “Mount Drive” in the menu.
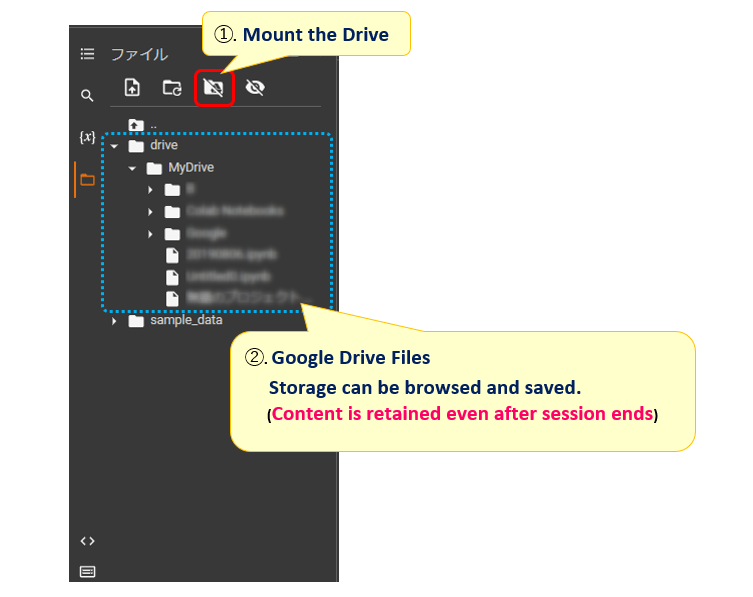
Mounting to the drive can be done by code. For more details, please refer to Section <3.2 “How to mount with Google Drive”> in the Applied Operations section.
3. Colabratory’s Useful Techniques

From here, we will explain useful Colab techniques such as “Using GPU (TPU) to speed up processing“, “Installing a new package” and “Programmatically mounting a drive and uploading a file“.
In particular, the biggest advantage of using Colab is that you can use GPUs for arithmetic processing, but you can also use them for simple operations.
3.1 How to enable GPU/TPU
Colab can use GPUs (Graphics Processing Units) on Google’s servers. Suitable for machine learning calculations and can significantly reduce computation time compared to a local CPU.
This section describes the procedure for using that GPU.
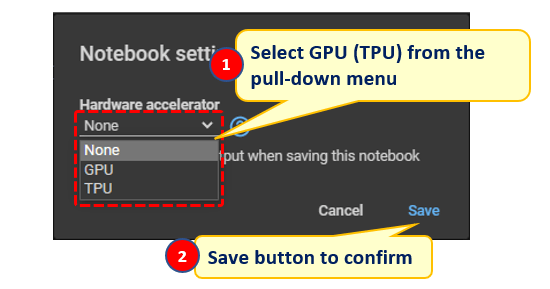
The default setting is disabled, so it must be enabled when using the GPU.
Go to the menu Runtime → Change Runtime Type. (➀,➁)
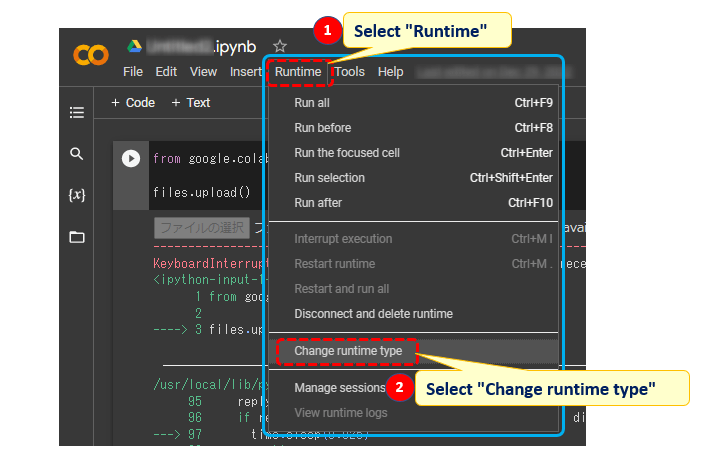
The Notebook Settings dialog appears, change the Hardware Accelerator list box from None to GPU and click the Save button. (➀,➁)
There is also “TPU” as an option, which is Google’s CPU. If you choose this option, you can expect higher speed. You may choose whichever is faster (depending on the environment and load conditions). Colab also has a “paid” version, which seems to improve the performance of GPU/TPU.
Once you have enabled GPUs, let’s check them to make sure.
The current processing engine selection status can be checked by executing the following code.<List1> (※Pyorch must be installed in advance.)
If the GPU is enabled, torch.cuda.is_available() returns True.
# Code to determine whether the current processing engine is GUP or CPU (example using Pytorch)

import torch
device = torch.device("cuda0:" if torch.cuda.is_available() else "cpu")
print(device)    # GPU is displayed as cuda0 / CPU as cpu
【Notes】
➀. Enabling GPU will reset the sessions of all cells in the Notebook once. (Module imports and variables are initialized) Therefore, when switching CPUs, all cells must be ”ReRun”.
➁. Therefore, when switching CPUs, all cells must be ”ReRun”.
3.2 Mount to Drive and Upload File (By Code)
As mentioned earlier, Colab can manage data in ”Session Storage”(temporary storage) and Google Drive. <Section 2.3>
Mounting and uploading files to Google Drive can also be done within the program without going through the GUI (Graphical User Interface). This section explains how to do so.
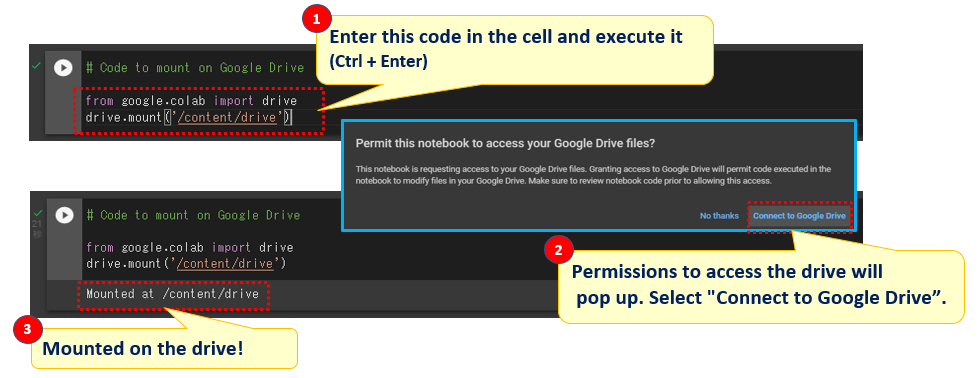
The following is how to mount to the drive.
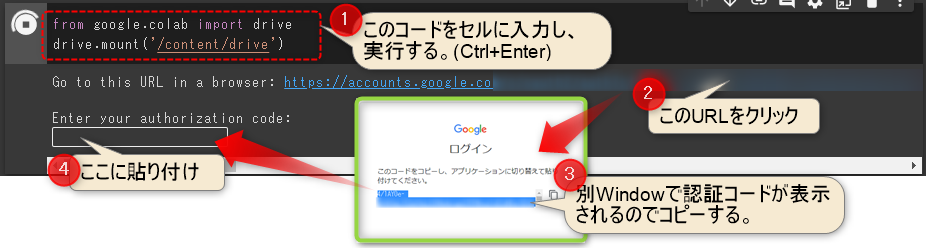
First, enter (➀) and execute the following code in the cell (Code area)
# Code to mount on Google Drive

from google.colab import drive
drive.mount('/content/drive')
Next, a window will pop up asking for permission to access the drive, select “Connect to Google Drive“.(➁) After a short wait, “Mounted at /content/drive” will appear in the execution result. (➂) You can now share files with the drive. (Figure 14_1)
Also, not long ago, Colab used to prompt for an authentication code as follows.
Listed for reference only.
【Reference】
After executing the above, the URL will be displayed and you can access it (➁). A separate window will then pop up, displaying an authorization code. Copy it (➂) and paste it again in the Colab input box (➃). (Fig14_1).
At this point, the directory under the drive is mounted, so data can be exchanged directly with the program by specifying the file path.
On the other hand, to upload files on the local PC instead of from the drive, import the files module and execute the upload() method, as in the following code <List3>. As shown in Figure15, click the “Select File” button when it appears in the execution result. The Open File dialog pops up, select the desired file.
# Upload Files
from google.colab import files
files.upload()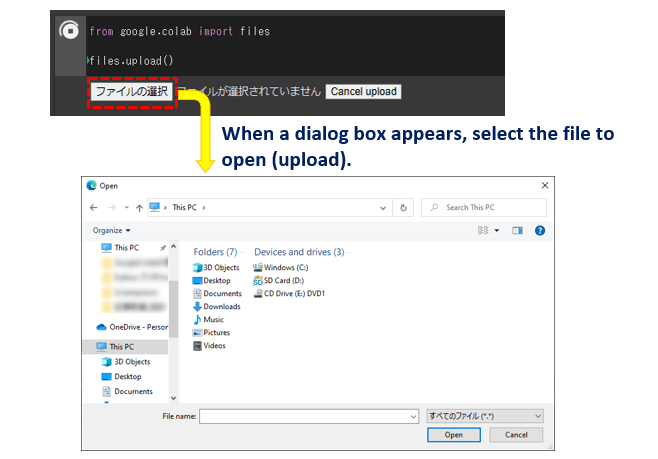
The return value of the upload() method is a File object. Like standard Python’s File object, it can be handled by various methods such as open(), read(), write(), etc.
3.3 Install new package
Colab includes the main packages (libraries and modules), but you can also re-install new packages or different versions of the libraries.
Use the package management tool “pip” as in official Python. at the beginning. Note the leading “!“.
(1) Check the installed libraries and versions
!pip list
!pip freeze
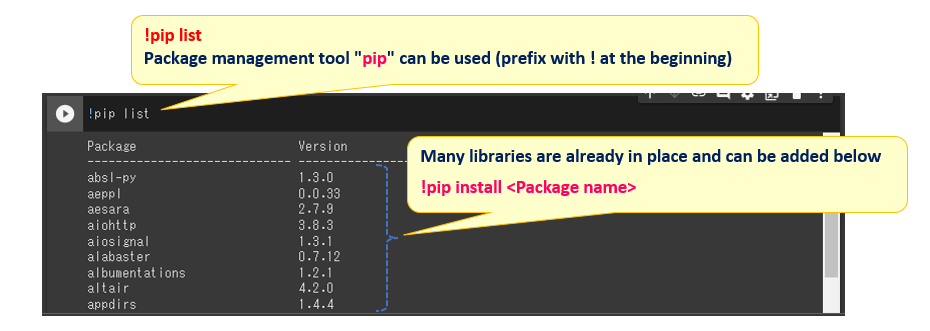
Familiar libraries such as Tensorflow and OpencCV are installed.
(2) Install a new package
!pip install <new package’s name>
4. Summary

How was it?
In this article, we introduced and explained how to use Google Colaboratory as a Python development environment.
It is compatible with JupyterNotebook, but allows you to experiment with GPUs as the processing engine. I think this service is especially useful when implementing machine learning frameworks.
It may be a good idea to use Colab as a development environment for everyday use.
Finally, let us summarize the key points of this article.
・Colab is a JupyterNote-like tool that allows you to easily try Python development.
・Many libraries pre-installed (Can be added)
・High-speed processing engines (GPU/TPU) can be tried out
・In the free version, sessions are automatically disconnected after 90 minutes of inactivity (disadvantage)
Thank you for reading this far.