
The use of an IDE is indispensable for efficient Python development.
Currently, several IDEs are available, including free and paid versions. (Figure.1)
For example, “Visual Studio” for full-scale development “Visual Studio Code” for installing various plug-ins and “Anaconda (including spyder and Jupyter Notebook)” for easy experimentation.
There are also platforms such as “Colabotatory” that can be developed in the cloud.
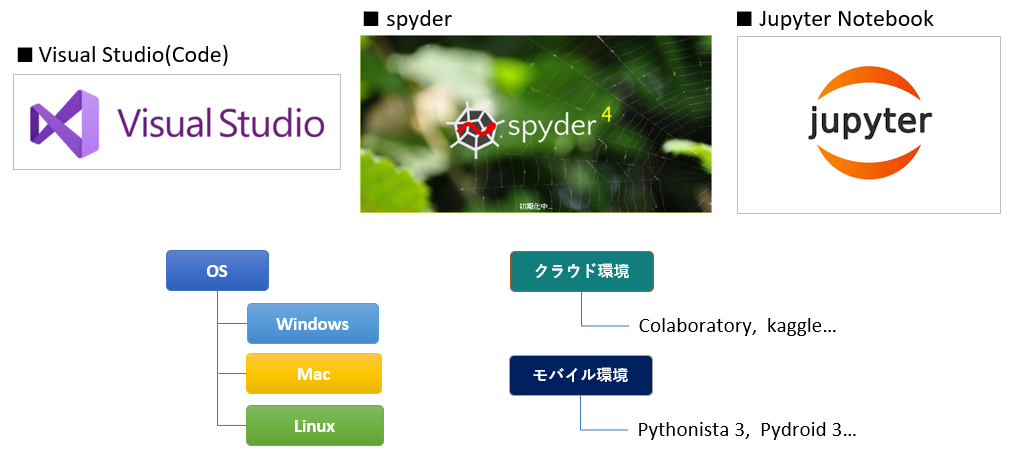
Each IDE has its own strengths and ease of use, but it is best to select an IDE that best suits your development style and objectives.
Among these, this article focuses on “Jupyter Notebook (*)”, the IDE with the most ease of use and suitable for beginner developers.
(* In the following explanation, it is expressed as “Jupyter”)
The reasons (features) for its popularity can be summarized as follows.
- Simple GUI and intuitive operation
- Coding and execution can be done in block unit (cell)
- Execution results are displayed inline
- Major libraries and modules already installed
Supplementary information on the features of 4.
Jupyter is a development tool included in the “Anaconda” distribution.
Anaconda can be used free of charge* and comes with a set of major libraries and modules pre-installed. (*There is also a paid version for commercial use.)
This has the great advantage of making it easy for beginners to get started by eliminating the troublesome environment construction process.
It is currently one of “the author’s most recommended IDEs“.
Please stay with us until the end of this article as you will be able to “do and understand” the following
Now, we will start explaining the basic operations of Jupyter from the next section.
1. Creating a Notebook ~ Executing Code

This section describes the basic operations of starting Jupyter and creating a project called “Notebook”, as well as writing and executing a program.
This section assumes that Jupyter is bundled with the Anaconda distribution.
Please refer to the following article for an explanation of how to install Anaconda.

Note that we have confirmed the operation on Windows10(64bit), Anaconda(2022.10), and JupyterNotebook(6.5.2).
1.1 Start Jupyter and create a project
This section explains how to start Jupyter and create a new project (Notebook).
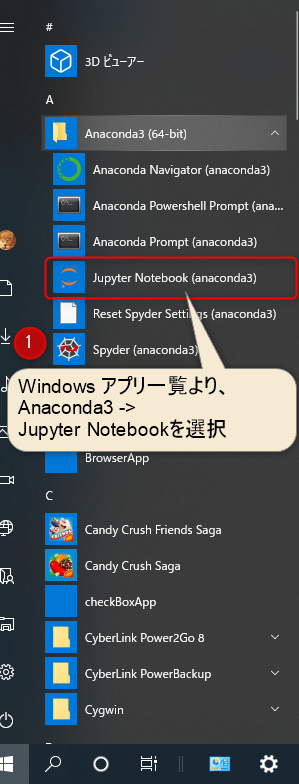
Select Anaconda3 from the Windows Start menu list. And then select Jupyter Notebook in the Anaconda3 folder. (Figure 2.➀)
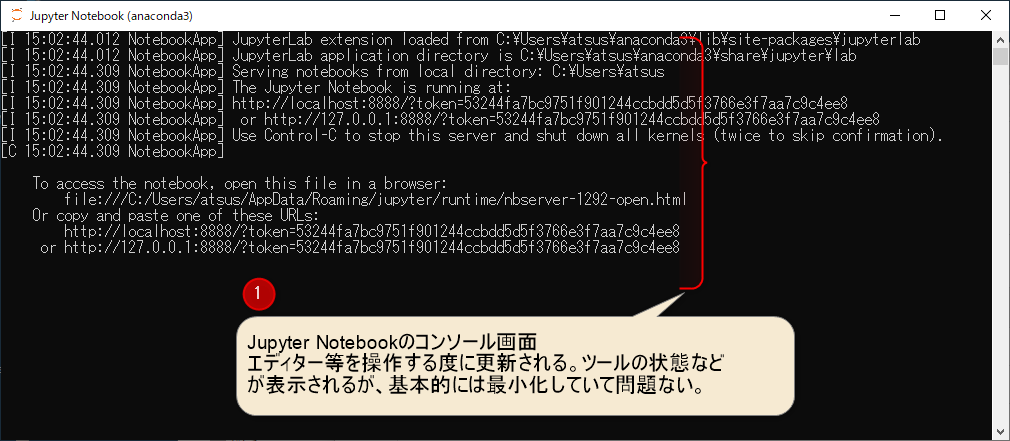
The console shown in Figure 3 will then appear and Jupyter will begin to run. This console only displays the status of JupyterNotebook, so it is not particularly necessary to proceed with development.
If it gets in the way, you can minimize it, but do not close it.
After a while, the top page of the web application “Jupyter” will appear. The recommended browser for Jupyter is “Google Chrome” for Windows and “Microsoft Edge” for Windows.
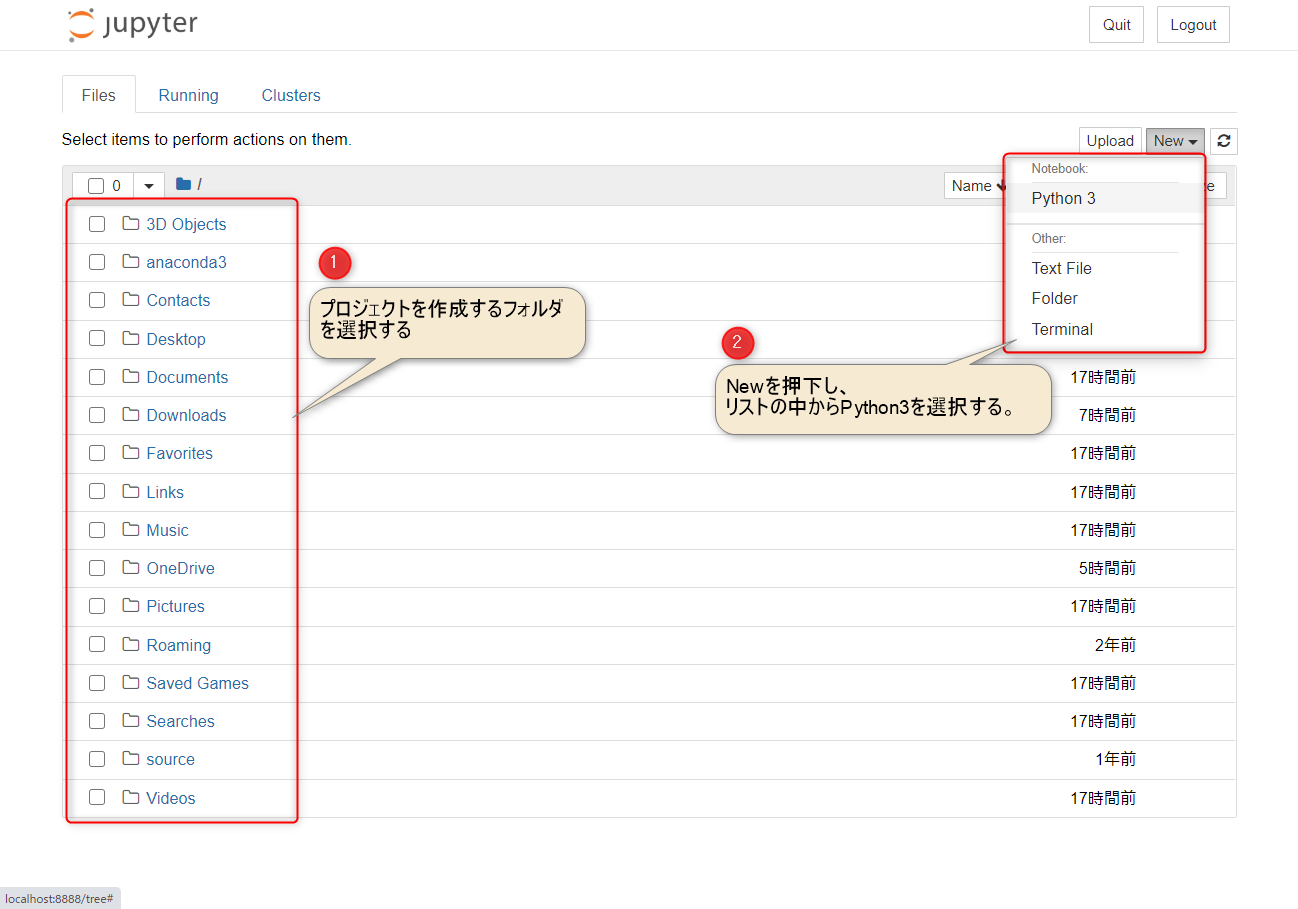
To start an existing project (Notebook) or create a new one, select a storage location from the folder tree (Figure 4.➀).
To create a new project, select python3 from the New pull-down list in the upper right corner. (Figure 4.➁)
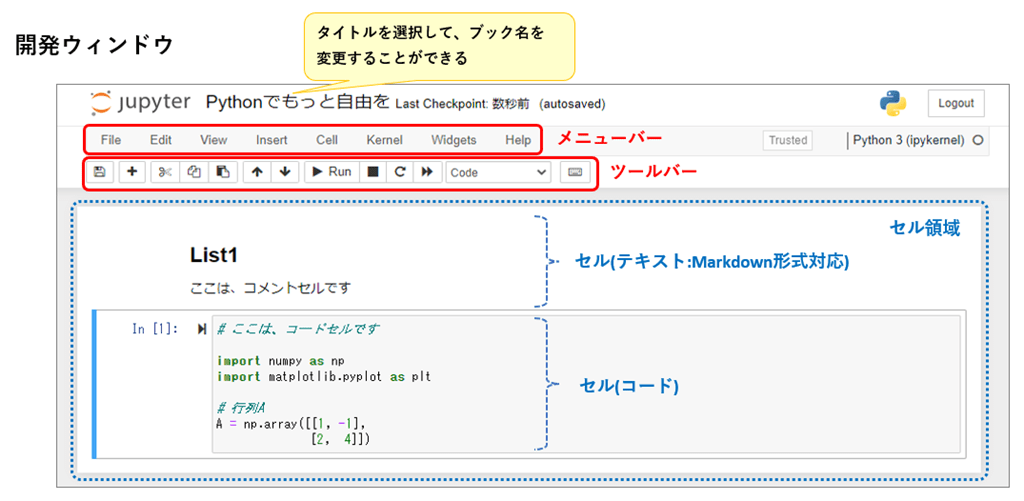
You will be redirected to the Jupyter Notebook development window (Figure. 5).
The development window is lined with ”Menus”, ”Toolbars” and ”Cell Areas”.
1.2 Cell(Code, Comment) and two Modes
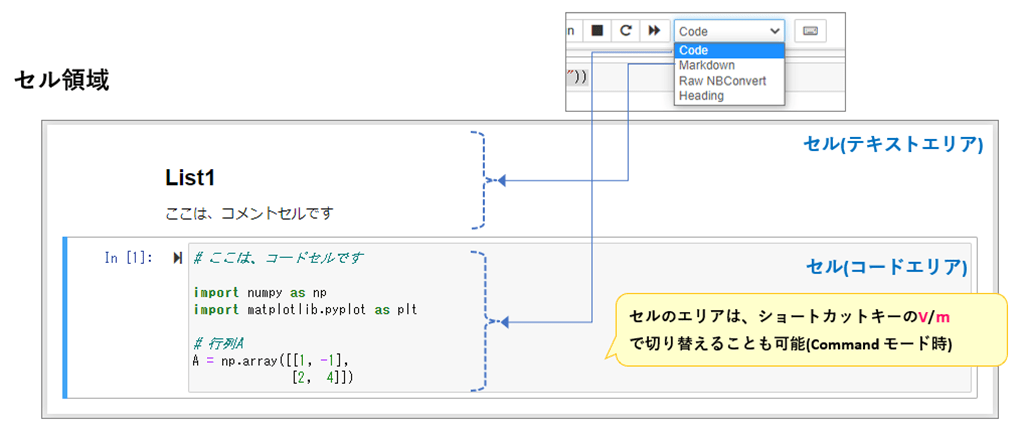
In Jupyter, program is written in area called “Cell”.
There are two types of cells, one is “an area for writing Python code” and the other is “an area for writing comments in Markdown format“.
The area type can be selected by “Code/Markdown” in the menu or by using the shortcut keys ( y / m ) after selecting “Command Mode (see below)”.
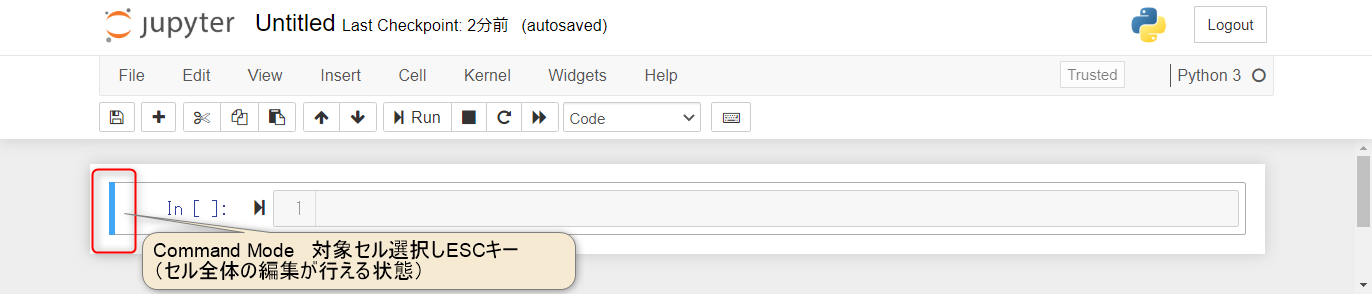
Furthermore, there are two types of cell states: “Command Mode” and “Edit Mode“.
“Command Mode” allows you to manipulate cells in the entire notebook. For example, move, delete, duplicate, etc. can be performed on a cell unit.
Command Mode can be entered by pressing the Esc key while a cell is selected. Command Mode is when the frame turns blue as shown below. (Figure 7)
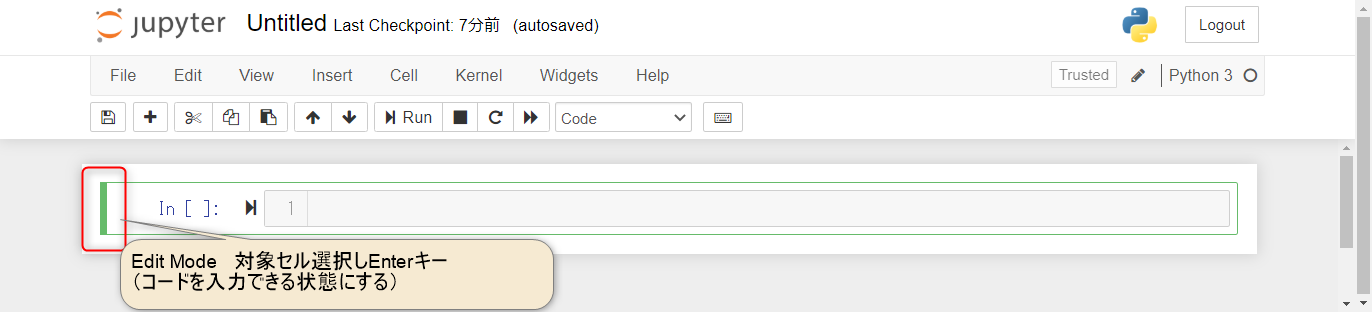
“Edit Mode” is the state in which Python code or comments can be written in the selected cell.
Edit Mode can be entered by pressing the Enter key while a cell is selected. Edit Mode is when the frame turns green as shown below. (Figure 8)
1.3 Manipulate Cell and Execute Code
Now, let’s actually manipulate the Cell.
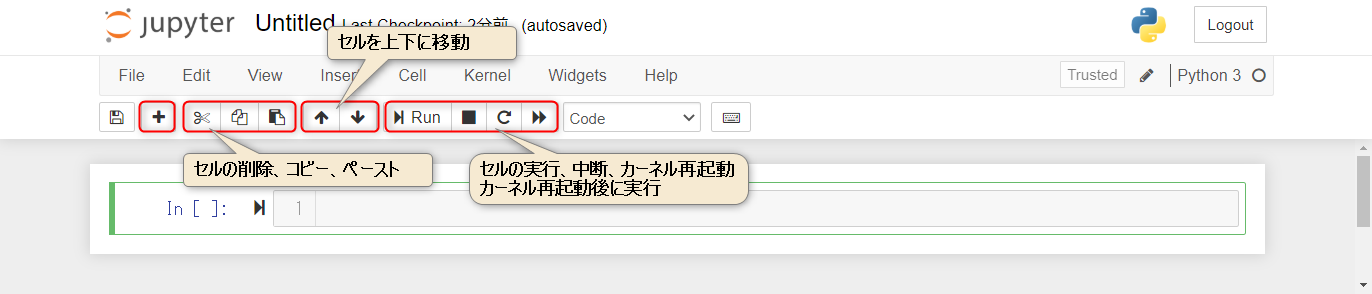
The “Toolbar” summarizes the most frequently used functions related to cell manipulation. (Figure 9)
- Delete, Copy, and Paste Cells
- Move Cell Up and Down
- Cell Execution, Interruption, Kernel Restart ・・・
Many other operations are grouped by function in the “Menu bar”. Most of them can be operated with shortcut keys, so once you get used to them, you can perform cell editing work smoothly.
Next, put the cell in code mode and try to enter and run the program.
If necessary, add a new cell and set Mode to “Code” (➀). Also, at this time, make sure the cell is in “Edit Mode” and enter the program (➁).
When you are done, press the Run button (➂) or the shortcut Ctr + Enter to execute. The script is then immediately executed and the result is displayed in the output window directly below the cell (➃ text, shape, graph, etc.).
Jupyter provides many shortcuts to assist in coding. See <2.1.5 Help menu> after this.

Jupyter can check the operation of each cell (minimum execution unit).
When coding, keep in mind the following points.
- Do not enter a large amount of script in a single cell
- Try to separate cells by function (method, class, processing unit).
- Check the operation of each cell and compare with the expected value.
- Use comment cells as appropriate to write descriptions
The project will automatically generate and save source files (*.ipynb) and .ipynb_checkpoints folder. The .ipynb_checkpoints folder contains backup information (rollback points).
2. Menu Items and Useful Usage

The menu bar of JupyterNotebook provides various functions. Compared to other IDEs, it is more intuitive to use. In addition, shortcut keys are assigned to each function for efficient development.
This section provides an overview of the menu bar items and their convenient usage.
2.1 Menu Bar Items
The Menu bar contains the following items. (Figure 11) This section describes the special features of each menu item.

- File … Creating and saving projects, etc
- Edit … Manipulation of cells in Book
- View … Show/hide headers, toolbars, line numbers, etc.
- Insert … Inserting Cells
- Cell … Cell Execution
- Kernel … Restarting the Python engine (interpreter), etc.
- Widgets … Restarting the Python engine (interpreter), etc.
- Help … Manuals, shortcut key lists, etc.
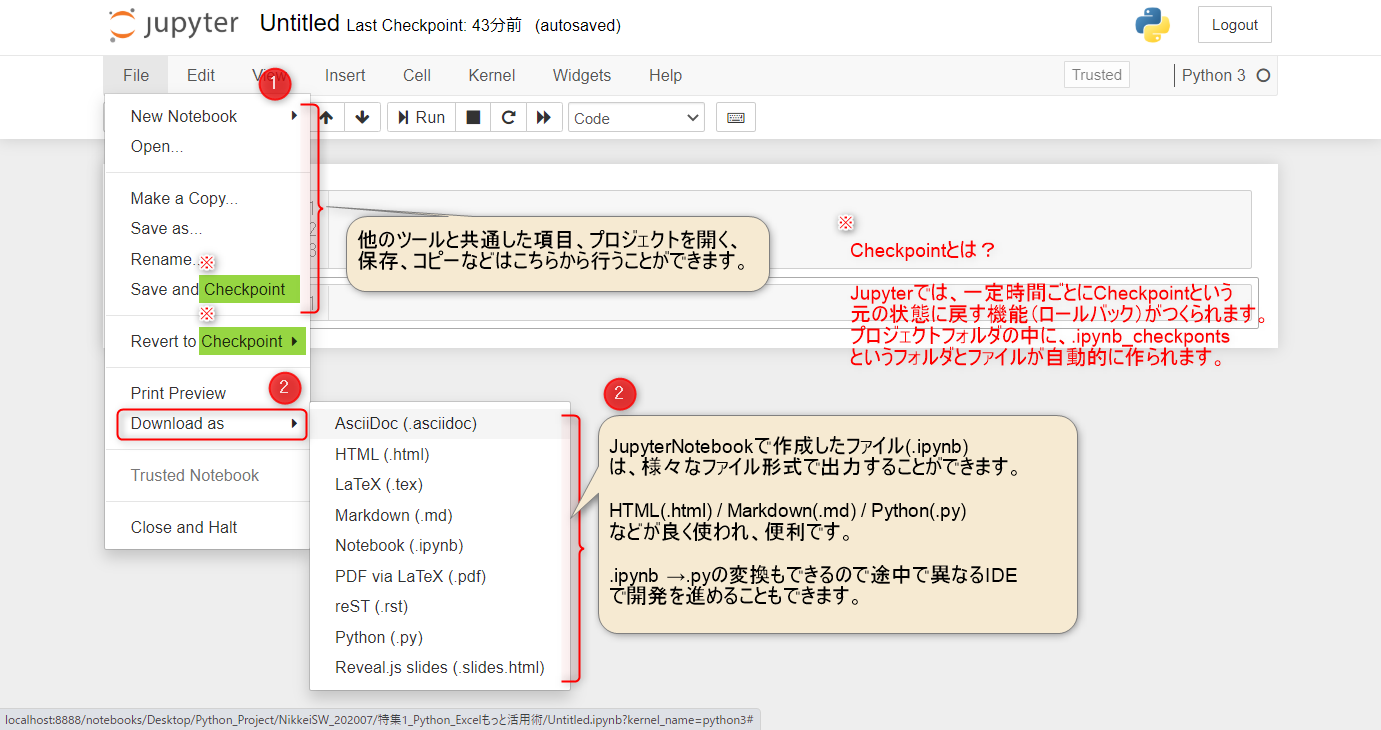
2.1.1 File Menu
This section describes the contents of the File menu. The File menu contains basic project(book) operations such as “Create,” “Open,” and “Save” (➀).
In addition, Downloads as allows you to convert the JupyterNotebook itself (*.ipynb) into various formats for output and storage. For example, you can output HTML, Markdown, etc., converted to Python extension (*.py) for use with other IDEs as well.(Figure12, ➁)
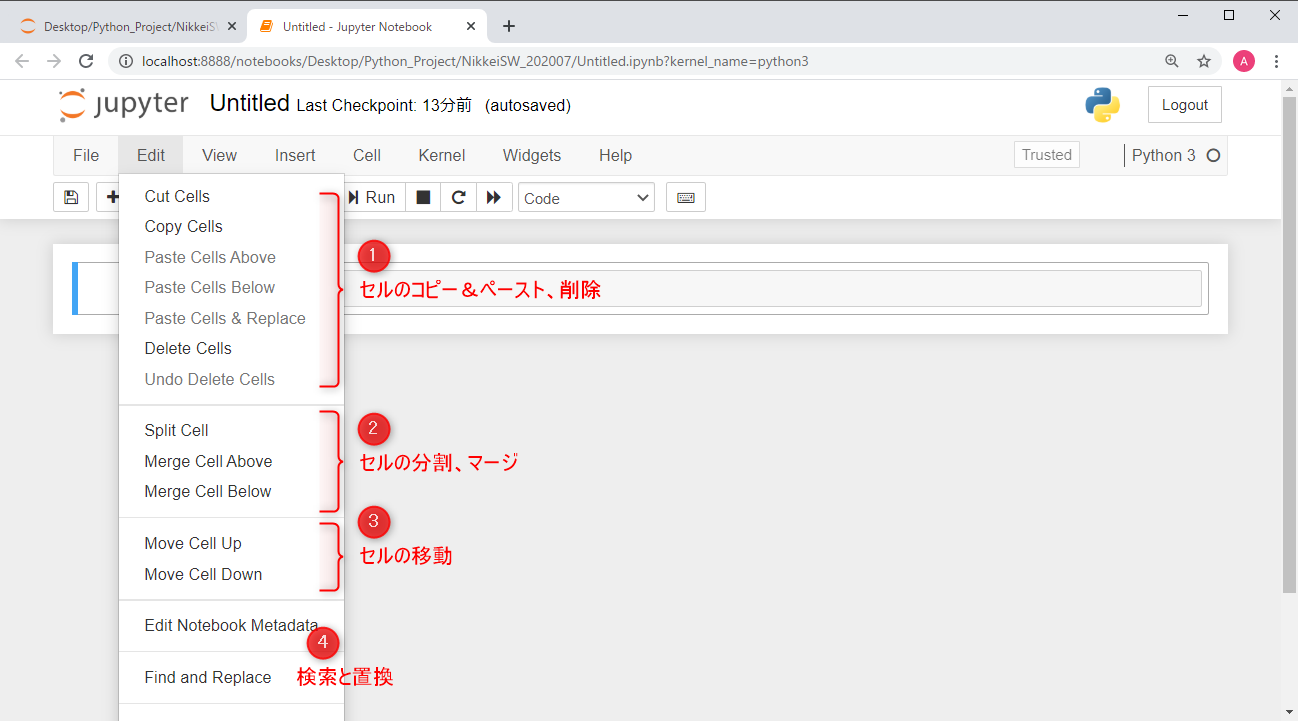
2.1.2 Edit Menu
Next, the contents of the Edit menu are explained. This section mainly describes cell operations.
The Edit menu contains items that can also be operated with the toolbar, such as duplicating and deleting cells.You do not even need to use the Edit menu, but you can split the cells into smaller cells (➁ Split Cell), debug them, and then merge them together (➁ Merge Cell * ). (Figure 13)
Others include moving cells (➂) and search and replace. (➃)
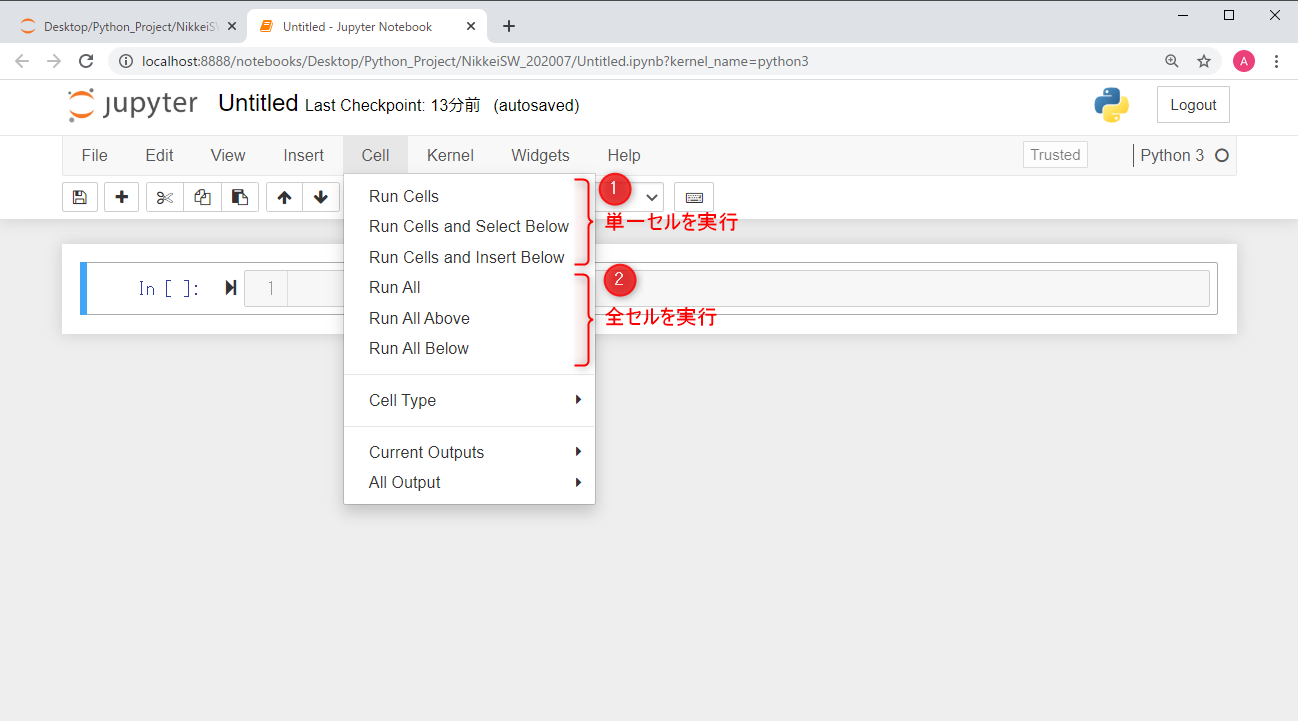
2.1.3 Cell Menu
Next, the contents of the Cell menu will be explained. This section summarizes the functions related to cell execution and output results. “Run selected cells + Options (➀)”, “Run all cells + Options (②)” etc… are lined up.
CellType also switches cell types such as Code (coding), Markdown (.md format), etc. The Current(All) Outpus can be used to display, hide, or delete output results. (Figure 14)
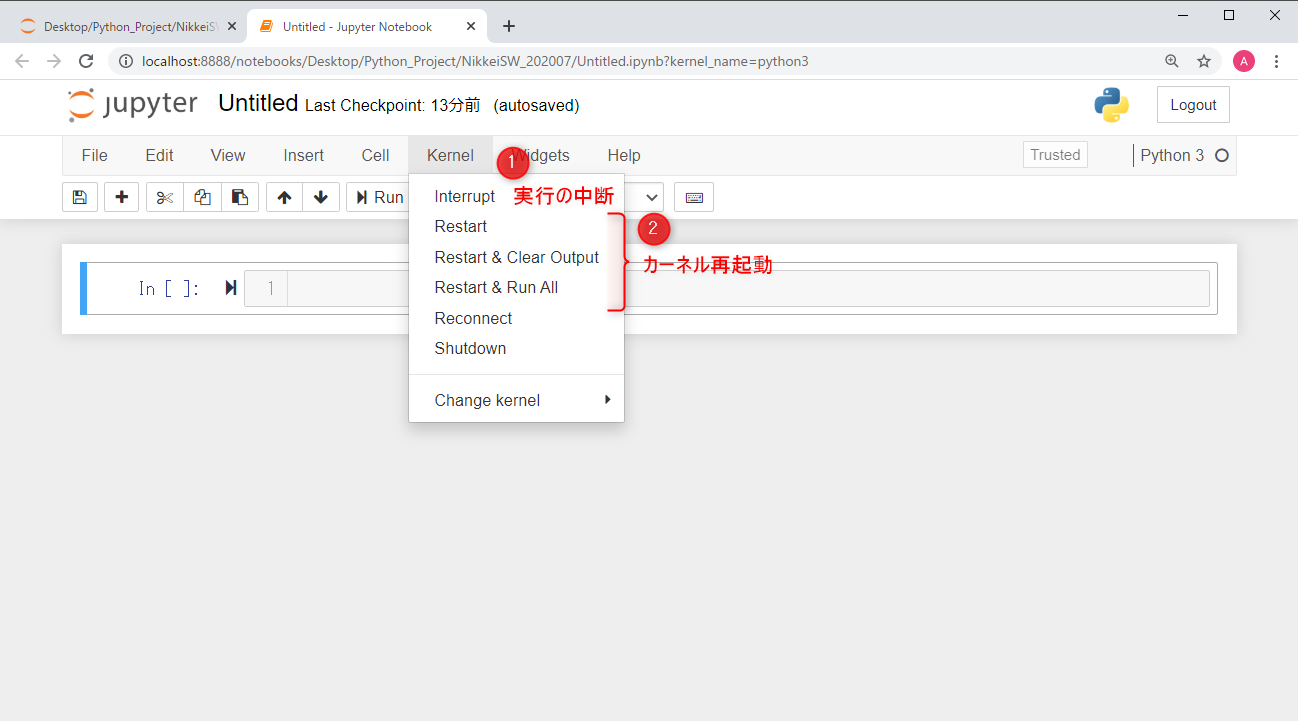
2.1.4 Kernel Menu
Next, the contents of the Kernel menu are described. This menu summarizes operations related to the interpreter of the python scripting language. (Figure 15)
The kernel restart is required if the process stops during execution (for example, if it enters an infinite loop) or to reflect changes in IDE settings. Try Interrupt (➀) or Restart (kernel restart) + option (②).
You can also select the version of the interpreter to be used with Change Kernel and stop the project with Shutdown.
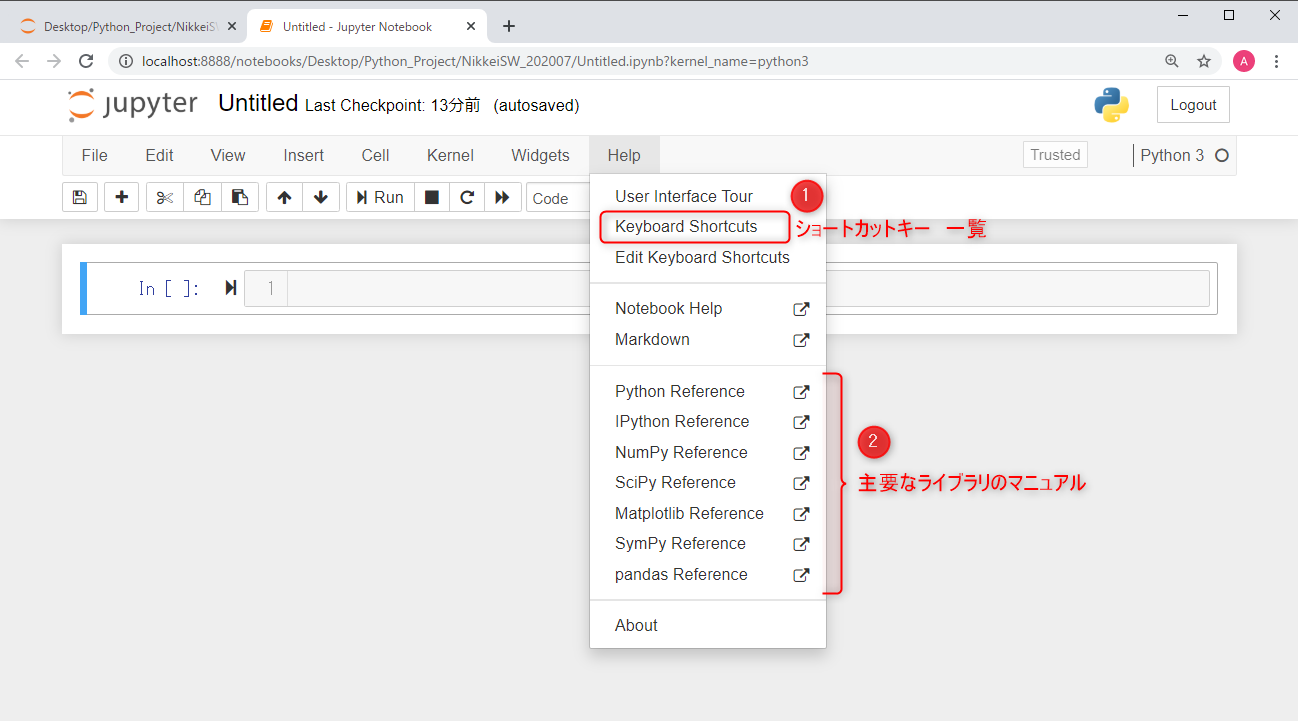
2.1.5 Help Menu
Finally, the contents of the Help menu are explained. This menu provides access to Tips information for coding.
Specifically, the list of shortcut keys (➀) and links to the official documentation of commonly used libraries(➁). Figure 16
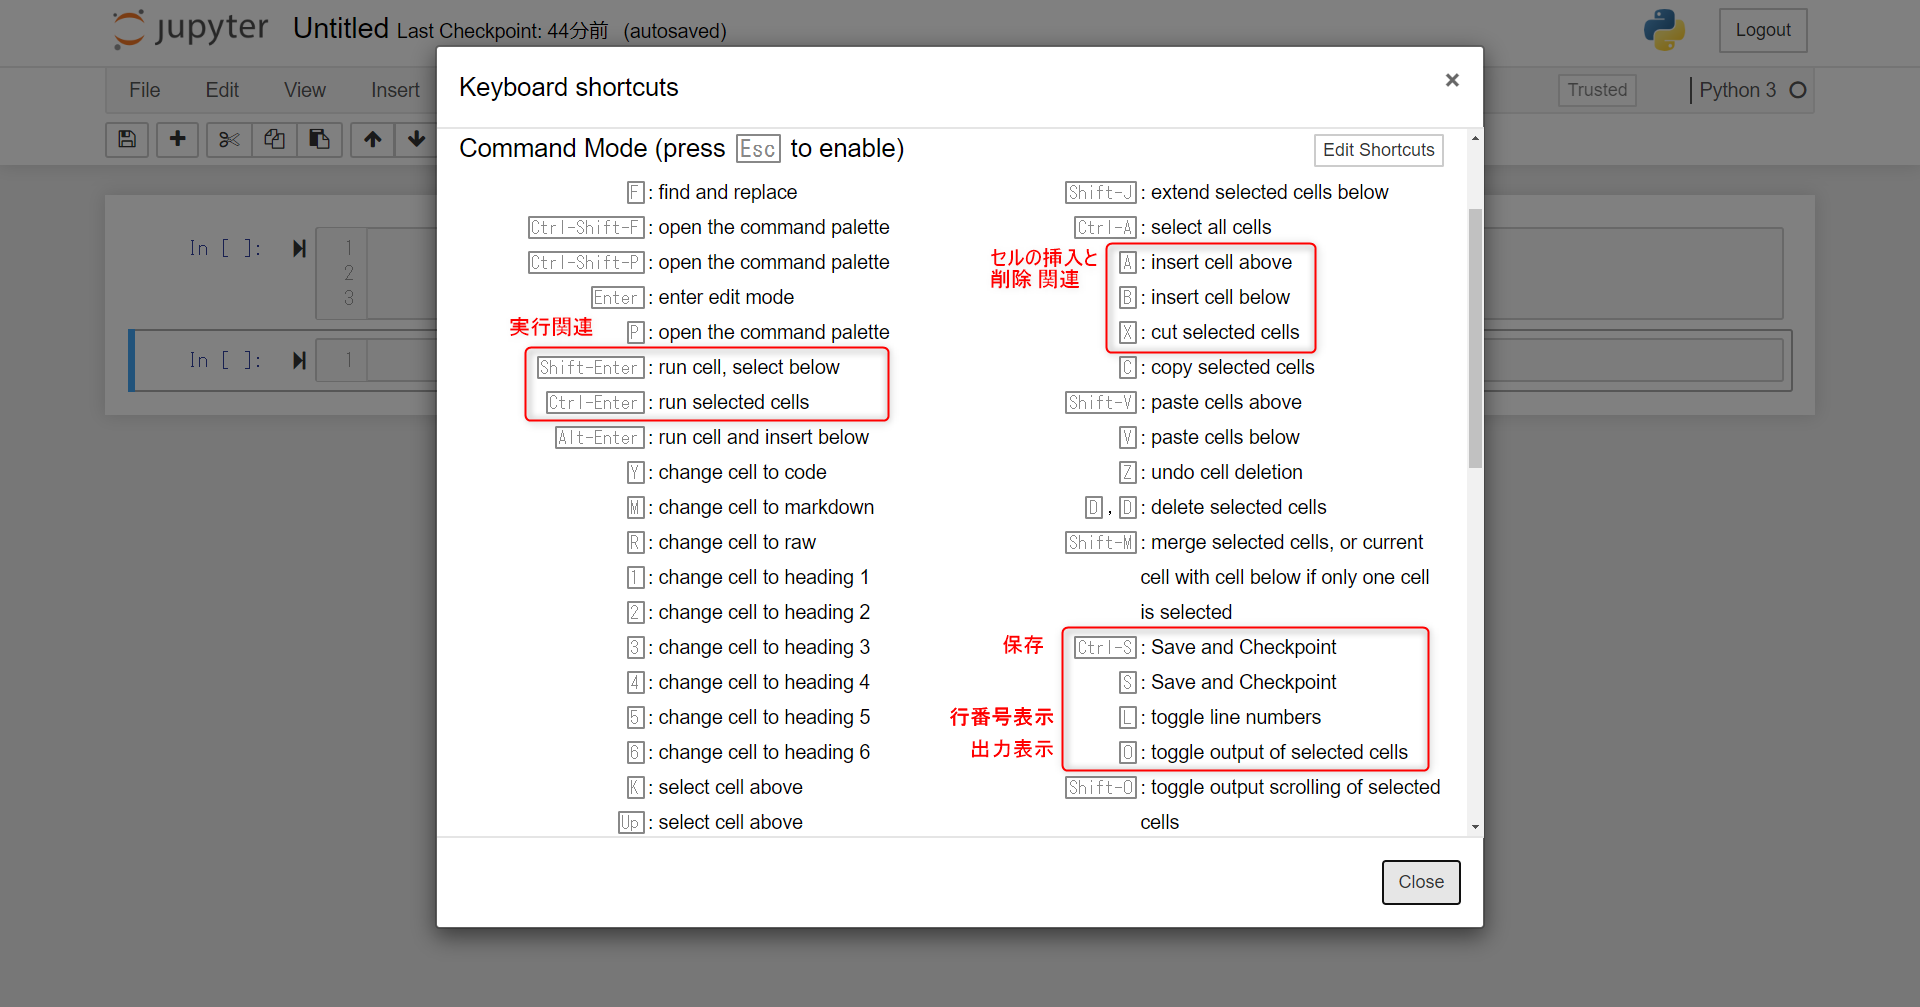
Let’s introduce some carefully selected shortcuts that you definitely want to remember when operating Jupyter.
The shortcuts to remember for use in ”Command Mode” are as follows.
【Cell Execution】
Shift+Enter: Go to next cell after current cell is executed
Ctrl+Enter: Execute the current cell
【Insert and delete cells】
A(a): Insert a new cell above the current cell
B(b): Insert a new cell below the current cell
X(x): Delete selected cell
【Save】
Ctrl+S(s): Save and Checkpoint update
【Display Related】
L(l): Toggle display/non-display of line number
O(o): Toggle display/hide of output results
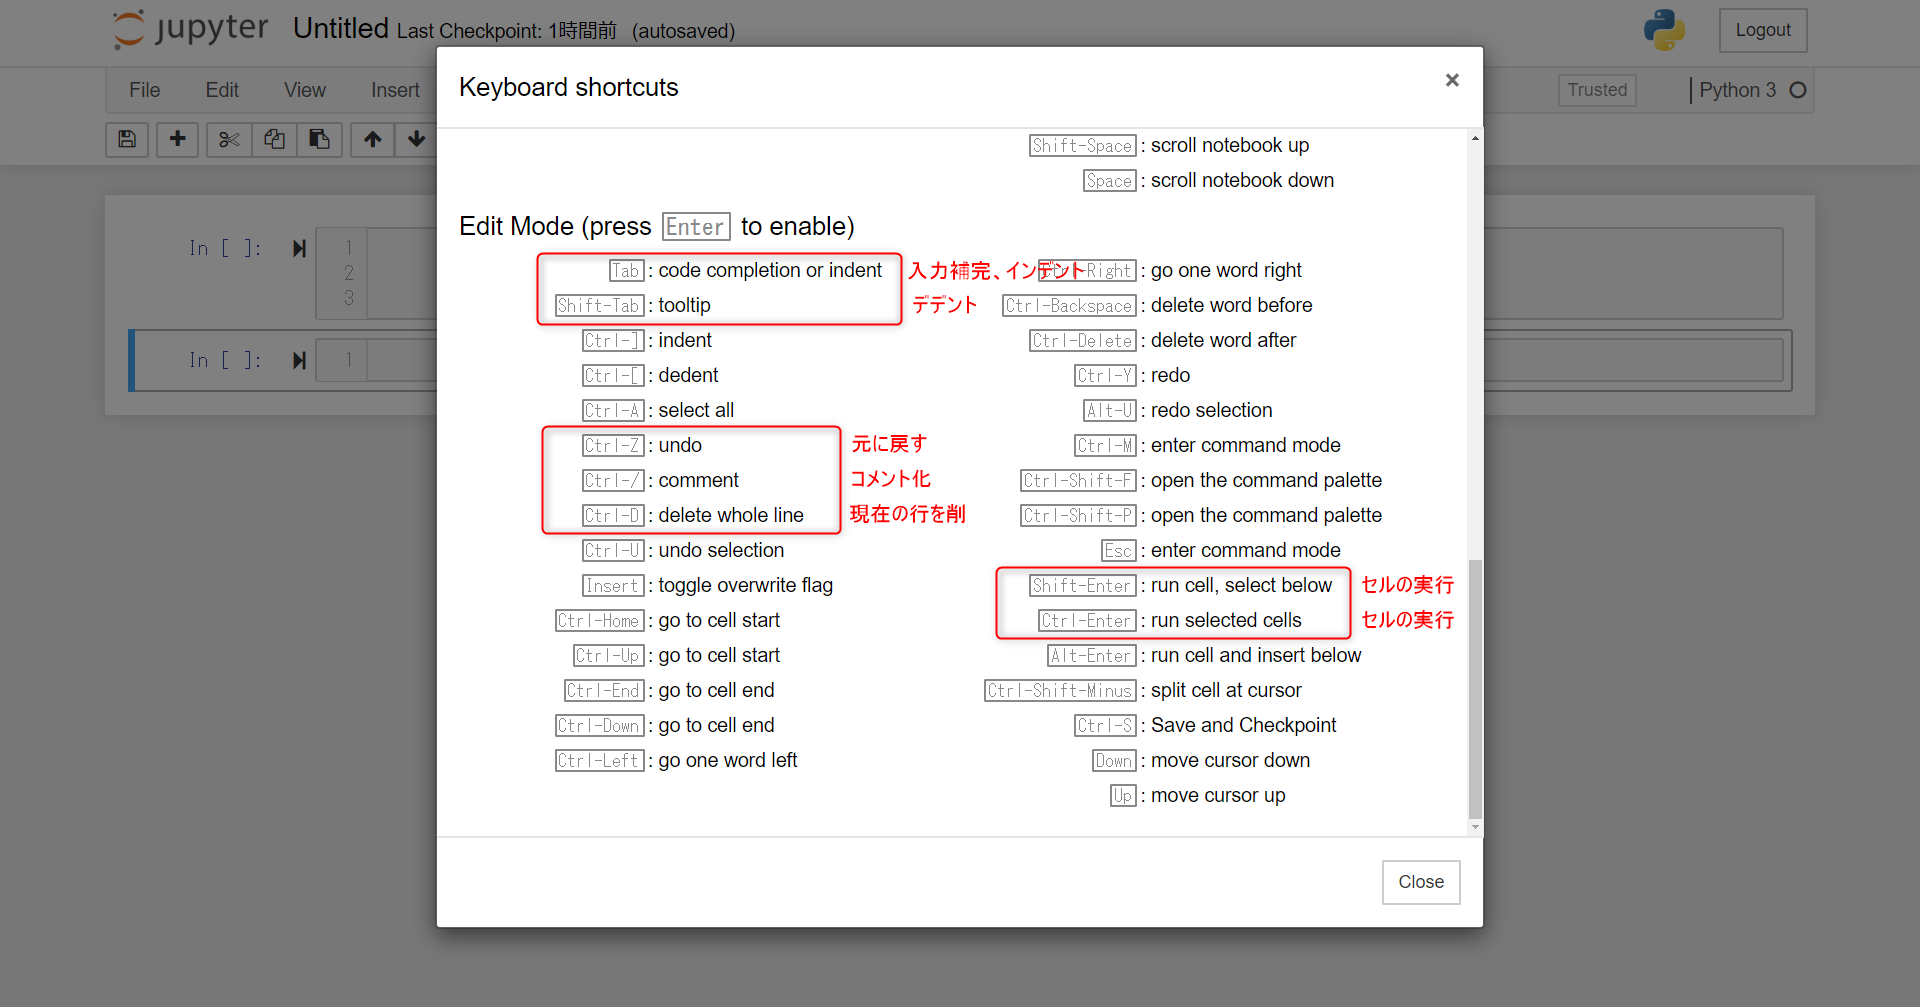
The shortcuts to remember for use in ”Edit Mode” are as follows.
【Code entry assistance】
Tab: Input support, insert indent
Shift+Tab: Remove indentation
Ctrl+Z(z): Undo
Ctrl+/: Comment the selected line
Ctrl+D(d): Delete selected line
【Cell Execution】(Same as Command mode)
Shift+Enter: Go to next cell after current cell is executed
Ctrl+Enter: Execute current cell
In addition, in the Help menu, there are links to the official websites of Numpy, Pandas, Matplotlib, which are essential libraries for machine learning and numerical analysis.
3. Summary

How was it?
In this article, we introduced how to use the Python development environment “JupyterNotebook“. Advantages and features of using “Jupyter” is the following.
- Simple GUI and intuitive operation
- Coding and execution in block (Cell)
- Execution results are displayed inline
- Major libraries and modules already installed
This is the IDE I recommend most for beginners.
We hope this article will help you to develop your Python skills.
There is also a cloud service called “Google Colaboratory” by Google that provides the same operability as JupyterNotebook. The advantage is that you can try out the GPU without a local environment.
If you are familiar with Jupyter, you may want to try “Colaboratory”. The following article explains how to use it. Please refer to it as well.

Thank you for reading to the end.