
This article describes the “openpyxl” library, which manipulates Excel in Python.
Excel has so many functions that it is impossible to cover them all in one article. The articles are written as a series of articles 【Python x Excel】, divided into major sections (functions).
In the previous article (the fifth in the series), the first part of this series explained how to set conditional formatting “Data Bar” “Icon Set” and “Color Scale” in cells. Applying conditional formatting makes it easy to visualize trends across data.
Please refer to the previous article here.

Now, as the second part of “Setting Conditional Formatting for Cells,” we will continue to cover the “Cell Highlighting Rule” “Top and Bottom Extraction Rule” and other supplementary information classified as Standard/Custom formatting.
Please stay with us until the end of this article, as you will be able to “do and understand” the following.
The information presented on this site is only an example. Please refer to the official website for details and clarifications, if necessary.
【Official Site】:https://openpyxl.readthedocs.io/en/stable/
We will now explain the specific procedures for applying “conditional formatting to cells” starting in the next section.
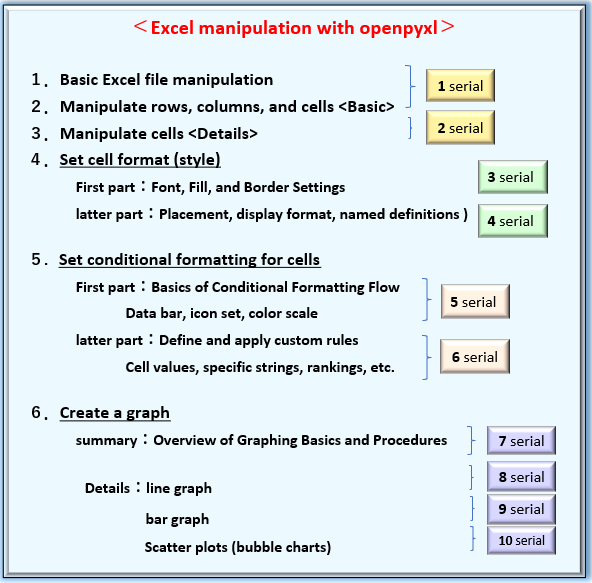
1. Set “Conditional Format” for Cells

This section provides an overview of “Types of Conditional Formats (Classification)” and “Formatting Flow (Procedure)” as well as a review of the previous section.
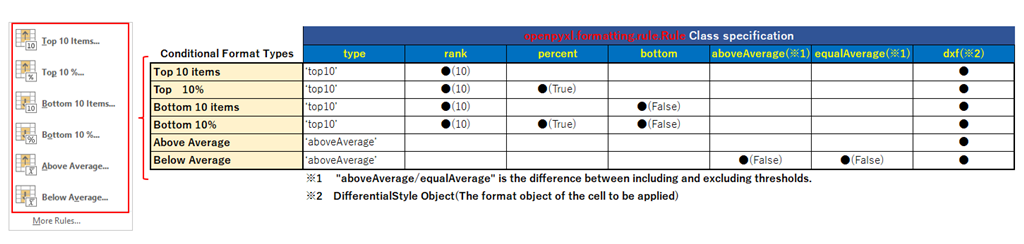
1.1 Types of ”Conditional Format”
The list of conditional formats that can be handled in Excel is reiterated in Fig2.
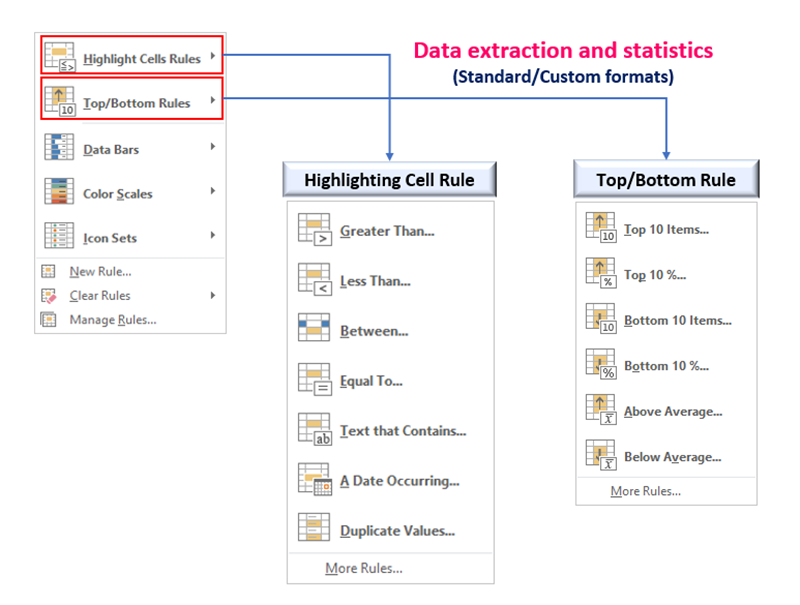
The classification by analysis function was divided into two main categories: ”visualizing data distribution (Builtin-formats)” and ”extracting and ranking data (Standard/Custom-formats)”.
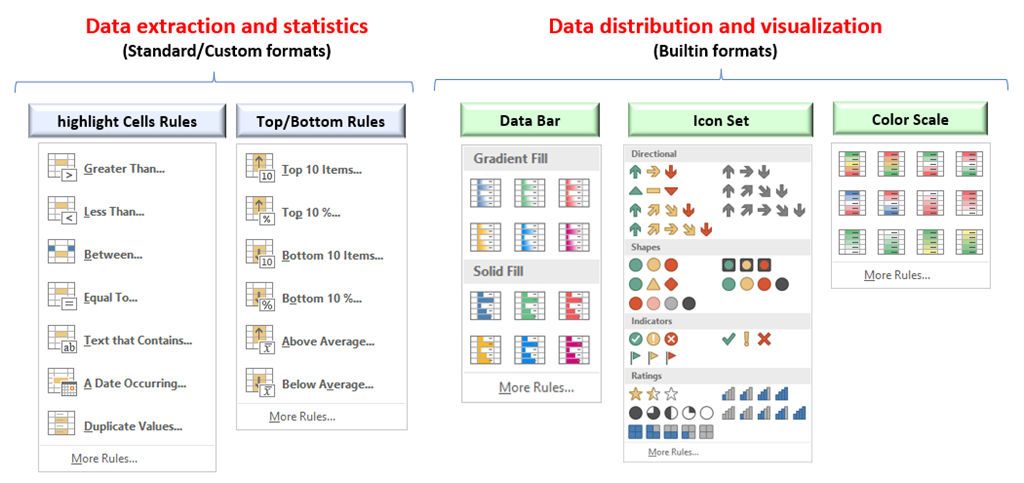
In addition, there are three types of Built-in-formats: “Data Bar“, “Icon Set” and “Color scale “. Standard/Custom-formats also fall into the categories of “Cell Highlighting” and “Top and Bottom Extraction Rule“.
In the previous article, we discussed the three types of Built-in-formats, and in this article, we will show you how to format Standard/Custom-formats.
1.2 About Formatting Process
The procedure for defining conditional formatting by openpyxl is a bit complicated.
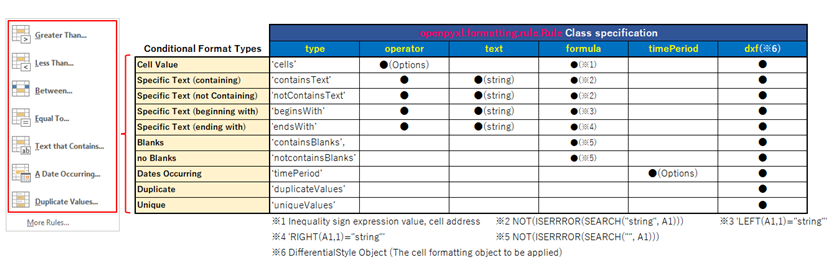
A Rule object that summarizes the definitions of cell extraction conditions (rules) must be prepared, and there are three different acquisition procedures as shown in Fig3.
Depending on the desired format type, you must select the appropriate class and specify the arguments.
(Note that the “pattern 〇” in the figure is the author’s opinion and no such classification method is adopted in the official documentation.)
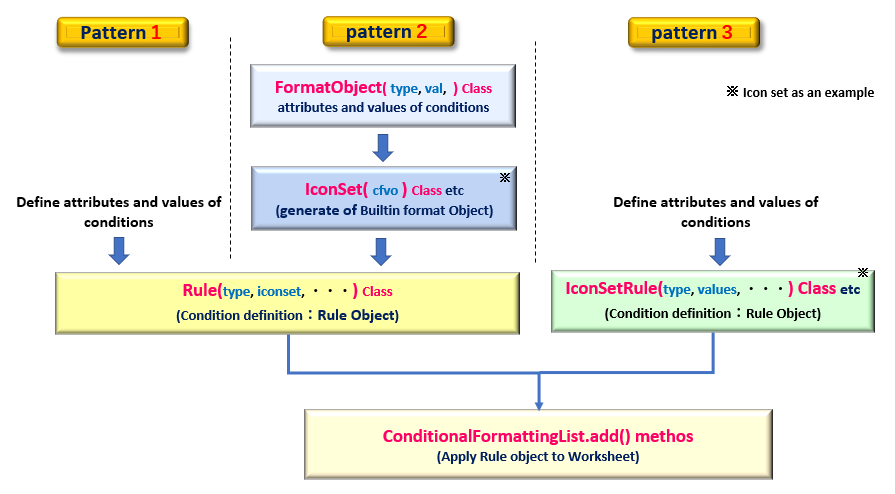
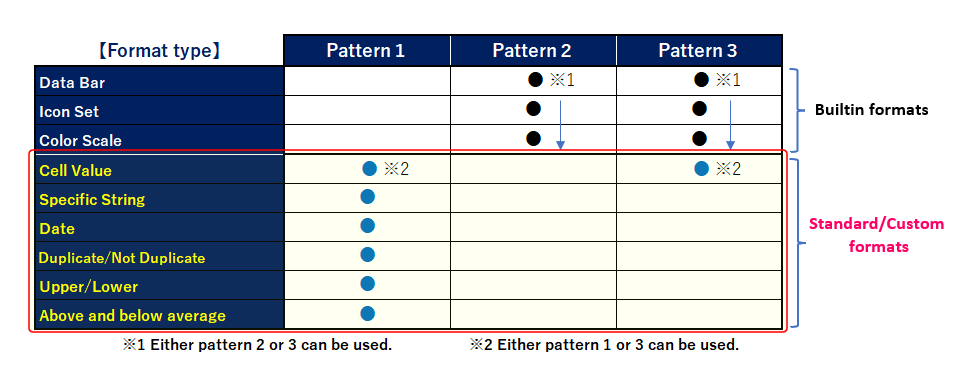
For conditional formats classified as “Standard/Custom-formats” as described in this article, you will define a “Rule object” by following the procedures in “Pattern 1” or “Pattern 3“. Please refer to the explanation in <Related Articles>.
This is an overview of Conditional Formatting. From the next section, we will explain in detail how to define Rule objects for “Cell Highlighting Rule” and “Top and Bottom Extraction Rule”.
2. Condition Definition by Rule Class (Pattern1)

This section describes the definition of the “Rule object” that manages conditions.
As mentioned above, conditional formats classified as “Standard/Custom-formats” are obtained from the Rule object by following the procedure in “Pattern1” or “Pattern3“
First, we will discuss condition definitions using Pattern1 (Rule class).
In the explanation that follows, conditional formats categorized as “greater than specified value” “date” “duplicate value” etc. are referred to as “Cell Highlighting Rule” and conditional formats categorized as “top 10 items” “above average” etc. are referred to as “Top/Bottom Rule,” as shown in Fig5.
The Rule class has many arguments. You need to use them appropriately depending on what type of format you are defining.
2.1 Define for “Cell Highlighting Rule”
The Rule object for a format classified as a “Cell Highlighting Rule” is obtained from the following argument specification.
from openpyxl.formatting.rule import Rule
Rule(type, operator, text , formula, timePeriod, dxf)
See table below for argument usage by conditional format type.
return: Rule Object
The arg:type is an optional constant that specifies the conditional format to be defined.
For example, Select according to the purpose as follows, “Cells” for “cell values” and “ContainsText” for “contains a specific string”.
The arg:operaotor, arg:text, arg:formula, arg:timePeriod may or may not need to be specified, depending on the format type, as shown in the matrix in Fig6.
Details are given in the explanation of each format type after <Section2.1.1>.
The arg:dxf is given as DifferentialStyle object for the decoration effect to be applied to the cells for which the extraction condition is satisfied. The object is defined and obtained from the following DifferentialStyle class.
from openpyxl.styles.differential import DifferentialStyle
DifferentialStyle(font, numFmt, fill, alignment, border, protection)
arg: font : Set Font object (font information)
arg: numFmt : Set the NumberFormatting object
arg: fill : Set the Fill object (Fill information)
arg: alignment : Set the Alignment object
arg: border : Set the Border object (Ruled line information)
arg: protection : Set Protection object
return: DifferentialStyle object
※All are optional arguments.
For details on Style objects set to individual arguments, see related articles <Part3><Part4> in this series.
2.1.1 Condition of ”Cell Value”
A Rule object with “cell value” as the extraction condition is defined as shown in the following format diagram.
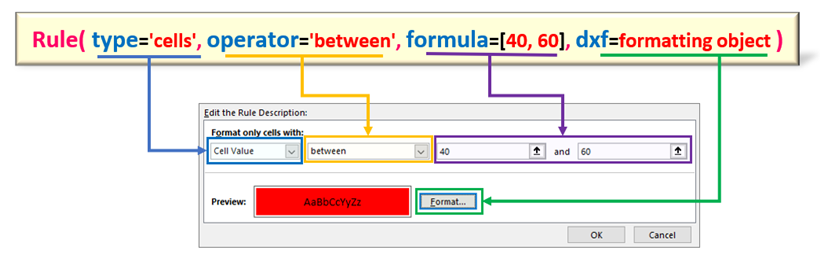
Specify “‘cells‘” for arg:type. Conditional expressions are constructed by arg:operator and arg:formula. The former sets the type of equal sign shown in (Table1), while the latter sets the range values, cell addresses, etc. The arg:dxf gives the format (Style object) to be applied to the cell if the conditional expression is true. (The example in Fig8 is a conditional formula to extract cells with values between 40 and 60.)
| arg:operator Options | functions |
|---|---|
| ‘lessThan’ | less than value |
| ‘lessThanOrEqual’ | below the value |
| ‘greaterThan’ | greater than the value |
| ‘greaterThanOrEqual’ | more than value |
| ‘between’ | between the values |
| ‘notBetween’ | other than between the values |
| ‘equal’ | equal to the value |
| ‘notEqual’ | not equal to the value |
Now, let’s check concrete examples of the extraction condition by “cell value”.
【Example.1】
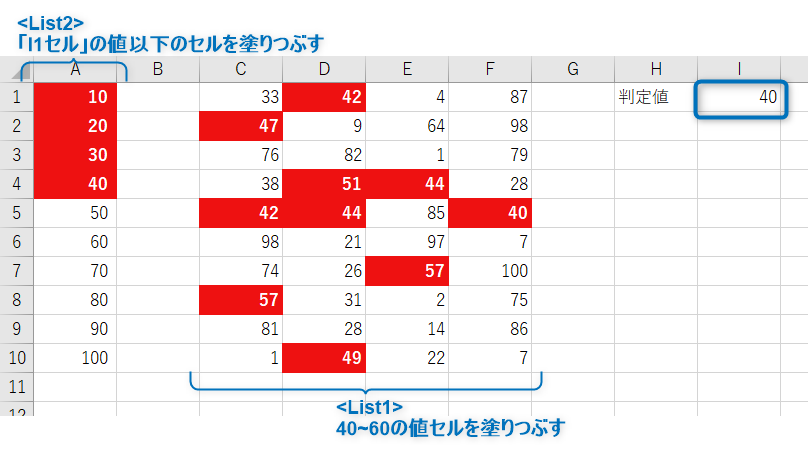
The conditional format “If the value of a cell is between 40 and 60, fill it with red” would look like <List1>. The arg:operator is specified as “between“. The arg:formula specifies the value of the equals sign, but if there is more than one, as in this case, it is passed as a list ([element1, element2…]).
Files (.xlsx) read by this program can be downloaded from
from openpyxl import load_workbook
from openpyxl.formatting.rule import Rule
from openpyxl.styles.differential import DifferentialStyle
from openpyxl.styles import PatternFill, Font

wb = load_workbook('Conditional_Formatting_num.xlsx')
ws = wb.active

# Define cell formatting as a DifferentialStyle object
fill_red = PatternFill(start_color='EE1111', end_color='EE1111', fill_type='solid')
font = Font(bold=True, color='FFFFFF')
dxf=DifferentialStyle(font=font ,fill=fill_red)

# Generating Rule Objects
# The arg:operator set to 'between'.
# The value of the equals sign expression is passed in list form in the arg:formula.

rule = Rule(type='cellIs', operator='between' ,formula=[40, 60], dxf=dxf)

ws.conditional_formatting.add('A1:A10', rule)
wb.save('Conditional_Formatting_num_apply.xlsx')【Example.2】
An example of defining the conditional format “If the value of cell “I1” is less than or equal to the value of cell “I1” would be <List2>. The arg:operator should be “lessThanOrEqual“, which means “less than or equal to”.
When passing an address to the arg:formula, either relative or absolute references are acceptable.In this example, an absolute reference “$” is given.
from openpyxl import load_workbook
from openpyxl.formatting.rule import Rule
from openpyxl.styles.differential import DifferentialStyle
from openpyxl.styles import PatternFill, Font

wb = load_workbook('Conditional_Formatting_num.xlsx')
ws = wb.active

# Define cell formatting as a DifferentialStyle object
fill_red = PatternFill(start_color='EE1111', end_color='EE1111', fill_type='solid')
font = Font(bold=True, color='FFFFFF')
dxf=DifferentialStyle(font=font ,fill=fill_red)

# Generating Rule Objects
# Specify 'lessThanOrEqual' for the arg:operator.
# Cell addresses(both absolute and relative references are acceptable) is
# specified in list form in the arg:formula.

rule = Rule(type='cellIs', operator='lessThanOrEqual',formula=['$I$1'], dxf=dxf)

ws.conditional_formatting.add('C1:F10', rule)
wb.save('Conditional_Formatting_num_apply.xlsx')
The result of running <List1><List2> is as follows.
The results of the <List1><List2> runs can be downloaded below.
2.1.2 Condition of “Specific String”
A Rule object with “specific string” as the extraction condition is defined as shown in the following format diagram. Fig9 shows an example of extracting cells containing the string “hoge“.
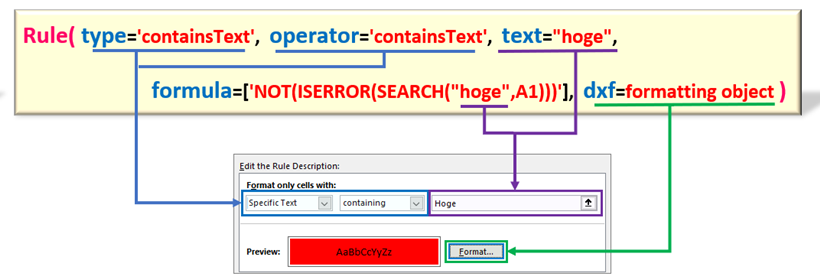
For the arg:type, select from the list of options (left side of Table 2) according to the string pattern to be extracted (ex. contains/begins with ○○). In addition to this, the arg:formula must be set to a string “decision expression”. (Center of Table 2) Replace “string” in the decision formula with the string to be extracted.
It is not necessary that the “target string” is actually entered in cell “A1”. It is a little confusing, but it seems to “scan” the cell range to which this formula is applied to determine “match” or “unmatch”.
Also, since openpyxl uses “cell A1” as its reference, specifying any other cell will cause problems, so it is recommended that “cell A1” be specified.
The arg:operator and arg:text also seem to be relevant arguments, but their presence or not, as far as the author has been able to ascertain, does not seem to be directly related to the behavior. In this article, we will follow the official website and specify.
operational expression for
| arg :type(operator) | decision expression for arg :formula | Functions |
|---|---|---|
| ‘containsText’ | ’NOT(ISERRROR(SEARCH(“string“, A1)))’ | Contains specified characters |
| ‘notContainsText’ | ’(ISERRROR(SEARCH(“string“, A1)))’ | not contain the specified characters |
| ‘beginsWith’ | ’LEFT(A1,1)=”string“‘ | Begin with the specified character |
| ‘endsWith’ | ‘RIGHT(A1,1)=”string“‘ | End with specified character |
| ‘containsBlanks’ | ’NOT(ISERRROR(SEARCH(“”, A1)))’ | blank cell |
| ‘notcontainsBlanks’ | ’(ISERRROR(SEARCH(“”, A1)))’ | not blank cell |
Now, here is an example of an extraction condition by “specific string”. The code are excerpted only as they relate to conditional formatting. Add file loading, saving, and other processes as needed.
【Example.1】
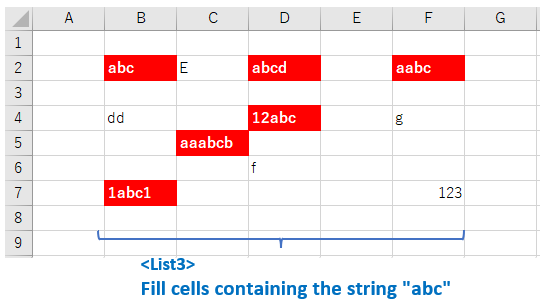
An example of defining the conditional format “If a cell contains the string “abc”, fill it with red” would be <List3>. Also, specify “NOT(ISERRROR(SEARCH(“string“, A1)))” for the arg :formula. The “string” part specifies the string to be searched for, in this case “abc“. The arg:text is also the same.
Please read the following file (.xlsx).
from openpyxl.formatting.rule import Rule
from openpyxl.styles.differential import DifferentialStyle

# (Omission)

# Define cell format as a DifferentialStyle object
fill_red = PatternFill(start_color='EE1111', end_color='EE1111', fill_type='solid')
font = Font(bold=True, color='FFFFFF')
dxf=DifferentialStyle(font=font ,fill=fill_red)

# Generatie Rule Objects
# Arguments operator and text are not required and do not need to be set
# The most important argument is the formula, which sets the format of the string to be searched combined with the Excel function.
# formula is used to determine the condition for the entire cell range. The reference cell must be cell A1.
rule = Rule(type='containsText', operator='containsText', formula=['NOT(ISERROR(SEARCH("abc",A1)))'], text='abc', dxf=dxf)

# (Omission)【Example.2】
An example of defining the conditional format “If a cell contains a string beginning with “E”, fill it with red” would be <List4>.
The arg:type(operator) should be set to “beginsWith” meaning “begins with 〇〇”. The arg:formula is set to ‘LEFT(A1,1)=”string“‘. The “string” part specifies the first character to be searched.(in this case “E”)
Incidentally, to extract the case of “ending with a specific character“, set ‘RIGHT(A1,1)=”string“‘ to the arg:formula.
from openpyxl.formatting.rule import Rule
from openpyxl.styles.differential import DifferentialStyle

# (omission)

# Define cell formatting as a DifferentialStyle object
fill_red = PatternFill(start_color='EE1111', end_color='EE1111', fill_type='solid')
font = Font(bold=True, color='FFFFFF')
dxf=DifferentialStyle(font=font ,fill=fill_red)

# Generat Rule Objects
# Set arg:type and arg:operator to 'beginWith'.
# The arg:formula specifies a decision expression for the first string.
rule = Rule(type='beginsWith', operator='beginsWith', formula=['LEFT(A1,1)="E"'], text="E", dxf=dxf)

# (omission)
The result of <List3> is as follows. Cells containing “abc” are highlighted in red.
The results of the <List3> runs can be downloaded below.
2.1.3 Condition of “Date”
A Rule object with “specific date” as an extraction condition is defined as shown in the following format diagram. Fig11 shows the format for extracting cells that contain “last month” date data.
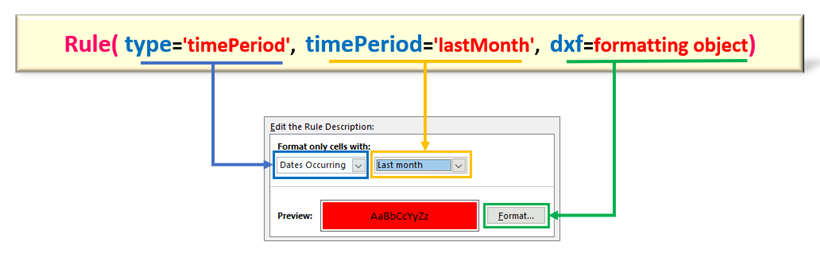
The arg:type should be “timePeriod“. For the arg:timePeriod, select any date period from (Table 3). Unlike the previous “numerical” and “string” extraction conditions, this is a simple specification.
| arg:timePeriod options | functions |
|---|---|
| ‘yesterday’ | yesterday |
| ‘today’ | today |
| ‘tomorrow’ | tomorrow |
| ‘last7Days’ | last 7 days |
| ‘thisWeek’ | this week |
| ‘lastWeek’ | last week |
| ‘nextWeek’ | next week |
| ‘lastMonth’ | last month |
| ‘thisMonth’ | this month |
| ‘nextMonth’ | next month |
Now, let’s check the code for an example of using “date” as the extraction condition. The code is excerpted only as it relates to conditional formatting.
【Example】
An example of defining the conditional format “Fill with red if the cell’s date is in the last month” would be <List5>. The arg:timePeriod should be ‘lastMonth‘.
from openpyxl.formatting.rule import Rule
from openpyxl.styles.differential import DifferentialStyle
# (omission)
# Define cell formatting as a DifferentialStyle object
fill_red = PatternFill(start_color='EE1111', end_color='EE1111', fill_type='solid')
font = Font(bold=True, color='FFFFFF')
dxf=DifferentialStyle(font=font ,fill=fill_red)
# Generate Rule Objects
# Specify the target period to the arg:timePeriod.
rule = Rule(type='timePeriod', timePeriod='lastMonth', dxf=dxf)
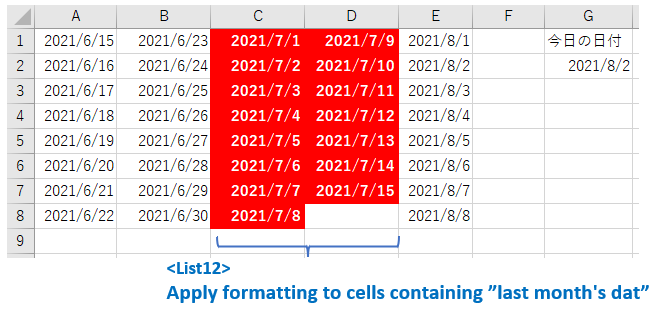
# (omission)The execution result of will be as follows.
Fill has been applied to the cell (column C/D) containing the July date, which is the last month of the excution date “August 2” (cell G2).
2.1.4 Condition of “Duplicate Value (Non-duplicate Value)”
A Rule object with “duplicate (non-overlapping) value” as the extraction condition is defined as shown in the following format diagram.
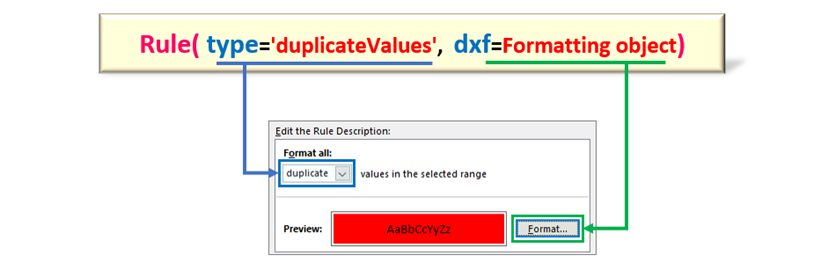
The arg:type should be set to “duplicateValues (duplicate cells) / uniqueValues (non-duplicate cells)”. Fig13 shows a format diagram for extracting cells with duplicate data.
All data types of “numeric,” “string,” and “date” types are subject to the duplication criterion. In particular, there is no need to specify the target data type in an argument.
| arg:type | Functions |
|---|---|
| ’duplicateValues’ | Duplicate value |
| ‘uniqueValues‘ | Unique value |
Now, let’s check the code for an example of using “duplicate value (not duplicate value)” as an extraction condition. The code is excerpted only as it relates to conditional formatting.
【Example】
An example of defining the conditional format “If there is duplicate data in a cell range, fill the target cell with red” would be <List6>.
Conversely, if you want to extract cells with no duplicates, set “uniqueValues” to the arg:type of the Rule class.
from openpyxl.formatting.rule import Rule
from openpyxl.styles.differential import DifferentialStyle

# (omission)

# Define cell formatting as a DifferentialStyle object
fill_red = PatternFill(start_color='EE1111', end_color='EE1111', fill_type='solid')
font = Font(bold=True, color='FFFFFF')
dxf=DifferentialStyle(font=font ,fill=fill_red)

# Generate Rule Objects
# Extract duplicate values with arg:type as 'duplicateValues'
rule = Rule(type='duplicateValues', dxf=dxf)
# Extract unique values with arg:type 'uniqueValues'
#rule = Rule(type='uniqueValues', dxf=dxf)

# (omission)
The result of excution <List6> is as follows
The target of the extraction can be any data type: “numeric”, “date”, or “character”.

2.2 Define for “Top/Bottom Rule”
The Rule object of a format classified as “Top/Bottom Rule” is obtained from the following argument specification.
from openpyxl.formatting.rule import Rule
Rule(type, rank, percent, aboveAverage, eualAverage, dxf)
See table below for argument usage by conditional format type.
return:Rule Object
Specify the format type as an optional constant for the arg:type. For example, select “top10” for “Top 10 items” or “AboveAverage” for “Value above average”.
Other arguments such as :rank , :percent and :bottom may or may not need to be specified depending on the format type, as shown in the matrix in Fig7. Details are given in the explanation of each format type in <Section.2.2.1> and thereafter. The arg:dxf gives a DifferentialStyle object.
From the next section, we will show you the details of each format type and examples of “upper and lower rules” with sample code.
2.2.1 Conditional Formatting by ”Top/Bottom”
A Rule object with “Top and Bottom Rules” as extraction conditions is defined as shown in the following format diagram.
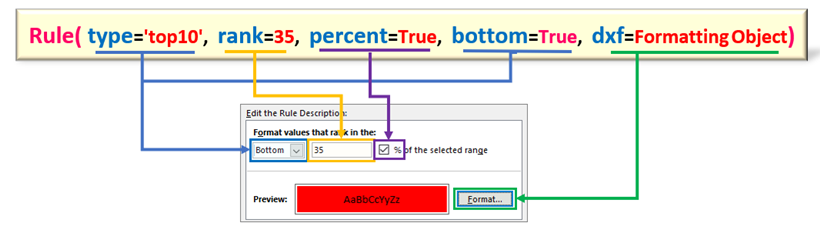
The arg:type should be set to “top10“. The default is 10th, 10% and the criterion is “10“, but you can specify any rank (%) for the arg:rank.
In addition, to switch from “top to bottom” or “rank to %”, set the arg:percent / arg:bottom in the combination as shown in Table 5. Figure 16 shows an example of extracting cells with values up to the bottom 35% of the total.
| arg:percent | arg:bottom | Functions |
|---|---|---|
| False (Default) | True (Default) | Rank from top 〇〇 |
| False (Default) | False | Rank from the bottom 〇〇 |
| True | True (Default) | Percentage from the top 〇〇 |
| True | False | Percentage from the bottom 〇〇 |
【SAMPLE】
Now, let’s check the code for an example of using “upper and lower rules” as extraction conditions. The code is excerpted only as it relates to conditional formatting.
【Example】
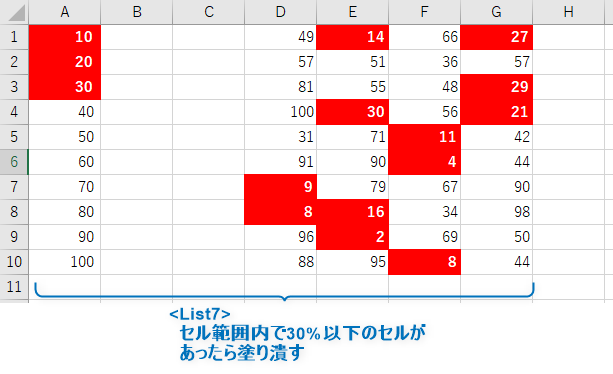
An example of defining the conditional format “If a cell’s value falls within the bottom 30% of the total” would be <List7>.
The arg:bottom is set to “False” because it is lower, and the arg:percent is set to “True” because the unit is %.
from openpyxl.formatting.rule import Rule
from openpyxl.styles.differential import DifferentialStyle

# (omission)

# Define cell format as a DifferentialStyle object
fill_red = PatternFill(start_color='EE1111', end_color='EE1111', fill_type='solid')
font = Font(bold=True, color='FFFFFF')
dxf=DifferentialStyle(font=font ,fill=fill_red)

# Generation of Rule object
# Arg:rank sets the rank, arg:bottom selects the upper or lower rank, and arg:percent selects the rank or %.
rule = Rule(type='top10', rank=30, bottom=True, percent=True, dxf=dxf)

# (omission)
The result of execution is as follows.
2.2.2 Condition of “Above/Below Average”
The Rule object with the extraction condition “Above/Below Average” is defined as shown in the following format diagram.
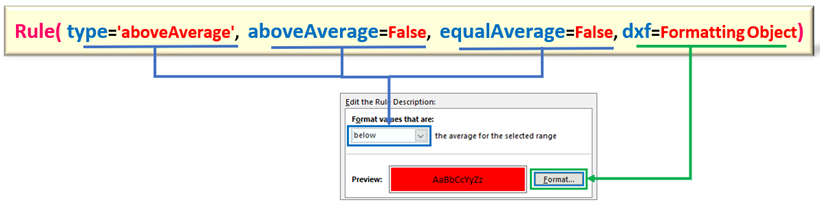
The arg:type should be set to “aboveAverage“. The conditions “above/below” and “greter than(>) / above (≥)” correspond to the combinations of the arg:aboveAverage and arg:equalAverage in Table 6. Fig18 shows an example of highlighting cells with values smaller than the average.
| arg: aboveAverage | arg: equalAverage | Functions |
|---|---|---|
| True (Default) | True | above average |
| True (Default) | False (Default) | greater than average |
| False | True | below average |
| False | False (Default) | less than average |
Now, let’s check the sample code using “Above/Below Average” as the conditional format. The code is excerpted only as it relates to conditional formatting.
【Example】
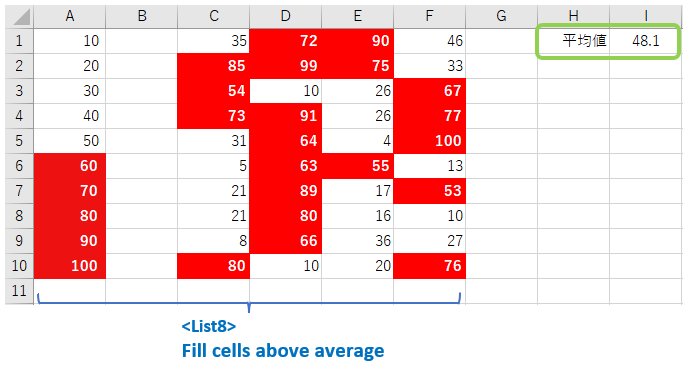
To define the conditional format “Fill with red if the value of the cell is greater than the average“. Since it is “greater than”, the arg:aboveAverage/arg:equalAverage is set to the default value (None).
from openpyxl.formatting.rule import Rule
from openpyxl.styles.differential import DifferentialStyle

# (omission)

# Define cell formatting as a DifferentialStyle object
fill_red = PatternFill(start_color='EE1111', end_color='EE1111', fill_type='solid')
font = Font(bold=True, color='FFFFFF')
dxf=DifferentialStyle(font=font ,fill=fill_red)

# Generating Rule Objects
# Arg:aboveAverage to set above or below average, arg:equalAverage to specify with or without equal sign
rule = Rule(type='aboveAverage', aboveAverage=None, equalAverage=None , dxf=dxf)

# (omission)
The execution result of is as follows.
Cells above the mean (48.1) were highlighted.
3. Condition Definition by CellIsRule Class(Pattern3)

In addition to using the Rule class to define the “conditional formatting by cell value” described in <Sec 1.2>(Pattern1), there is another method using the CellIsRule class (Pattern 3).
The same thing can be done in either case, but it is no longer necessary to prepare a DifferentialStyle object (a collection of cell formatting information), which was specified in the “Rule class”.
Instead, set the cell format object directly to the font / border / fill arguments.
In other words, it has the advantage of omitting the DifferentialStyle class declaration and procedures. but the choice is up to the programmer’s preference.
The format of the CellIsRule class is as follows, and a Rule object can be obtained as the return value.
from openpyxl.formatting.rule import CellIsRule
CellIsRule(operator, formula, stopIfTrue, font, border, fill)
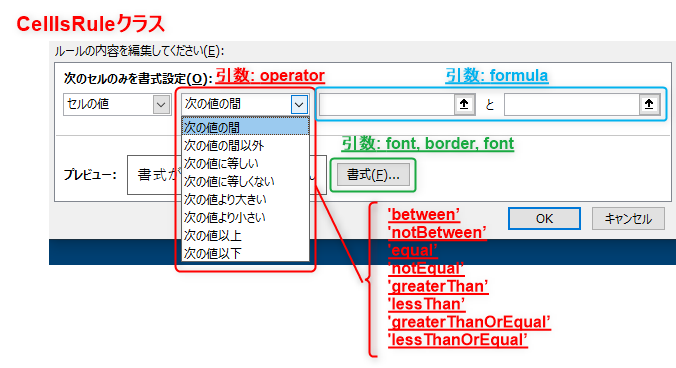
arg: operator : The Inequality is specified from the following optionals.
(‘lessThan’, ‘lessThanOrEqual’, ‘greaterThan’, ‘greaterThanOrEqual’, ‘notBetween’, ‘notEqual’, ‘between’, ‘equal’)
arg: formula : Specify the reference address of the value or cell for the Inequality.
Sets a list whose elements are strings of values or cell addresses (the number of elements that can be specified depends on the Inequality)
arg: stopIfTrue : Specifies whether processing continues when the condition is satisfied
(False: None(No stop) / True(stop))
arg: font : Font format to be applied to the cell when the condition is satisfied.
(Set the Font Object )
arg: border : Ruled format to be applied to a cell when a condition is satisfied.
(Set the Border Object )
arg: fill : Fill format to be applied to a cell when a condition is satisfied
(Set the Fill Object )
return:Rule Object
The relationship between the Excel settings window and each argument is shown in Fig 20. The inequality formula that serves as the extraction condition is composed of the arg:operator and the arg:formula. The Inequality is selected from the optional constants in <Sec 2.2> Table1.
【SAMPLE】
Here is an example of conditional formatting by the CellIsRule class.
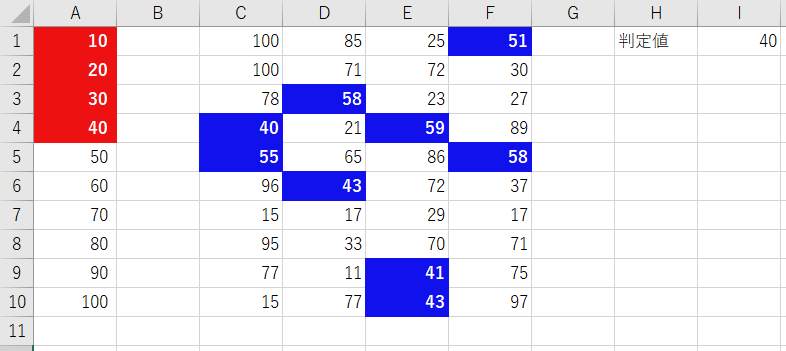
The outline of the code is to define a conditional format for “extracting cells with a value less than or equal to the “I1”” and “extracting cells with a value between 40 and 60” in the CellIsRule class.
Files (.xlsx) read by this program can be downloaded from
from openpyxl import load_workbook
from openpyxl.styles import PatternFill, Font

# Import of required classes
from openpyxl.formatting.rule import CellIsRule

wb = load_workbook('Conditional_Formatting_num.xlsx')
ws = wb.active


# [A]-----------------------------------------------------------------------------------
# Generate Fill object

# Fill in red
fill_red = PatternFill(start_color='EE1111', end_color='EE1111', fill_type='solid')
# Fill in blue
fill_blue =  PatternFill(start_color='1111EE', end_color='1111EE', fill_type='solid')

# Generate Font object (bold/white)
font = Font(bold=True, color='FFFFFF')

# [B]-----------------------------------------------------------------------------------
# Generate CellIsRule object

# Fill cells with red and make text color white
rule1 = CellIsRule(operator='lessThanOrEqual', formula=['$I$1'], stopIfTrue=None, fill=fill_red, font=font)

# Fill cells with blue and make text color white
rule2 = CellIsRule(operator='between', formula=['40', '60'], stopIfTrue=None, fill=fill_blue, font=font)


# [C]-----------------------------------------------------------------------------------
# Apply conditional formatting rules to  range of cells

# A1:A10の範囲にrule1を適用
ws.conditional_formatting.add('A1:A10', rule1)
# C1:F10の範囲にrule2を適用
ws.conditional_formatting.add('C1:F10', rule2)


wb.save('CF_CellIsRule_apply.xlsx')
Let me explain the key points.
Defines the cell format objects to be applied when the extraction condition is matched.
Here, the patternFill class defines the fill effect and the Font class defines the object that sets the font.
Define two extraction conditions by “cell value” in the CellIsRule class. Each of them is constructed as an Inequality expression with arg:operator and arg:formula, respectively.
The arg:fill and arg:font set the previous format object.
Apply the previous Rule object to the cell range using the conditional_formatting.add() method of the Worksheet object.
The result of running <List9> is as follows. Matching cells are highlighted.
4. Smmary

How was it?
We have described how to use the external library “openpyxl” to manipulate Excel and set conditional formatting on cells.
Excel has many functions related to data analysis and statistics. Conditional Formatting of Cells” introduced in this article is one of them. Other useful functions such as “sorting” and “filtering” can be operated from openpyxl.
Both Python and Excel excel at data analysis, making them a perfect match.
Instead of using Python for all data processing, we can integrate it well with Excel and say, “This process and this function is done in Excel! Data visualization is in Excel!” It may be a good idea to be able to use them in different ways.
I hope this “openpyxl” will be the bridge between the two.
Let me summarize the main points of this article.
➀. Conditional formats provided by Excel are classified into two types: ”Standard/Custom” and ”Built-in”. The former is further divided functionally into “cell highlighting rules” and “Top/Bottom Rules“.
➁. Extraction conditions are defined as Rule objects. Rule objects are obtained from the Rule class, but the argument specification must be appropriately selected according to the condition type. Condition types include the following.
Cell highlighting rules: 「cell value」「specific string」「date」「duplicate」
Top/Bottom Rules: 「Top/ Bottom」「above average」「below average」
➂. The condition format (Rule object) by “cell value” can be obtained from the CellisRule class in addition to the Rule class.
Now, in the next issue, we will cover how to insert a graph into a worksheet.
Graphs are Excel’s best feature for “visualizing” data. Of course, openpyxl provides various modules and classes related to graphs, and we will carefully explain them from the basics.
Stay tuned for the next post! The link will be here.↓

Thank you for reading to the end.