This article describes the “python-docx” library, which manipulates MS-Office Word with Python.
So far, we have covered how to use python-docx to “Create Text” “Insert Image and Table” and “Manage page by section”.
Links to related articles can be found here.
In this third article in the series, we will explain how to “Apply style to document” and “Register user-defined style“.
The advantages of using the style include
- Able to create a consistent look and feel throughout the document
- Multiple sentences with the same style applied can be reflected at once.
- Confusing format setting can be registered once as the Style and reused in subsequent document (Less code and simpler)
… and others.
In the Word UI Menu, the following items allow you to set the “Style”.
The “python-docx” library provides functions related to these operations.

In the previous sections, we have used the arg:style and sytle property (attribute) to set the default style (built-in style) for each object (Paragraph, Ran, Table) that manages text and table.
The python-docx libraries provide the Style object that manages styles. In addition to applying the predefined styles in Word, users can also customize their own formatting and register it as ”style”.
This article will explain in more depth how to make use of this Style.
To summarize the main points, this article discusses the following
The usage of various classes and functions introduced in this article is only an example. Optional arguments are omitted, so please refer to the official documentation above for details and clarifications as necessary.
<Official Site>https://python-docx.readthedocs.io/en/latest/
In the next section, we will explain in detail how to handle the Style object.
1. Overview of Style (Style Object)

Operations such as “Apply” or “Define” the Style are managed by the Style object.
In this section, we will first discuss the Style object type and its hierarchical structure, and then review how to apply Style.
1.1 Type of Style Object and Structure
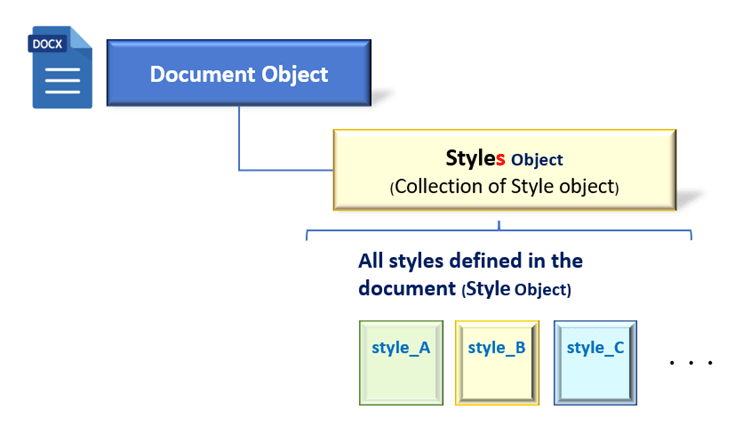
All style format defined in the document are located in the Styles Object (suffixed with s) under the Document Object.
The Styles Object is iterable object (collection) whose elements are Style objects. (see Fig2)
Document Object.styles property
return: Styles Object
(The collection (iterable object) whose elements are Style objects)
The layers and elements of Word document, such as paragraph, word(character) and table, have their own styles and are clearly distinguished from each other.
The paragraph layer is the _ParagraphStyle object, the word (character) layer is the _CharacterStyle object and the table element is the _TableStyle object, each of which is separate objects.
All of these objects inherit from the BaseStyle object, but there is little need to be aware of this. (Fig3)
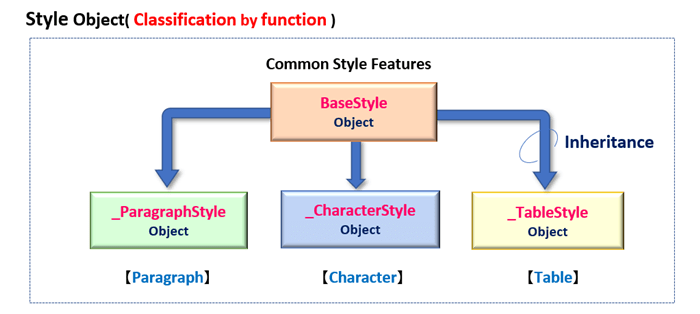
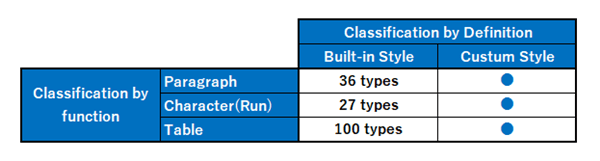
These are the style classifications by function.
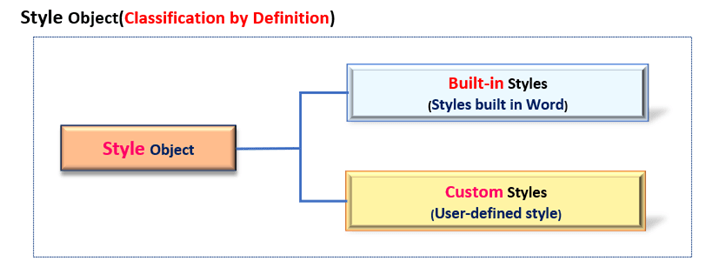
In addition, Style objects can be broadly classified into two types: those that are pre-installed in Word and can be used immediately and those that are defined (custom) by the user.
The official website distinguishes between “Built-in styles” and “Custom styles” respectively, so this article is written accordingly.
Users can define their own styles (Custom styles) for paragraph, word(character), table. (Fig5)
「Built-in styles」 will be explained in detail in Section 2, and 「Custom styles」 will be explained in detail in Section 3.
1.2 Apply Style(Style Object)
Now that you understand the advantages and overview of styles, we will explain the procedure for actually applying styles. There are two ways to apply Style (Style Object).
- When adding paragraph, specify it as the “argument: style” of the method.
- Set by the “style property” of paragraph Object
【1. Specify “Argument:style” of the method】
The add_paragraph() and add_table() methods, which add objects such as paragraph, character and tables have an optional argument:style.
By specifying a style name (string) in the argument style, such as “‘Meiryo UI‘”, the style will be applied when the object is added.
<Paragraph>
Document Object.add_paragraph(text, style)
arg: text: Set the text of paragraph
arg: style: Specify paragraph style (※ Both optional arguments)
<Charactor(Run)>
Paragraph Object.add_run (text, style)
arg: text: Set character
arg: style: Specify charactor style (※ Both optional)
<Table>
Document Object.add_table(rows, cols, style)
arg:rows: Specify the number of rows
arg:cols: Specify the number of columns
arg:style: Specify the style to be applied (※ Both optional)
In both cases, the argument style is optional, and if omitted, the Default style is applied.
【2. Set by style property of target Object】
You can also set it using the style property provided by the target object for paragraph, character and table. You can also get the name of the style currently being applied.
The format for setting the attribute is as follows, specifying either style name (string) such as “‘Meiryo UI'” or the Style object such as Styles collection[‘Meiryo UI’].
| 【Target Object】 | 【Property】 | 【Set/Get】 |
|---|---|---|
| Paragraph Object | style property | Get and set paragraph style Set by Style Name(string), Style Object |
| Run Object | style property | Get and set character style Set by Style Name(string), Style Object |
| Table Object | style property | Get and set table style Set by Style Name(string), Style Object |
【SAMPLE (1)】
Let’s see an example of applying the style with sample code.
While adding paragraph and character (Run), you can see examples of applying style by specifying method argument or property. <List1>
※Note that notations such as [A1][A2]…[B3] in the code comments correspond to the results of the subsequent execution.
from docx import Document

doc = Document() # Get the Document Object


# (A)--------------------------------------------------------------------------------
# Apply style by argument style


# Paragraph: specified by style name(Title)・・・[A1]
pg1 = doc.add_paragraph('Set StyleName by method arg:style', style='Title')
print(pg1.style.name) # >>Title

# Character: specified by style name (Subtitle Char)・・・[A2]
run1 = pg1.add_run('Set StyleName by add_run() argu:style', style='Subtitle Char')
print(run1.style.name) # >>Subtitle Char

#-----------------------------

# Paragraph: Specify by Style object・・・[A3]
pg2 = doc.add_paragraph('add_paragraph() Set the Object to arg:style.', style=doc.styles['Intense Quote'])
print(pg2.style.name) # >>Intense Quote


# (B)--------------------------------------------------------------------------------
# Set and get style by property

# Paragraph: Check default style・・・[B1]
pg3 = doc.add_paragraph('Paragraph: Setting Style by Property')
print(pg3.style.name) # >>Normal

# Paragraph: Set and get by style name(Caption)
pg3.style = 'Caption'
print(pg3.style.name) # >>Caption

#-----------------------------

# Character: Check default style・・・[B2]
run3 = pg3.add_run('Character: Setting Style by Property')
print(run3.style.name) # >>Default Paragraph Font

# Character: Set and get by style name(string)
run3.style = 'Intense Emphasis'
print(run3.style.name) # >>Intense Emphasis

#-----------------------------

# Paragraph: Set by Style object・・・[B3]
pg4 = doc.add_paragraph('Paragraph: setting style by property (object)')
pg4.style = doc.styles['Body Text']
print(pg4.style.name) # >>Body Text


doc.save('Apply_Style_List1.docx')
Now, let me explain some key points.
Paragraph is added with the add_paragraph() method, and at the same time, the style name is specified in the arg:style as string, such as ‘Title’. …[A1]
In addition, character is added to the paragraph using the add_run() method. Style is applied by specifying ‘Subtitle Char’ (subtitle character) in the arg:style. …[A2]
Add second paragraph. This time, The Style object is set to the arg:style to apply the style.…[A3]
The style name is checked in the name attribute at each step, and it can be confirmed that the style name is reflected as set. ※The main methods and properties under the Style object are explained in detail in Section3.
Add paragraphs and text. Now we set the style via the style property of each object. …[B1]~[B3]
As with the previous argument specification, specify default string, such as ‘Caption’, ‘Intenses Emphasis’. Also, as in line 50, what can be set with the Style object is the same as specifying arguments.
The result of the <List1> run is as follows (Fig.6)
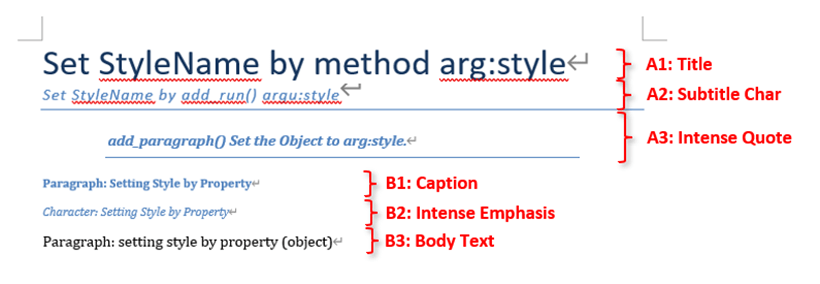
The style format is applied as specified.
Notations such as [A1][A2]…[B3] correspond to comments in the code.
A1: Title, A2: Subtitle Char, A3: Intense Wuote
B1: Normal → Caption, B2:Default Paragraph Font → Insense Emphasis/
B3: Body Text
This has been an overview of styles and how to apply them. Several examples of “built-in styles” have appeared so far, and the next section presents all of the built-in styles in Word.
2. Design Recipes for “Built-in Style”

This section introduces all of the Built-in Styles designs.
Please use it as a design recipe!
Word comes with about 200 pre-built styles that can be used as templates.
As in the previous section, you can apply a style by simply specifying a “style name” to method or property, because this predefined style is built into Word.
All style names are defined in the “WordprocessingML file” in a globally standardized notation in English. The python-docx library also conforms to this.
Therefore, it cannot be specified with a Japanese style name that appears in a WordUI that supports Japanese.
You can check the correspondence between the global unified notation and Japanese style names by downloading and executing the macro from the following site.
Reference:DocTools Word Macros&Tips
https://www.thedoctools.com/word-macros-tips/word-macros/create-style-name-list/
The author’s operating environment is “Microsoft Office Personal 2016”. Please note that the appearance may differ depending on the environment.
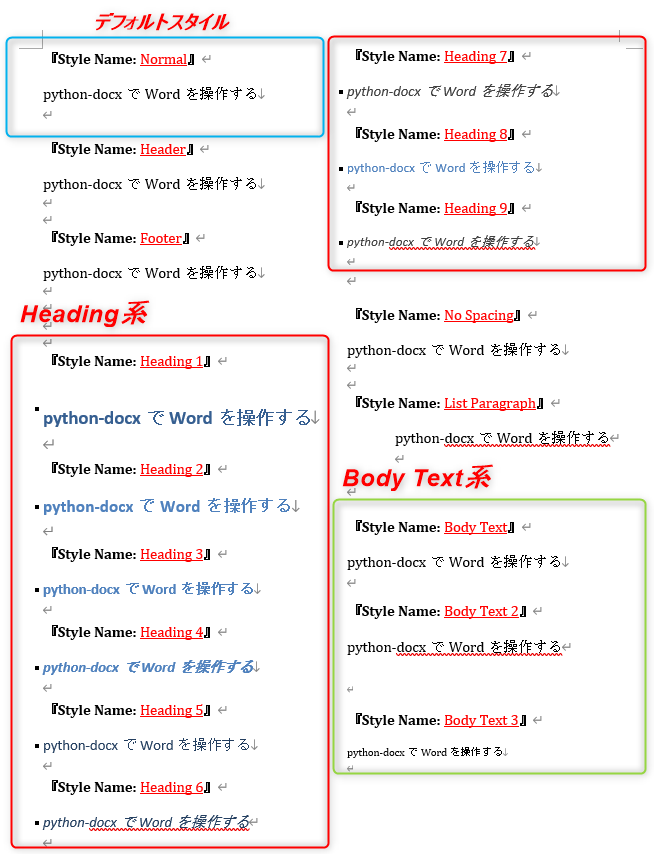
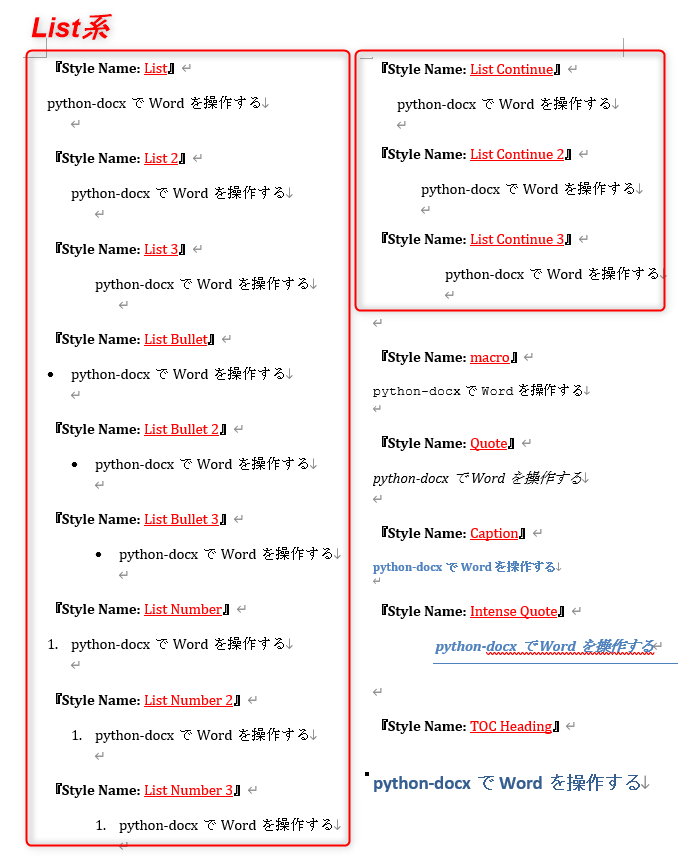
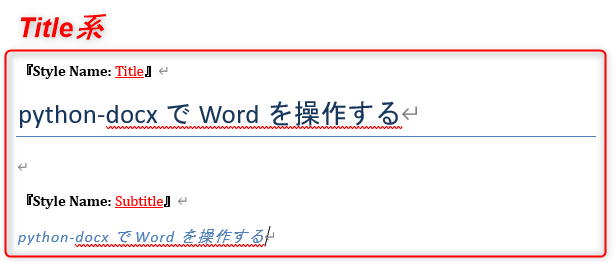
2.1 Paragraph Style (_ParagraphStyle Object)
Shows an example of applying all 36 types of built-in paragraph styles (_ParagraphStyle object ). If the style specification is omitted, the default ‘Normal‘ is applied. In addition, there are several systems of paragraph styles, such as “Heading-based,” “BodyText-based,” and “List-based.
Paragraph styles in default template
https://python-docx.readthedocs.io/en/latest/user/styles-understanding.html#paragraph-styles-in-default-template
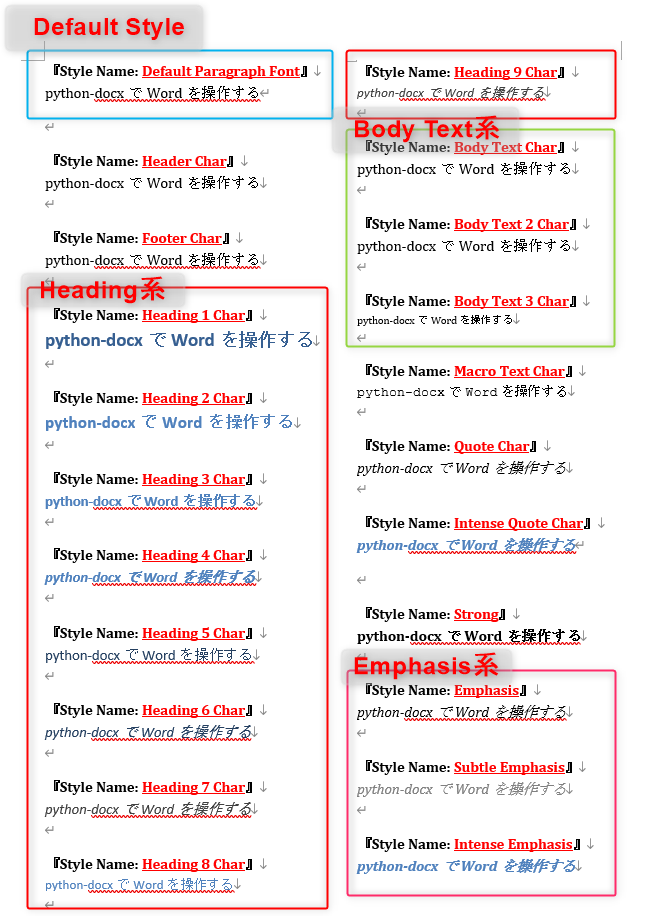
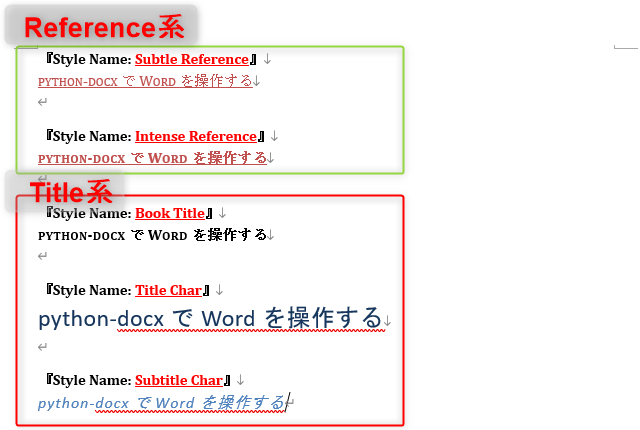
2.2 Character Style(_CharacterStyle Object)
The built-in style of character(_CharacterStyle object) shows an example of applying all 27 types. If the style specification is omitted, the default ‘DefaultParagraphFont‘ is applied.
In addition, there are several systems of character styles, such as “Heading”, “BodyText” and “Emphasis”.
Character styles in default template
https://python-docx.readthedocs.io/en/latest/user/styles-understanding.html#character-styles-in-default-template
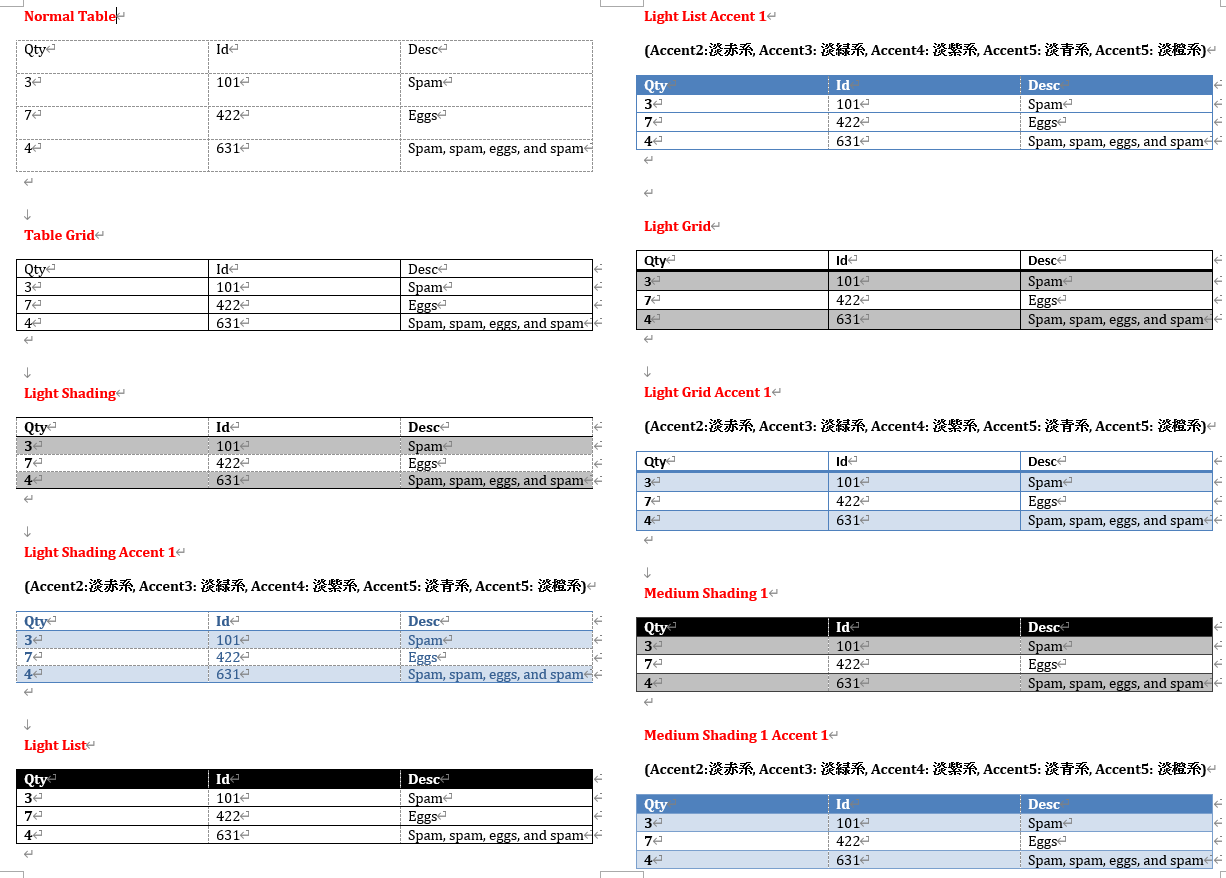
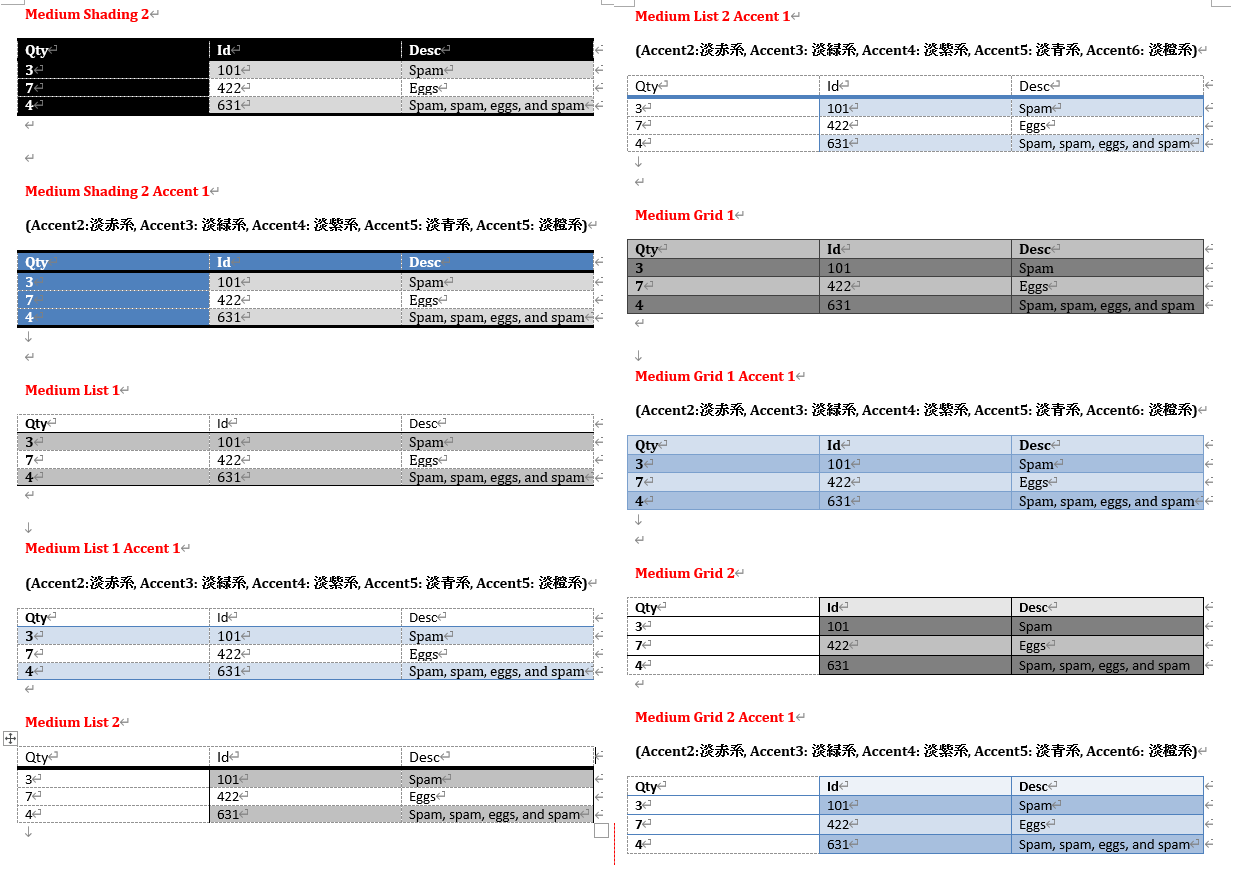
2.3 Table Style(_TableStyle Object)
There are many built-in Table style (_TableStyle object) 100 types in all. In the following, those of the same type with different color designations are omitted.
If the style specification is omitted, the default ‘Normal Table‘ is applied.
Table styles in default template
https://python-docx.readthedocs.io/en/latest/user/styles-understanding.html#table-Paragraph styles in default template

This is an introduction to Built-in Styles. Styles can be defined by the user as well as using the default templates. The next section describes these user-defined style (Custom-Style).
3. About User-Defined Style(Custom style)
In addition to choosing from the default Built-in Style, users can define and customize their own style. This section describes user-defined style( Custom style ).
This section also describes how to use the methods and properties necessary for defining and using Style objects.
3.1 Add and Define User-Defined Style
To define additional style, first get the Styles object, which is collection of Style objects, and then execute the add_styles() method under it as follows.
Document Object.styles property
return: Styles Object
(Collection whose elements are Style object / Iterable object)
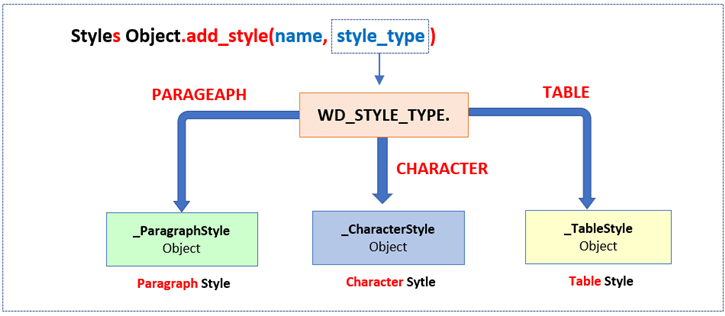
Styles Object.add_style(name, style_type)
arg: name :Name of style to be added
arg: style_type: Select the style type from the Enum of the WD_STYLE_TYPE Class.
(CHARACTER, PARAGRAPH, TABLE)
return: Style Object
As explained in <Sec1.1>, the Style object are managed for each individual element of document (Paragraph, Character, Table).
Therefore, when adding the Style object with the add_style() method, it is necessary to clearly indicate in the arg:style_type which individual element the style corresponds to. Specify the Enum definition for the WD_STYLE_TYPE class. (Fig15)
Now, you have added the Style object, but at this stage it inherits the “Default” style. To customize it, the user should use the method and property (attribute) provided under the Style object.
First, here are the main methods/properties common to paragraph, character, and table Style object.
The base_style attribute can be used to specify template style. For example, specifying ‘Body Text 2’ will inherit the style formatting of ‘Body Text 2’ and override any settings the user wishes to change. If you do not specify otherwise, the Default style will be used as the template.
The font property can also be used to set typeface, bold, italic, underline, etc., in the same way as setting the font for paragraph and character.
Please refer to <Font Object>.
| 【Style Object(Common)】 | 【Functions】 | 【Other/Details】 |
|---|---|---|
| name property | Get style name | |
| type property | Get style type | Enum of WD_STYLE_TYPE Class is returned WPARAGRAPH, CHARACTER, TABLE |
| base_style property | Set the Built-in-Styles to inherit | If omitted, each default style is inherited |
| font property | Get Font object and setting the font | Similar to the Font Object applied to body paragraph or character |
In addition to the above, the style formatting for paragraph (including paragraph in table cells) has the paragraph_format property. As with normal paragraph formatting, you can also set the formatting (alignment, indentation, spacing, etc.) via the ParagraphFormat object.
Please refer to <ParagraphFormat Object>.
In addition, the paragraph style has a useful attribute (next_paragraph_style property) that allows you to predefine the style to be applied to the next paragraph to be added after the current paragraph.
It is useful if you have a fixed rule, such as putting in a heading (‘Heading 1‘), followed by the body text (‘Body Text‘), and so on.
| Style Object(Paragraph only) | Functions |
|---|---|
| paragraph_format property | Get the Paragraph_Format object and formats it. It is the same as the Paragraph_Format object for body paragraphs. ※Valid only for _ParagraphStyle, _TableStyle |
| next_paragraph_style property | Sets the style to be applied when a paragraph is added. If not specified, the current style is applied ※Valid only for _ParagraphStyle, _TableStyle |
【SAMPLE (2)】
Here, let’s check the user-defined style with sample code.
A paragraph is added, and customized fonts and paragraph formatting are applied.
from docx import Document
from docx.enum.style import WD_STYLE_TYPE
from docx.shared import Pt, Inches, RGBColor
from docx.enum.text import WD_ALIGN_PARAGRAPH


doc = Document()

styles = doc.styles # Get the Styles object (container)

# Add new Style object with the add_style()
style = styles.add_style('Original-Style', WD_STYLE_TYPE.PARAGRAPH)


# Check the existing style inherited by base_style property
# None" is displayed when newly added (i.e. Default style is applied)
print(style.base_style) # >>None

# Inherit existing styles with base_style property
style.base_style = styles['Title']
print(style.base_style) # >>_ParagraphStyle('Title') id: 2408904452360


#---------------------------------------------------------------------------------
# Font Definition

# Get Font object for font formatting
font = style.font

# Get and set font typeface with name property
print(font.name) # >>None
font.name = 'Meiryo UI'
print(font.name) # >>Meiryo UI

# Get and set character size with size property
print(font.size) # >>None
font.size = Pt(20)
print(font.size.pt) # >>10.0

# Get and set font color with the color property
print(font.color.rgb) # >>None
font.color.rgb = RGBColor(255,0,0)
print(font.color.rgb) # >>FF0000

#---------------------------------------------------------------------------------
# Define the format of paragraph

# Get the Paragraph_Formatting object to set paragraph formatting
paragraph_format = style.paragraph_format

# Get and set paragraph alignment with alignment property
print(paragraph_format.alignment) # >>None
paragraph_format.alignment = WD_ALIGN_PARAGRAPH.LEFT
print(paragraph_format.alignment) # >>LEFT(1)

# Get and set the left indent of paragraph
print(paragraph_format.left_indent) # >>None
paragraph_format.left_indent = Inches(0.50)
print(paragraph_format.left_indent.inches) # >>0.5

#---------------------------------------------------------------------------------

# Apply the newly added style to paragraph
doc.add_paragraph('Define and apply Custom-Style', style = style)

#print(len(styles)) # >>165
#style.delete()
#print(len(styles)) # >>164

#doc.add_paragraph('Define and apply Custom-Style', style = style)


doc.save('CustomStyle_List2.docx')


print(len(styles)) # >>165
# Delete additional style
style.delete()
print(len(styles)) # >>164

# AttributeError' occurs because I tried to apply a style that has been deleted
#doc.add_paragraph('Define and apply Custom-Style', style = style) # 'NoneType' object has no attribute 'type'
Now, let me explain the key points.
Add new style with the add_style() method. The style name and type are specified as arguments. In this case, the style for paragraphs is defined and added as ‘original-style‘.
You can check the style template (inherited style) with the base_style property. In the newly added style, the initial value is shown as ‘None’, as in line 17. This is the state that inherits the ‘Default’ style of the paragraph.
If you want to change the template, set the existing Style object, as in line 20. In this, we use ‘Title’ as a base and customize the format thereafter.
The Font object is obtained with the font property at line 28 and stored in the variable font. The style can be set using the name attribute, the font size using the size attribute, and the font color using the color attribute. (‘Meiryo UI’, 20pt, red)
Get the ParagraphFormat object with the paragraph_format property at line 49 and store it in the variable :paragraph_format.
Alignment can be set with the alignment attribute and indentation (left) can be set with the left_indent attribute. (Left-aligned, indented left 0.5 Inchi)
Finally, after checking all existing style counts (165), delete the added style with the “delete()” method. We confirm that the number of styles has been decreased by one to (164).
Note that deleting an applied style will return it to the “Default” style.
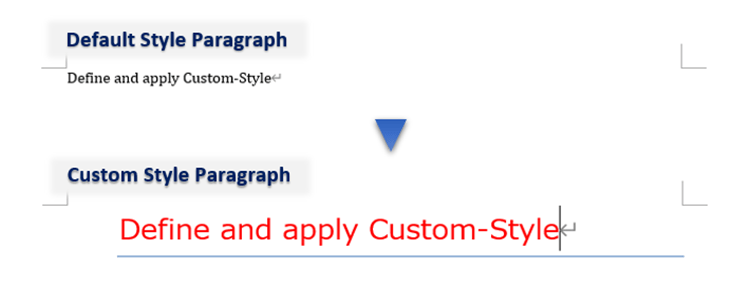
The results of the run are as follows (Fig16)
Font and paragraph formatting can be customized based on the template (‘Title’).
The above explains how to add and create user-defined Style(Custom Style). The next section describes how to display styles in the Word UI Menu and register them in the Recommended List and Gallery.
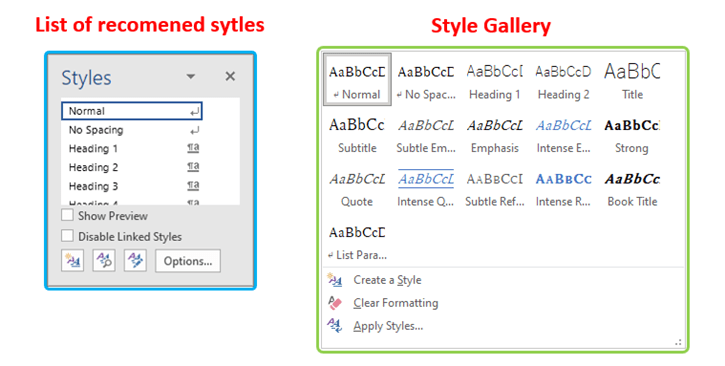
3.2 Display in Word’s Menu
User-defined styles can be displayed in Word’s menu list and gallery. This makes customized styles available not only from the code, but also directly from Word’s UI (user interface).
You can view the style gallery and the list of recommended styles (Fig17).
There are five properties related to display settings.
| 【Style Object】 | 【Functions】 |
|---|---|
| hidden property | Whether to display in the list or not (True:Hide/False:Show) ※Applying the style itself is possible |
| quick_style property | Whether to display in the list or not (True:Hide/False:Show) The hidden property is assumed to be False |
| locked property | Hide and disable (True: protect / False: disable) ※Assuming Word format protection setting is enabled |
| unhide_when_used property | Ensure that the style is displayed at the time it is applied (True:valid/False:Invalid) |
| priority property | Specifies the display order of the style list. Default is highest priority. If there is more than one same rank, it will be sorted by name |
For example, to display the “Style List” and “Recommended List”, the hidden property must be set to “Flase” and the quick_style property must be set to “True“.
Also, if the locked property is set to “True“, it cannot be applied, let alone displayed.
The other attribute combinations are shown in Fig18.

【SAMPLE (3)】
Let’s check it out here with sample code that displays user-defined style in list or recommended list.
from docx import Document
from docx.enum.style import WD_STYLE_TYPE

doc=Document()
# Get the Styles object
styles = doc.styles

# Add style ('Original-A')
style_A = styles.add_style('Original-A', WD_STYLE_TYPE.PARAGRAPH)

# Add style ('Original-B')
style_B = styles.add_style('Original-B', WD_STYLE_TYPE.PARAGRAPH)

#------------------------------------------------------------
# Check the default attribute values

print(style_A.hidden)      # >>False
print(style_A.locked)      # >>False
print(style_A.quick_style) # >>False
print(style_A.priority)    # >>None

#------------------------------------------------------------
# Set the style ('Original-A') attribute
# Displayed in Word UI "Style List" and "Recommended List"
# Highest display priority

style_A.hidden = False
style_A.quick_style = True
style_A.priority = 0

#------------------------------------------------------------
# Set the style ('Original-B') attribute
# Show only in "Word UI Recommended List"
# Display priority is third.

style_B.hidden = False
style_B.quick_style = False
style_B.priority = 2

doc.save('WordUI_CustumStyle_List3.docx')
Now, let me explain the key points.
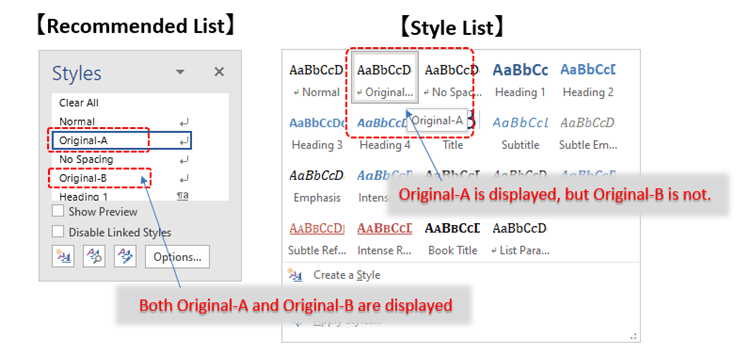
In lines 9 and 12, add two new paragraphs style (“original-A”, “original-B”).
Checks the initial (Default) attribute value of the added style.
The hidden/quick_style property is set to “False” so that only the recommended listings are displayed.
The quick_style property of style (“original-A”) is set to “True” to allow the style to be displayed in the “Style List” and “Recommended List”. In addition, the priority property is set to “0” which means maximum priority, to display it at the top position.
Set the quick_style property of style(“original-B”) to “False” to display only in the recommended list. The display priority is set to “2” so that it is the third on the list.
The execution result of is as follows. (Fig19)
In the style list on the right, only the style (“original-A”) is shown, and the two styles could be shown together in the recommended list on the left. The priority is also as specified.
The above is an explanation of how to reflect user-defined style in the Word UI. Finally, let us summarize the contents of this article.
4. Summary

How was it ?
In this article, we have explained the procedure for applying “Style” with the “python-docx” library and “User-defined Style(Custom Style)”.
The appearance of the document is important. Any good content may not reach readers if it is uneven. Let’s make good use of styles to create a unified look. We hope this article will be of some help to you.
Finally, let me summarize some key points.
- Style(Style objects) can be set for paragraph, character and table. There are two types of styles: one is pre-built into the library (Built-in-Style) and the other is user-defined (Custum-Style).
- There are 36 built-in styles for paragraph, 27 types for text and 100 types for table.
- User-defined style can be customized to your favorite formatting while using the built-in-Style as a template. Also, the registration to Word and the display to UI can be specified on the code.
This is the last article in this series, but we hope to introduce more applications using python-doc when we have a chance. Please look forward to it.
In addition to Word, libraries for operating “Excel” and “PowerPoint” are also explained in the series of articles. Let’s combine the three major Office software with Python to improve your work efficiency!
〇 Learn more about the Excel series here.

〇 Learn more about the PowerPoint series here.

Thank you for reading to the end.