<Concept of our website “More Freedom with Python”>
This site aims to automate troublesome daily tasks and improve efficiency using Python, currently the most popular programming language. The goal is to introduce a variety of useful libraries (modules) in each issue.
Why? Why Python…
・Python provides a variety of libraries (modules) that allow us to manipulate and automate familiar applications.
・It is a well-balanced scripting language that is easy for beginners to understand, yet has a full-fledged object-oriented aspect.
What? Automate…
When we think of the most familiar applications used in the business scene, the first ones that come to mind are probably MS-Office’s 「Excel」, 「Word」, and 「PowerPoint」.

Because they are “standard indispensable tools” that are used daily, the impact of automating and improving the efficiency of these related tasks can be extremely large.
Therefore, in this series of articles, we would like to introduce a method and library for operating the spreadsheet software Excel, which is considered to be the most frequently used of all Office applications, using Python.
Excel has so many features that it is impossible to cover them all in this article alone. We will provide detailed explanations over a series of articles on the following topics
In this first article of the series, we will cover how to introduce the library, create a new Workbook/Worksheet, and manipulate rows, columns, and cells.
Please stay with us until the end of this article as you will be able to “do and understand” the following
The next section will provide an overview of the library, how to introduce it, and the various objects.
1. 「openpyxl library」 to manipulate Excel

There are several options for libraries to manipulate Excel from Python.
For example, there is “pywin32,” which can operate not only Excel but Office in general, while “openpyxl” is specialized only for Excel operations.Another method is to use some of the methods included in a library called “pandas,” which labels and manages data, or to use the standard library “xlrd”.
As one would expect from a classic MS-Office application, Excel, there are more choices of related libraries than Word, PowerPoint, and other applications.
Among them is “openpyxl,” a classic Python library that specializes in Excel operations and allows the use of Excel-like functions.
Therefore, in this series of articles, we would like to thoroughly explain this “openpyxl library” from the basics to application examples.
1.1 About openpyxl
As mentioned earlier, the library openpyxl makes it possible to program almost all the operations that can be done in the original Excel.
However, classes and functions (methods) are not based on Excel, but are unique to this library. In other words, the VBA reference in the Office Developer Center is not a reference.
(Of course, the basic concept is the same, so it is easy to understand if you have knowledge of VBA.)
This article has been explained in such a way that it can be read without any prerequisite knowledge, but it will be better understood if you also refer to the official documentation as appropriate.
「openpyxl」Official Documents
https://openpyxl.readthedocs.io/en/stable/
The development environment and version information that was confirmed to work in the article are as follows. Please keep this in mind when using libraries from different environments and versions.
・Python 3.7.6(64bit)
・openpyxl 3.0.3
・JupyterNotebook 6.0.3
・lxml4.5.0
・PIL(Python Imaging Library) 7.0.0
・Microsoft Office Personal 2016
1.2 Installation and Operation Check
Next, we will explain how to install and check operation.
This library is not bundled with the Anaconda distribution and must be installed separately using the Python package management tool “pip“.
Enter the following command at the Anaconda prompt.
pip install openpyxlThis single command will automatically install not only openpyxl, but also check dependencies and necessary peripheral libraries.
Openpyxl requires importing various classes depending on the purpose of use, but first let’s import the basic module, openpyxl.
The alias name may be arbitrary, but is declared as px as a convention.
import openpyxl as pxAt this point, run the program and if no error message is displayed, the installation was successful.
2. Basic of “openpyxl” Usage

This section describes the object structure of openpyxl and basic operations such as creating a book and adding a sheet.
Excel has component units such as workbooks, worksheets, rows, columns, and cells. openpyxl similarly provides and manages dedicated objects for each component unit. The layered structure of openpyxl objects is shown below (Fig.3).
Basically, objects are acquired in order from the upper layers, and the related methods and attributes are used to create a workbook (.xlsx file) containing the desired content.
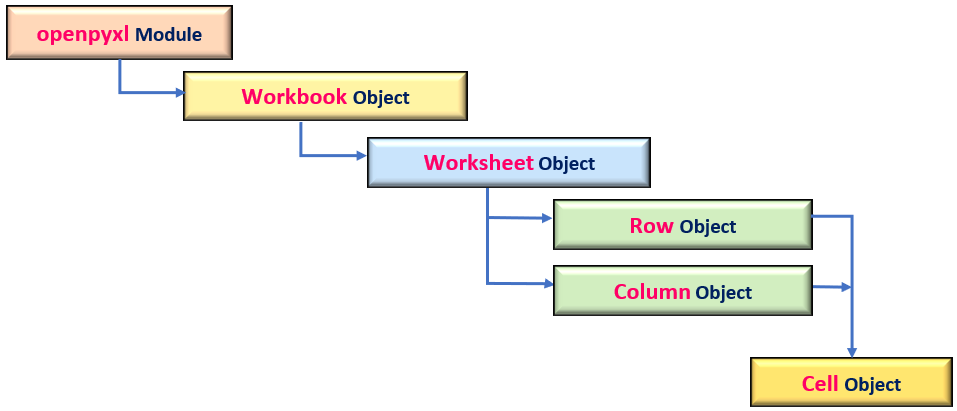
In the following sections, we will explain how to handle Workbook, Worksheet, and Cell objects, starting from the top layer.
2.1 Read and Create new Book (Workbook object)
To manipulate Excel using openpyxl, you must first obtain a Workbook object, which is an Excel file itself, with a number of classes, methods, and attributes under it to create the desired content.
There are two ways to obtain a Workbook object: “reading an existing Excel file (book)” and “creating a new file (.xlsx)“.
First, to load an existing book, create an instance of the load_workbook class in the following format
from openpyxl import load_workbook
load_workbook(filename, read_only, keep_vba, data_only)
arg: filename :Specify the name of the target book with path
arg: read_only :Read in read-only mode Default (False)
arg: keep_vba :Load xlsm file with macros enabled Default (False)
arg: data_only: Specify False if the formula is to be read as a mathematical expression. Default(False)
return: Workbook Object
The arg:filename is required, but the other arguments are optional and default to “False”.
The arg:read_only reads the book as read-only mode. Read-only mode makes the book uneditable, but significantly reduces memory consumption and improves performance.
The arg:keep_vba allows you to enable/disable macros for the book (.xlsm) containing the macro.
Another arg:data_only, should be “false” (default) to read worksheet formulas as formulas.
Normally, it is sufficient to specify only the arg:filename.
The following is an example program that only loads “sample.xlsx” with the load_workbook class.
import openpyxl as px	# oImport openpyxl module as px

wb = px.load_workbook('sample.xlsx') # Read sample.xlsx and get Workbook object and set it as wb
print(type(wb))       # Check the attributes of wb. <class 'openpyxl.workbook.workbook.Workbook'>
wb.close()		        # Closing the Workbook object
The output of the type function of the variable wb in line 4 is , which means that a Workbook object was obtained.The image will look like this.
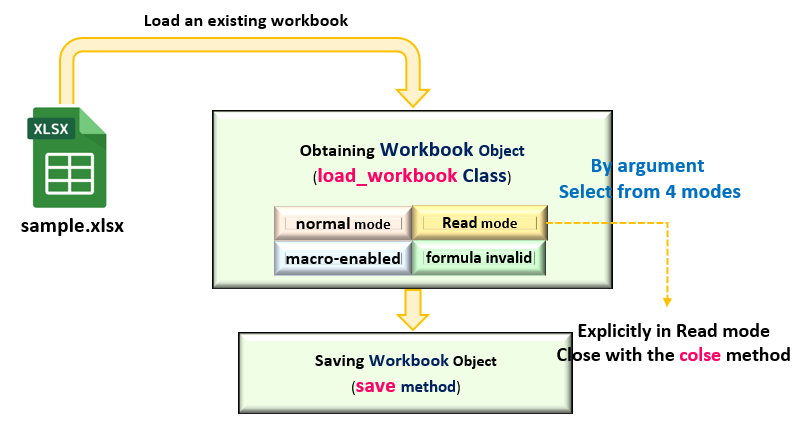
Before exiting the program, the workbook object should be saved (save method) or closed (close method), as described below.
On the other hand, to create a new book, instantiate the Workbook class with the following format
from openpyxl import Workbook
Workbook(write_only)
arg: write_only : If True, set to write-only mode Default (False)
return: Workbook Object
The Workbook class normally creates objects with no arguments, but openpyxl has a write-only mode, which can be enabled by setting the arg:write_only to “True”. Enabled. (Default is False)
Write-only mode also improves performance by reducing memory consumption. However, it is not usually used due to its many limitations.
Here is an image of the Workbook class. An example program is shown with (save method).
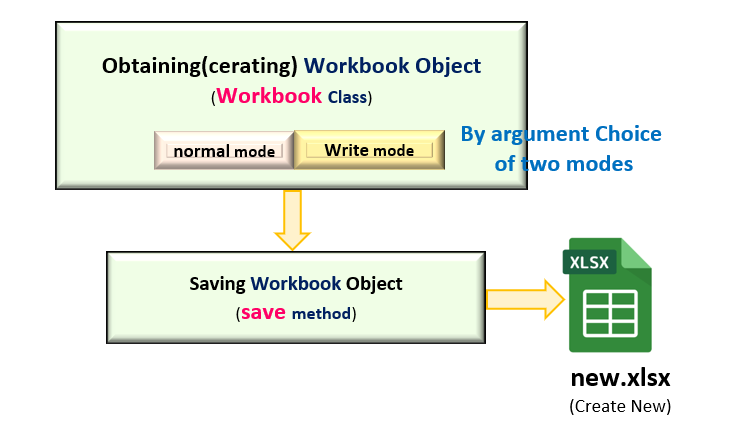
2.2 Save the Workbook
Next, save the created book. The save method is used to save the book. The arg:filename specifies the name of the book to be saved with the extension (.xlsx). If the destination directory is not the current directory, specify the path as well.
Workbook Object.save(filename)
arg: filename: Specify the name of the file to be saved
(Specify with Path if other than current directory)
The following shows an example of loading an existing workbook “sample.xlsx” and saving it as another workbook “sample_copy.xlsx”. A new book is created and saved under a different name without modifying the existing workbook.
Note that if the same name is specified, the file will be overwritten, but no special prior warning message will be displayed.
import openpyxl as px

wb = px.load_workbook('sample.xlsx')    # Load sample.xlsx as a Workbook object

# Name the Workbook object (sample_copy.xlsx) and save it (save it as an alias)
wb.save('sample_copy.xlsx')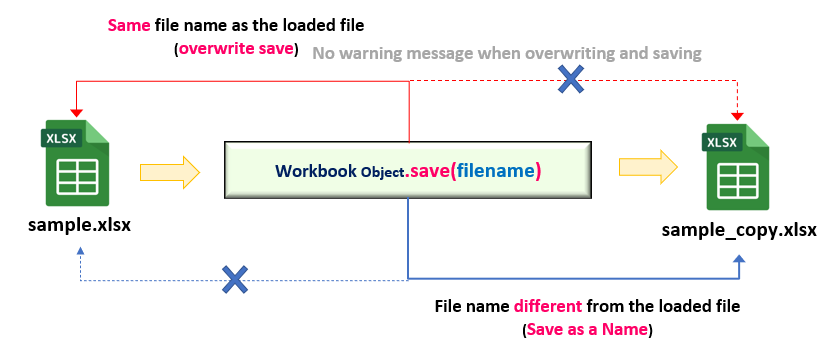
2.3 Worksheet Operations (Worksheet Object)
The next layer after the Workbook object is the Worksheet object.
There are two ways to get a Worksheet object: “to get an object for a sheet that exists in a book” or “to add a new Worksheet object“.
2.3.1 Retrieve worksheet (existing)
To obtain an object of an existing sheet, use the active and worksheets properties under the Workbook object. To obtain a worksheet name (string) instead of an object, use the sheetnames property, etc.
Workbook Object.active property
Get the active (selected) worksheet
return: Worksheet Object
Workbook Object.worksheets property
Retrieve all worksheets (objects) that exist in a book
return: List whose elements are Worksheet objects
Workbook Object.sheetnames property
Get the names of all worksheets present in the book
return: List with worksheet name as an element
The worksheets and sheetnames properties retrieve all sheet information in a book.
Each returns a list whose elements are Worksheet objects and sheet names. Because it is in list format, each element can be iteratively accessed with a For statement, etc., or specified individually by index, as in [index].
Here is an example of the use of these properties. (Fig.7) All “sheet names” and “Worksheet objects” from “sample.xlsx,” which consists of worksheets as shown above, are retrieved in list format.
import openpyxl as px

wb = px.load_workbook('sample.xlsx', data_only=True)    # Load sample.xlsx as a Workbook object
print(wb.sheetnames)    # sGet the name of the worksheet contained in sample.xlsx  >> ['Sheet1', 'Sheet2', 'Sheet3']

ws = wb.active    # Obtain the currently selected worksheet (Worksheet object) of sample.xlsx
print(ws)         # >> <Worksheet "Sheet1">

ws_list = wb.worksheets    # Obtain all worksheets (Worksheet objects) contained in sample.xlsx (in list format)
print(ws_list)             # >> [<Worksheet "Sheet1">, <Worksheet "Sheet2">, <Worksheet "Sheet3">]

wb.close()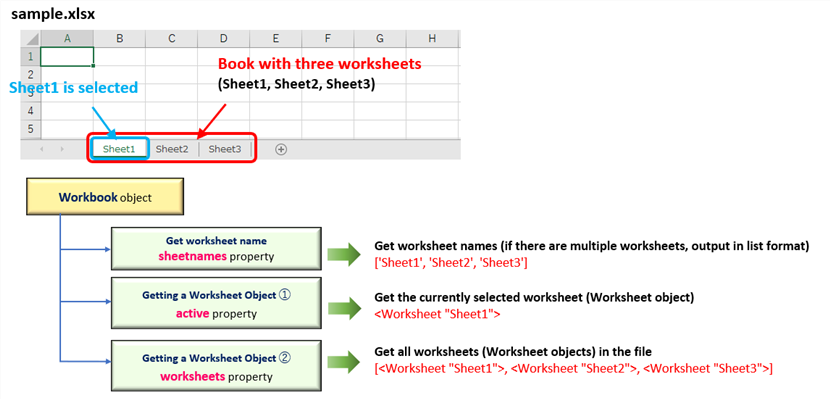
2.3.2 Add Worksheet
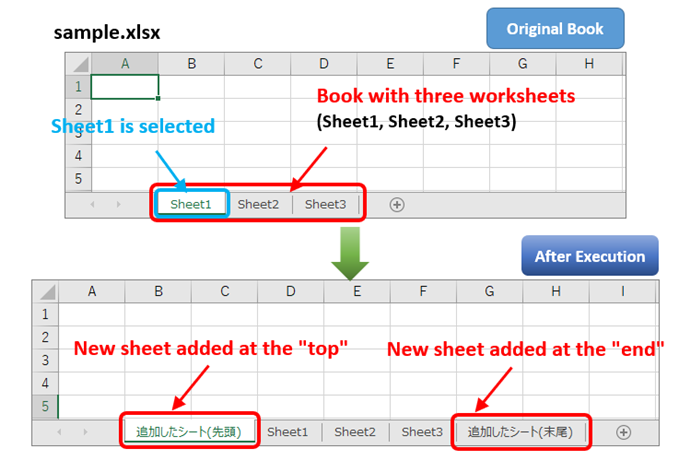
Next, let’s add a new Worksheet object. To add a worksheet, use the create_sheet() method with the following format
Workbook Object.create_sheet(title, index)
arg: title :Set sheet name Default(None) Optional
arg: index :Specifies the sheet insertion position to be added Default(None) Optional
return:List with worksheet name as an element
Check the sample code for an example of the use of the create_sheet() method. One worksheet is added at the beginning and at the end of the loaded workbook (Fig.8 upper).
The key point is the arg:index of the create_sheet() method. To insert at the beginning, specify “0“; to insert at the end, specify “the number of existing worksheets” or “-1“.
Note that the indexes start with 0 as well as the listings.
import openpyxl as px

wb = px.load_workbook('sample.xlsx')     # Load sample.xlsx as a Workbook object

wb.create_sheet('Added sheet (top)', 0) 		           # Add a worksheet at the top with '0' as the second argument

ws_num = len(wb.sheetnames)			                       # Total number of current worksheets
wb.create_sheet('Sheet added (end)', ws_num) 	       # Add a worksheet at the end with the number of existing sheets as the second argument

wb.save('sample.xlsx')
After running , the worksheet configuration looks like this (Fig.8 bottom) One sheet has been added at the beginning and one at the end.
2.3.3 Delete Worksheet
To remove a sheet that is no longer needed, use the remove() method with the following format
Workbook Object.remove(worksheet)
arg: worksheet: Specify the Worksheet object to be deleted
2.3.4 Duplicate(copy) Worksheet
To duplicate a worksheet, use the copy_worksheet() method
Workbook Object.copy_worksheet(from_worksheet)
arg: from_worksheet: Specify the Worksheet object to be copied
return:Duplicated Worksheet Objects
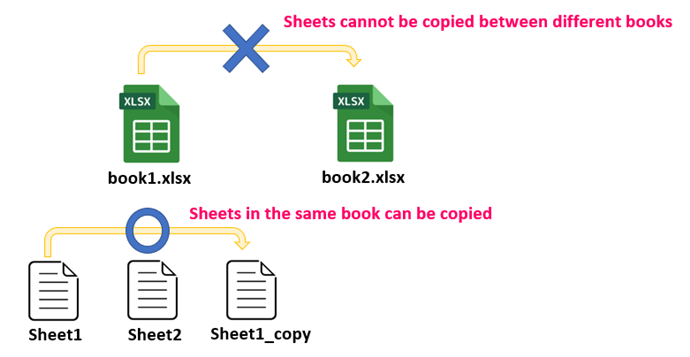
It is important to note that the copy_worksheet() method can duplicate sheets within the same book, but cannot duplicate sheets between different books. (Fig.9)
In addition, duplicates are limited to values, styles, hyperlinks and comments. There is a restriction that images and charts (Chart objects) cannot be duplicated.
Therefore, to duplicate content from another book, it is necessary to repeatedly exchange data (get and set) on a per-cell object basis.
(※It’s a little cumbersome. Expect more updates in the future.)
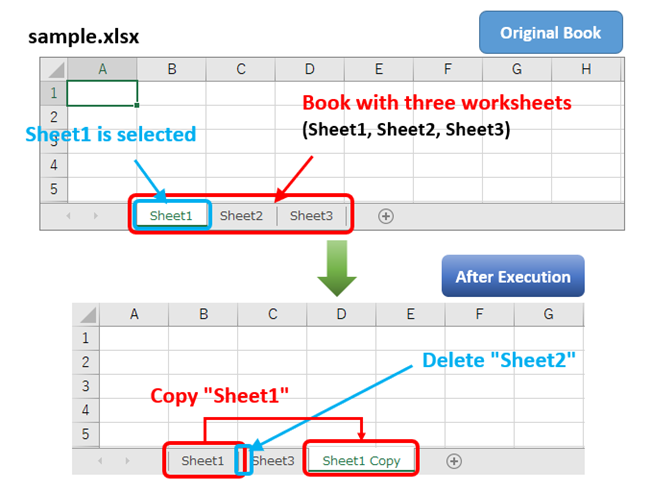
Now let’s check it out with the sample code . Sheet1 is duplicated from Fig.10 (above) and Sheet2 is deleted.
The copy_worksheet() method adds the duplicated sheet to the right edge. The sheet name “original_sheet_name_Copy” is automatically assigned, and the insertion position cannot be specified.
import openpyxl as px

wb = px.load_workbook('sample.xlsx')     # Load sample.xlsx as a Workbook object

wb.copy_worksheet(wb['Sheet1'])                        # Copying worksheets in the same book
wb.remove(wb['Sheet2'])                                # Delete a worksheet

wb.save('sample.xlsx')
After execution, the sheet configuration is shown in Fig.10 below.
3. Get Row/Column/Cell

As in Excel, the units for manipulating data on a worksheet in openpyxl are rows and columns/cells. Each is managed as a Row/Column/Cell object.
When writing code, one must always be aware of its inclusion relationships and layered structure. We will restate the layered structure of the object at the beginning of this section because it is important.
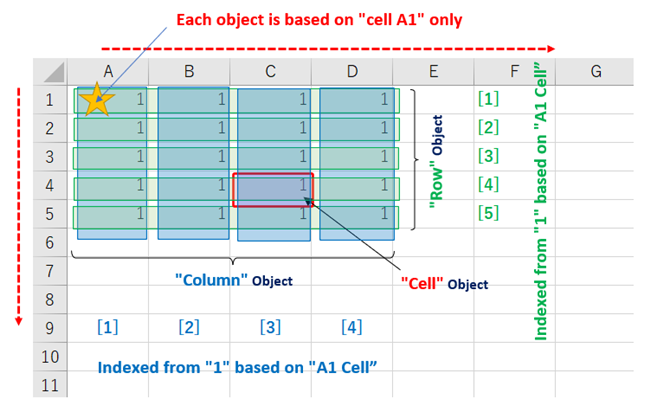
The position of each object is overlaid on the Excel worksheet. (Fig.12)
The reference point for rows, columns, and cells is “A1” cell. Cell “A1” is the first row/column, and each object is accessed as a cell (row/column) address offset from the first row/column. (Note that the index does not start with “0” like normal indexes.)
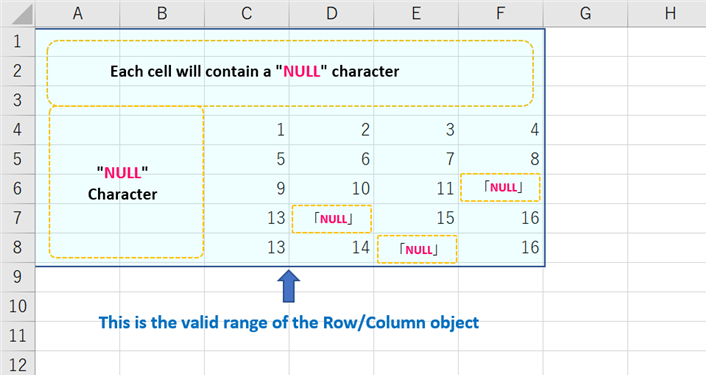
In addition, there are two “conditions under which Cell objects are allocated in memory space” as follows.
- When data is set (or simply accessed) in a specific cell (single or range)
- If a cell (cell range) is sandwiched between a specific cell in 1. and the first row and column A
The two are.
I would like to add a supplementary point regarding 2.
For example, consider the case where a value is set (accessed) in the cell range “C4:F8” as shown in Fig13. At first glance, it looks as if only the “C4:F8” Cell object with the value set exists. (Condition 1)
However, in actual memory space, Cell objects are also automatically generated internally for the empty “blank” cells surrounded by dotted lines in Figure 13. The contents of these cells are “null” and cannot be used for actual processing, but the objects themselves exist.
It is necessary to note that when all Cell objects are acquired with the “cells property / values property” described below, even cells without substance (NULL) are targeted for acquisition.
The next section will explain how to acquire individual objects.
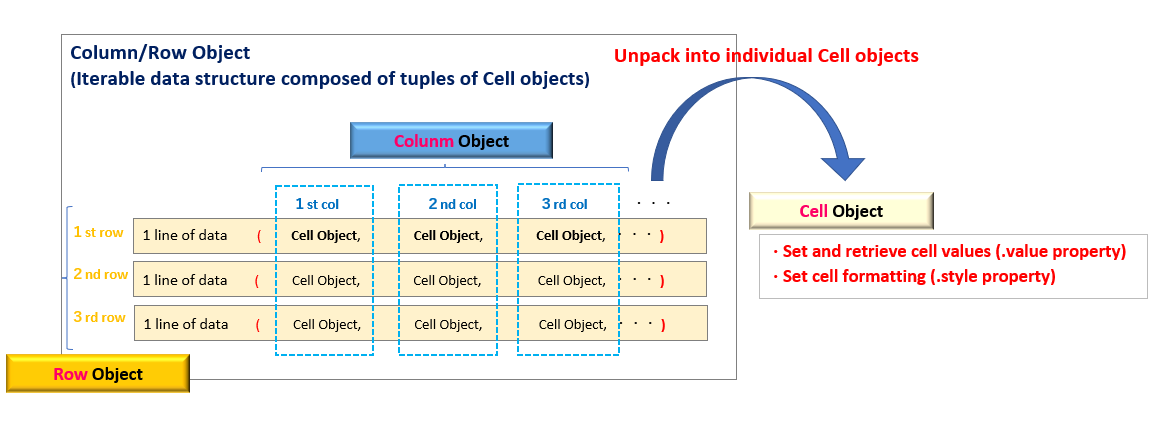
3.1 Obtain Row data (Row object)
Data processing performed on a row-by-row basis must be handled by the Row object.
The entity of a Row object is a tuple whose elements are cells (Cell objects).
There are three ways to retrieve a Row object
All of these are methods and properties under the Worksheet object.
Each of them has a different return value format, and there are cases where the target Row object is specified directly (➀) and cases where the rows property (②) and the iter_row method (➂) are used to collectively retrieve Row objects in the form of generators that take Row objects as elements.
➀. Worksheet Object[row]
arg:row: Specifies the line number of the target line The line number begins with 1 (note that it is not 0)
return: Row Objects
➁. Worksheet Object.rows property
return: Generator that takes all Row objects on the sheet as elements
➂. Worksheet Object.iter_rows(min_row, max_row, min_col, max_col)
arg:min_row: ow to start iteration All the following are optional arguments
arg:max_row: Row to end the iteration
arg:min_col: Column to start iteration
arg:max_col: Column to end iteration
return: Generator that takes all Row objects on the sheet as elements
Also, the rows property can be used to access individual Row objects, as in rows[index].
Note that the index is based on “0” since it is the index of the generator. (Usually, line numbers are specified as integers starting from “1“.)
In addition, there are the following methods and properties under the Worksheet object that are related to the Row object.
| 【Worksheet Object】 | 【Functions】 | 【Other details】 |
|---|---|---|
| min_row property | Get the first line number | Integer with 1 as the base (first line) |
| max_row property | Get last line number | Integer with 1 as the base (first line) |
| insert_rows(idx, amount) | Insert Row Object | arg:idx:Specify the row number where the Row object is to be inserted arg:amount:Specify the number of rows to insert |
| deleate_rows(idx, amount) | Delete a Row object | arg:idx:Specify the row number of the Row object to be deleted arg:amount:Specify the number of rows to delete |
Here is sample code for getting and manipulating Row objects.
(※The “Sample.xlsx” file to be loaded is assumed to have the data in “A1:C2” in advance. In addition, “[A][B]” refers to the comments in the code.)
<About the Code Summary>
The above three methods are used to obtain a Row object.
In [A], the row number of the Worksheet object is specified. In [B][C], the generator is acquired by the rows property and iter_rows() method, and then expanded by the For statement.
At the end [D], the insert_rows() method inserts (adds) two rows of Row objects.
from openpyxl import load_workbook
from openpyxl import Workbook
wb = load_workbook('Sample.xlsx')
ws = wb.active
# [A]----------------------------------------------------------------------------------
# Obtaining a Row object➀ Worksheet Object[row]
print(ws[1])
# >> (<Cell 'Sheet1'.A1>, <Cell 'Sheet1'.B1>, <Cell 'Sheet1'.C1>)
# [B]----------------------------------------------------------------------------------
# Obtaining a Row object➁ Worksheet Object.rowsproperty
print(ws.rows)
# >> <generator object Worksheet._cells_by_row at 0x0000017B7929C7C8>
for row in ws.rows:
print(row)
# >> (<Cell 'Sheet1'.A1>, <Cell 'Sheet1'.B1>, <Cell 'Sheet1'.C1>)
# >> (<Cell 'Sheet1'.A2>, <Cell 'Sheet1'.B2>, <Cell 'Sheet1'.C2>)
# [C]----------------------------------------------------------------------------------
# Obtaining a Row object➂ Worksheet Object.iter_rows method
# Row object after the second row and after the second column
for row in ws.iter_rows(min_row=2, min_col=2):
print(row)
# >> (<Cell 'Sheet1'.B2>, <Cell 'Sheet1'.C2>)
# [D]----------------------------------------------------------------------------------
# Other Row object-related methods and properties
print(ws.min_row) # >> 1 First line number
print(ws.max_row) # >> 2 Last line number
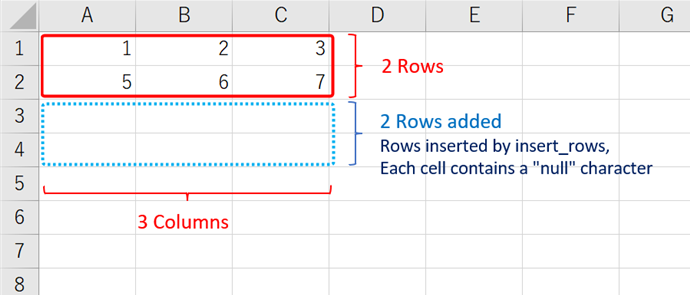
ws.insert_rows(2,2) # >> Add two lines after the second line
print(ws.max_row) # >> 4 Confirmation that two lines have been addedThe results of the List6 run are shown below (Fig.14) and in the comments in the code.
3.2 Obtain Column data (Column object)
Data processing performed on a column-by-column basis must be handled by the Column object.
The entity of a Column object is a tuple whose elements are cells (Cell objects).
There are three ways to obtain a Column object, but the usage is the same as for a Row object, only the criteria is changed from row to column.
➀. Worksheet Object[col]
arg:col: Specify the column name of the target column (addressed as ‘A’, ‘B’, ‘C’, etc.)
return: Column Object
➁. Worksheet Object.columns property
return: Generator that takes all column objects on the sheet as elements
➂. Worksheet Object.iter_cols(min_row, max_row, min_col, max_col)
arg: min_row : Row to start iteration All the following are optional arguments
arg: max_row: Row to end the iteration
arg: min_col: Column to start iteration
arg: max_col: Column to end iteration
return: Generator that takes all column objects on the sheet as elements
The columns property can also be used to access individual column objects, as in columns[index].Note that the index is based on “0“ since it is the index of the generator. (Normally, column numbers are specified as integers starting from “1”.)
In addition, the Worksheet object has the following methods and properties related to the Column object
| 【Worksheet Object】 | 【Functions】 | 【Other details】 |
|---|---|---|
| min_column property | Obtain first column number | Integer with 1 as the base (first column) |
| max_column property | Get last column number | Integer with 1 as the base (first column) |
| insert_cols(idx, amount) | Insert Column object | arg:idx:Specify column number to insert arg:amount:Specify the number of columns to insert |
| deleate_cols(idx, amount) | Delete a Column object | arg:idx:Specify column number to be deleted arg:amount:Specify the number of columns to delete |
Here is sample code for getting and manipulating a Column object.
From the Row object, the direction of scanning has only changed from horizontal to vertical, so the explanation and execution results are omitted.
from openpyxl import load_workbook
from openpyxl import Workbook

wb = load_workbook('Sample.xlsx')
ws = wb.active

#----------------------------------------------------------------------------------
# Obtaining a Column Object➀ Worksheet Object[col]

print(ws['A'])
# >> (<Cell 'Sheet1'.A1>, <Cell 'Sheet1'.A2>)

#----------------------------------------------------------------------------------
# Obtaining a Column Object➁ Worksheet Object.columns Property

print(ws.columns)
# Get the generator of Column object
# >> <generator object Worksheet._cells_by_col at 0x0000017B7BD3A048>

for col in ws.columns:
    print(col)

# Display the contents of a Column object (a tuple of Cell objects) one by one
# >> (<Cell 'Sheet1'.A1>, <Cell 'Sheet1'.A2>)
# >> (<Cell 'Sheet1'.B1>, <Cell 'Sheet1'.B2>)
# >> (<Cell 'Sheet1'.C1>, <Cell 'Sheet1'.C2>)

#----------------------------------------------------------------------------------
# Obtaining a Column Object➂ Worksheet Object.iter_cols method

for col in ws.iter_cols(min_row=2, min_col=2):
    print(col)

# Display the contents of Column objects (tuples of Cell objects) one by one after the second row and after the second column.
# >> (<Cell 'Sheet1'.B2>,)
# >> (<Cell 'Sheet1'.C2>,)

#----------------------------------------------------------------------------------
# Other methods and properties related to Column object

print(ws.min_column)   # >> 1 First column number
print(ws.max_column)   # >> 3 Last column number

ws.insert_cols(3,2)    # >> Two additional rows after the third row
print(ws.max_column)   # >> 5 Confirmation that two rows have been added
3.3 Obtain Cell (Cell object)
The basic unit of data processing in Excel is the cell. The rows and columns described so far are merely units of a collection of cells. (Fig.15)
Cells are managed by Cell objects, which can be manipulated in various ways. In this article, we will first explain how to get (access) a Cell object. Specific operations will be covered in another article.
< Examples of operations that can be performed with the Cell object >
- Set (get) values and formulas into cells >>
- Formatting cells >>
- conditional format >>
- Figures, Tables, Graphs >>
openpyxl provides many procedures for accessing Cell objects. (The following format is an example.)
The ➀➁ is accessed by specifying cell addresses and cell numbers in [cell_adr]([row_index][col_index]) for the Worksheet object. There is also the cell() method as in ➂.
You can also specify an index for a Row/Column object with [index], as in ➄➅.
As shown above, there are various types of addressing methods such as “A1”, “B3”, etc., and cell number (index) designation methods, etc., which should be selected in consideration of the ease of data processing.
➀. Worksheet Object[row_index][col_index]
index1: row_index: Specify row number (integer) with A1 cell as “1“
index2: col_index: Specify column number (integer) with A1 cell as “0” ※
(※ Note that specifying column names ‘A’, ‘B’, etc. will result in an error.)
return: Cell Object
➁. Worksheet Object[cell_adr]
index: cell_adr:Specify by cell address method (‘A1′,’B2’, etc.)
return: Cell Object
➂. Worksheet Object.cell(row, column)
arg: row: Specify row number (integer) with A1 cell as “1“
arg: column: Specify column number (integer) with A1 cell as “1” ※
(※ Note that specifying column names ‘A’, ‘B’, etc. will result in an error.)
return: Cell Object
➃. Worksheet object.values property
return: Tuple of Cell values for each row (generator)) ※
(※ The range that can be obtained with values is from cell A1 to the last row and column containing the value)
➄. Row Object[row_index]
index: row_index:Specify row number (integer) with A1 cell as “0” ※
(※Note that this is a tuple index, so it starts with 0.)
return: Cell Object
➅. Column Object[col_index]
index: col_index: Specify column number (integer) with A1 cell as “0” ※
(※Note that this is a tuple index, so it starts with 0.)
return: Cell Object
Here is an example code for obtaining a Cell object.
(※The “Sample.xlsx” file to be loaded is assumed to have the data in “A1:C2” in advance. In addition, “[A][B]” refers to the comments in the code.)
<About the Code Summary>
[A]:By specifying the index of the Worksheet object
[B]:By specifying the argument of the Cell() method
[C]:Expand values of individual Cell objects from values property (row by row)
[D]:Expansion from Row/Column objects to individual Cell objects
The cell value is obtained from the Cell object’s value property.
from openpyxl import load_workbook
from openpyxl import Workbook

wb = load_workbook('Sample.xlsx')
ws = wb.active

#---------------------------------------------------------------------
# 【A】Obtaining a Cell object➀ Specify the index of the Worksheet object
#---------------------------------------------------------------------

# To specify the index of a cell
# Cell A1 is designated as row 1 and column 0
print(ws[1][0]);  print(ws[1][0].value)

# >><Cell 'Sheet1'.A1>  >>1

# Column indices cannot be specified by column name. The following error occurs
# print(ws[1]['A'])

# >>TypeError: tuple indices must be integers or slices, not str

# To specify the address of a cell
print(ws['A1']);  print(ws['A1'].value)

# >><Cell 'Sheet1'.A1>  >>1


#---------------------------------------------------------------------
#【B】Obtaining a Cell object➁ Acquisition by cell method
#---------------------------------------------------------------------

# Specify arguments in row, column order
print(ws.cell(1, 1)); print(ws.cell(1, 1).value)

# >><Cell 'Sheet1'.A1>   >>1

# When specified with a named argument
print(ws.cell(row=1, column=1)); print(ws.cell(row=1, column=1).value)

# >><Cell 'Sheet1'.A1>   >>1


#---------------------------------------------------------------------
#【C】Obtaining a Cell object➂ Acquisition by values
#---------------------------------------------------------------------

# Generator (tuple of Cell values for each row)
print(ws.values)

# >><generator object Worksheet.values at 0x0000017B7BDB0CC8>


# No need to use the value property since it is output as a value
for row in ws.values:
    print(row); print(row[0]); print(row[1]); print(row[2])

# >> (1, 2, 3) >> 1  >> 2  >> 3
# >> (4, 5, 6) >> 4  >> 5  >> 6

#---------------------------------------------------------------------
#【D】Obtaining a Cell object➃ Patterns to be expanded from Row/Column objects
#---------------------------------------------------------------------

# <Expand from Row object>
for row in ws.rows:
    for cell in row:
        print(cell); print(cell.value)

# >> <Cell 'Sheet1'.A1>; >> 1
# >> <Cell 'Sheet1'.B1>; >> 2
# >> <Cell 'Sheet1'.C1>; >> 3
# >> <Cell 'Sheet1'.A2>; >> 4
# >> <Cell 'Sheet1'.B2>; >> 5
# >> <Cell 'Sheet1'.C2>; >> 6


# <Expand from Column object>
for col in ws.columns:
    for cell in col:
        print(cell); print(cell.value)

# >> <Cell 'Sheet1'.A1>; >> 1x
# >> <Cell 'Sheet1'.A2>; >> 4
# >> <Cell 'Sheet1'.B1>; >> 2
# >> <Cell 'Sheet1'.B2>; >> 5
# >> <Cell 'Sheet1'.C1>; >> 3
# >> <Cell 'Sheet1'.C2>; >> 6
Please refer to the comments in the code for the execution results.
There are many other uses and operations for the Cell object. See also the following as a sequel article.
The above is an overview of Row/Column/Cell and how to acquire objects.
4. Summary

How was it?
In this issue, we covered the “openpyxl library” for manipulating Excel, explaining basic operations such as creating a new book and saving it, as well as how to handle the various objects that make up a book.
Let’s wrap up with a few final points.
➀. There are several Python libraries that can manipulate Excel. One of these libraries is “openpyxl,” which is particularly easy to handle and provides a wealth of functionality.
➁. Basic operations such as creating a new workbook, loading, and saving can be handled in a few code steps.
➂. It is important to understand the layered structure and inclusion relationships of the row, column, and cell objects that make up a workbook. In particular, the Cell object is the basic unit of data processing and provides various operations. In this article, we summarize how to obtain (access) a Cell object.
Although you can use openpyxl to manipulate the various functions provided by Excel, you will always go through a “cell” when performing any operation or process.
In other words, “Excel work” = “operations on cells“.
Therefore, in the next article, we will explain more in depth about cells (Cell object).
We hope you will find the following article useful. The link will be here.↓
Thank you for reading to the end.
