We will continue to introduce the “openpyxl” library to manipulate “Excel” from Python.
In the previous article, we discussed an overview of the library and “basic operations” such as creating and saving new workbooks.Then, we explained the “main objects and their layer structure,” which must be understood when using openpyxl.
The previous article can be found here.
We have omitted duplicative content and encourage you to read it.

Also, please refer to the entire contents of this series [Python x Excel] as shown here.
In this second article in the series, we will provide a more in-depth explanation of cell (Cell object) operations.
The purpose of using the spreadsheet software “Excel” is to apply various processes to “data entered in cells” and summarize them in “analysis and statistical charts“.
In other words, “Excel work” = “operations on cells“.
This section explains how to “get” and “process” cell values with specific examples.
Please stay with us until the end of this article as you will be able to “do and understand” the following
The information presented on this site is only an example. Please refer to the official website for details and clarifications, if necessary.
【Official Documents】https://openpyxl.readthedocs.io/en/stable/
We will now proceed in detail to the next section on how to manipulate the Cell object in concrete terms.
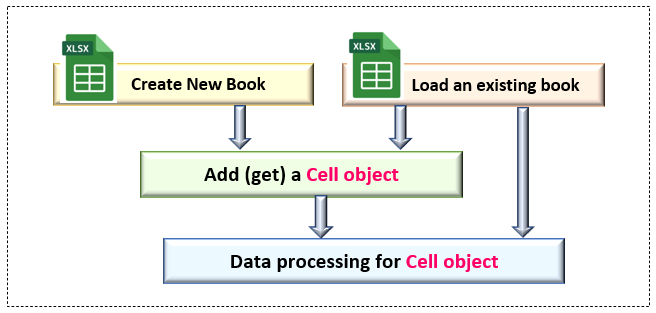
1. Obtain Cell (CellObject)

The cell is the basic unit of Excel work. Therefore, the Cell object provides various objects, methods, and properties (attributes) related to cell operations. Programmers need to understand and use them well.
This section provides more in-depth explanations of operations on the Cell object, including “Adding and Getting Objects,” “Getting Data,” “Setting Formulas,” and “Defining and Managing Cell Ranges“.
1.1 Add (Get) Cell Object
As mentioned above, data processing in Excel can be said to be an operation on the Cell object.For newly created workbooks, there is no Cell object yet, so it must be “added and retrieved”.
Also, if you are reading and editing an existing workbook that contains some content, you can “get” existing Cell objects, or even “add and get” them.
arious formats are available for adding and retrieving Cell objects.
There is some overlap with the previous article, but it is important, so I will reiterate it.
1.1.1 Add single Cell (Cell Object)
First, we will discuss how to add a single cell (Cell object).
There are two types of formats: one that specifies the “cell address (‘A1’, etc…)” for the Worksheet object (➀) and one that uses the cell() method (②), as shown below.
In the cell() method, the arg:row/column specifies the row and column number of the additional cell. (The A1 cell criterion “1” is assumed.) You can also set a value to the arg:val.
➀.Worksheet object[cell_adr]
arg: cell_adr: Specify by cell address method (‘A1′,’B2’, etc.)
return: Cell Object
➁.Worksheet Object.cell(row, column, val)
arg: row: Specify row number (integer) with A1 cell as “1“
arg: column: Specify column number (integer) with A1 cell as “1” ※
arg: val: Specify the value (data) to be set in the cell (optional argument)
(※ Note that specifying column names ‘A’, ‘B’, etc. will result in an error.)
return: Cell Object
【SAMPLE(1)】
shows an example program. [A] is “cell addressing” and [B] is adding a Cell object by the Cell() method. It is confirmed that the value can be set with the argument value.
from openpyxl import Workbook

wb=Workbook()
ws=wb.active

# [A] ------------------------------------------------------------------
# By specifying the index of the Worksheet object
# Adding Cell Objects and Setting Values

ws['B4']
print(ws['B4'])        # >><Cell 'Sheet'.B4> Add Cell object
print(ws['B4'].value)  # >>None Default value is none.

ws['B4']=4            # Set value in 'B4' cell (without value property)
print(ws['B4'].value) # >>4 Confirm value (4) in 'B4' cell

ws['B5'].value=5      # Set a value in 'B5' cell (with value property)
print(ws['B5'].value) # >>5 Confirm value (5) in 'B5' cell


# [B] ------------------------------------------------------------------
# by the cell() method of the Worksheet object.
# Obtaining a Cell object and setting its value

ws.cell(row=4, column=2).value=10        # Setting values by named argument specification・value property
print(ws.cell(row=4, column=2).value)    # >>10 Check cell values

ws.cell(row=4, column=3, value=20)       # The argument value can be used to set the cell value at the same time.
print(ws.cell(row=4, column=3).value)    # >>20 Check cell values

ws.cell(4, 4, 30)                        # There is no problem with sequential arguments, of course.
print(ws.cell(4, 4, 30).value)           # >>30 Check cell values
1.1.2 Add Multiple Cells (Cell Object)
Multiple cells can be added at a time.
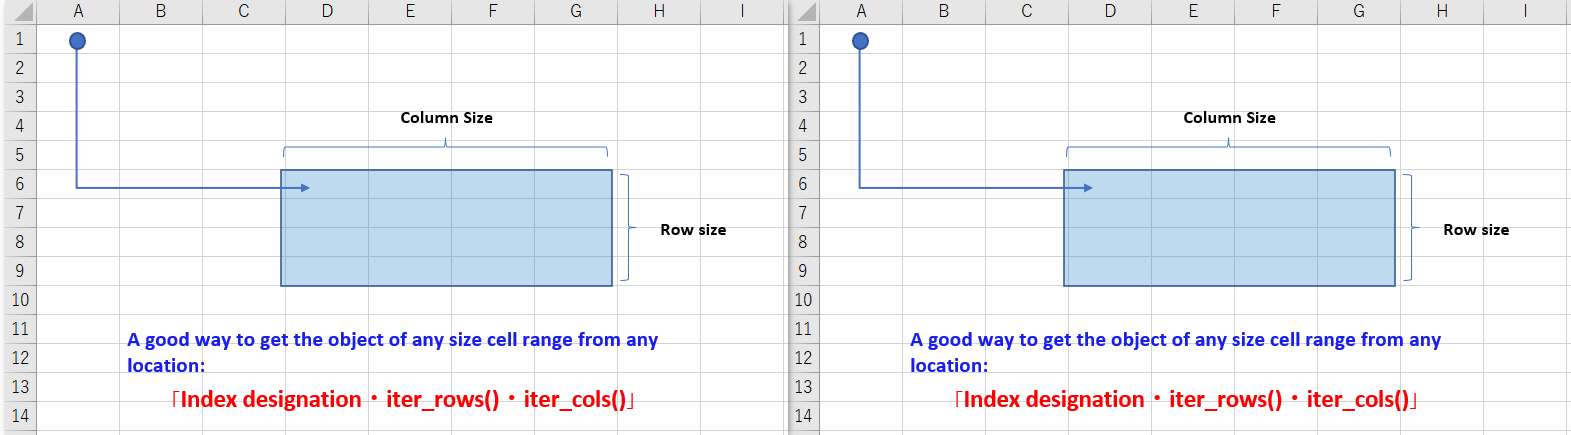
Add multiple Cell objects by specifying a cell range (by row, by column, or both).
The format is “Cell address range (“A1:C3”, “A1”: “C3″, etc.)” for the Worksheet object as follows ) (➀) and dedicated methods such as append() iter_rows()/iter_cols(). (②➂), respectively. The format is as follows.
➀.Worksheet Object[range_adr]
arg: range_adr: Specify a range of cells by address (“A1“: “C3” or “A1:C3“)
return: Row Object Generator of (tuple of Cell objects)
➁.Worksheet Object.append(row_data)
arg: row_data: A list whose elements are the values of cells in one row
return:None
➂-1. Worksheet Object.iter_rows(min_row, max_row, min_col, max_col)
➂-2. Worksheet Object.iter_cols(min_row, max_row, min_col, max_col)
arg: min_row: Row to start iteration All the following are optional arguments
arg: max_row: Row to end the iteration
arg: min_col: Column to start iteration
arg: max_col: Column to end iteration
return: Row/Column Object Generator of (tuple of Cell objects)
The append() method takes a list of cell values in one row as its argument, and the data is appended to the last row starting from “Column A”.
The iter_rows()/cols() method adds an object by specifying a cell range with row number (start, end) and column number (start, end) as arguments. The return value is a tuple (generator) whose elements are Row objects if iter_rows() method.
The following is a summary of the guidelines for using both methods.
➀.To add a Cell object from an arbitrary location, specifying a range of cells
→ “Addressing a cell range” or “iter_rows() / iter_cols() method“
➁. When appending a Row(Cell) object in row units starting from cell A1
→ The append() method.
【SAMPLE(2)】
shows an example program. [A] is specified by a range of cell addresses, [B] uses the append() method, and [C][D] uses the iter_**() method.
See comments in the code for execution results.
In [A], you can get a double-tuple type with a Cell object as an element, and in [C][D], you can get a generator with a Rows/Columns object as an element.
from openpyxl import Workbook

wb=Workbook()
ws=wb.active

# [A]------------------------------------------------------------------
# By specifying the index of the Worksheet object
# Adding Cell Objects and Setting Values

print(ws["A1:C3"])
print(ws["A1":"C3"])

# Cell object as well as adding
# Add a tuple with Cell object as an element (if there are multiple rows, it will be a 2D tuple)
# >>((<Cell 'Sheet'.A1>, <Cell 'Sheet'.B1>, … <Cell 'Sheet'.B3>, <Cell 'Sheet'.C3>))


# [B]------------------------------------------------------------------
# Adding a Cell object using the append() method
# Sets a value on the last line (no method return value)

data = [1, 2, 3, 4]
ws.append(data)


# [C]------------------------------------------------------------------
# Adding Cell objects by iter_rows() method

# A generator of Row objects is generated.
print(ws.iter_rows(min_row=6, max_row=7, min_col=3, max_col=5))
# >><generator object Worksheet._cells_by_row at 0x0000025205EC58C8>


# [D]------------------------------------------------------------------
# Adding Cell objects by iter_cols() method

# Generator of Column object is generated
print(ws.iter_cols(min_row=6, max_row=7, min_col=7, max_col=9))
# >><generator object Worksheet._cells_by_col at 0x0000025205EC58C8>


wb.save('Multi_Cell_gen.xlsx')
1.1.3 Valid Range of Cell Object
Be careful when adding Cell objects.
The Cell object is automatically created (added) with a null character (empty) in the space between the reference “A1 cell” and the newly added Cell object.
A concrete example is shown below (Fig.4), where a Cell object is added to “C3” using the cell() method (the value can be either set or unset).Then, a Cell object with a null character is automatically added to the blank cells between cells A1 and C3. The point is that they are (or will be) added automatically.

This allows access to all Cell objects on the worksheet, including blank cells when the rows/columns property (described in the next section) is executed.
Although this is convenient, when blank cells are used for data processing, unexpected errors often occur, so consider measures such as checking for the existence of cell values and including exception handling.
1.1.4 Obtain Cell Object
So far, we have explained how to add (acquire) a Cell object. When a Cell object is added with a method or property, it can be acquired as a return at the same time.
So what is the method for simply retrieving an existing Cell object? This section summarizes the format specialized for retrieval only.
Naturally, Cell objects that do not exist (have not been added) cannot be acquired. For example, if you execute the following format on a Workbook object that has just been created, please note that an “IndexError” will occur.
➀.Worksheet Object[row_index][col_index]
index1: row_index: Specify row number (integer) with A1 cell as “1“
index2: col_index: ASpecify column number (integer) with A1 cell as “0” ※
(※ Note that specifying column names ‘A’, ‘B’, etc. will result in an error.)
return: Cell Object
➁.Row Object[row_index]
index: row_index: Specify row number (integer) with A1 cell as “0” ※
(※Note that this is a tuple index, so it starts with 0.)
return: Cell Object
➂.Column Object[col_index]
index: col_index: Specify column number (integer) with A1 cell as “0” ※
(※Note that this is a tuple index, so it starts with 0.)
return: Cell Object
You can get a Cell object by specifying an index on the Worksheet object like [row_index][col_index].(➀)
The row number row_index is based on cell “A1” as “1” and the column number col_index is based on cell “A1” as “0“.
Similarly, matrix units (Row/Column objects) can be indexed as [index]. (②➂) Both of these matrices are indexed in the “0” base.
For more information on Row/Column objects, see the related articles below.
A property to batch retrieve all Cell objects on a worksheet is also provided.
The rows property is for rows (Rows object) and the columns property is for columns (Columns object). (➀➁)
Both return in generator format. Targets are all ranges from “Cell A1” up to the last row and column where the value (including None) is set.
There is also the valules property, which allows you to directly obtain the “value” in a batch instead of an object. (➂)
➀.Worksheet Object.rows property
return: Generator of all Row objects (Cell tuples)
➁.Worksheet Object.columns property
return: Generator of all Column objects (Cell tuples)
➂.Worksheet Object.values property
return: Generator of all Row objects (tuples of Cell values)
See here <Previous Article> an example of execution
2. Manipulate Cells (Cell Objects)

Now that the Cell object has been added, the next step is to explain how to manipulate the cell.
This section covers “setting and getting values (numbers, strings, and formulas) in cells,” “merging cells,” and “naming and defining cell ranges.
2.1 Set Value in Cell
To set a value (number or string) to a Cell object, use the value property.
In addition, the cell() method of <section1.1.1> can be used to add an object and set its value at the same time by using the arg:val.
Also, Elements of the list set as arguments to the append() method can be set to cell values.
<section1.1.2>
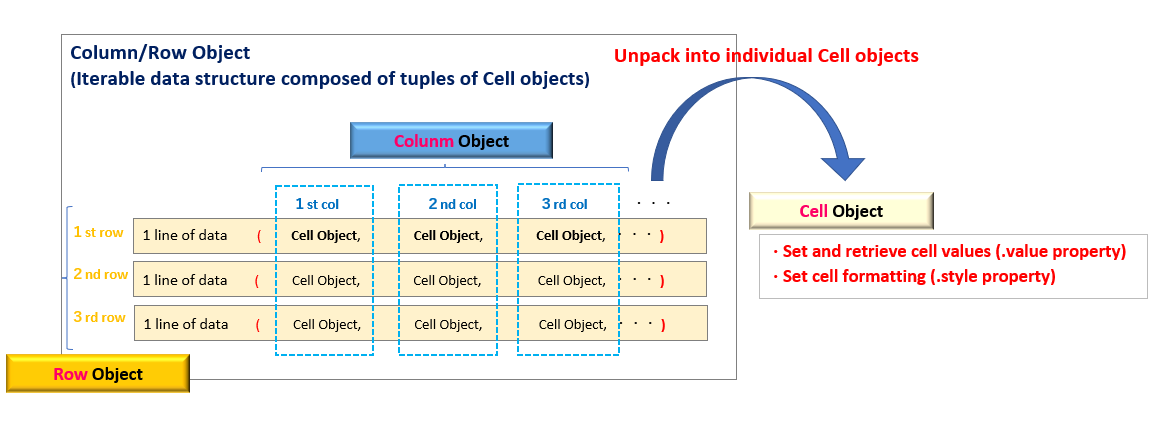
On the other hand, the Row/Column/Range (cell range) objects, which group multiple cells, do not provide a value property or similar functionality.
Therefore, it is not possible to set values for multiple cells at once, but to unpack (split) them down to individual constituent Cell objects and then apply the value property. (Fig.5)
【SAMPLE(3)】
Let’s see a concrete example of its use in the sample code.
[A]: The cell range (“A1:C3”) is expanded into rows (Row objects). Furthermore, the For statement is nested to expand the Row object into cell units (Cell object), and then the value (1) is set with the value property.
[B]:Instead of using the “value” property, use the append() method to append the value to the cell.
[C]: After the iter_rows() method is used to generate a row-by-row generator, it is the same as in [A].
[D]: After the iter_cols() method is used to generate a per-column generator, it is the same as in [A].
from openpyxl import Workbook
wb=Workbook()
ws=wb.active
# 【A】------------------------------------------------------------------
# By specifying the index of the Worksheet object
# Adding Cell Objects and Setting Values
# Set cell values by breaking them down into individual cells
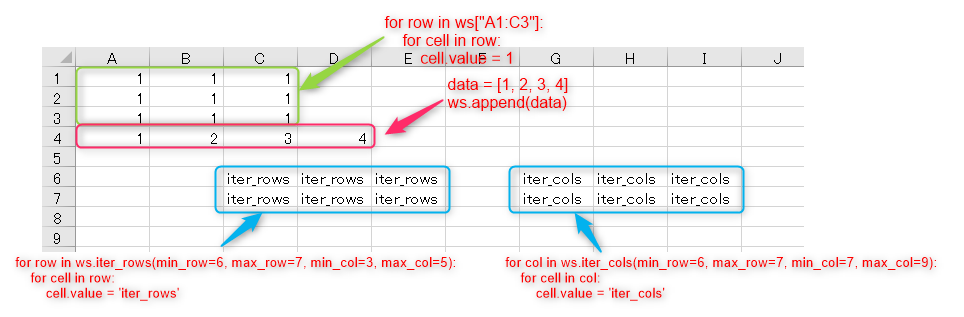
for row in ws["A1:C3"]:
for cell in row:
cell.value = 1
# 【B】------------------------------------------------------------------
# Adding a Cell object using the append() method
# Sets a value on the last line (no method return value)
data = [1, 2, 3, 4]
ws.append(data)
# 【C】------------------------------------------------------------------
# Adding Cell objects by iter_rows() method
for row in ws.iter_rows(min_row=6, max_row=7, min_col=3, max_col=5):
print(row)
# >>(<Cell 'Sheet'.C6>, <Cell 'Sheet'.D6>, <Cell 'Sheet'.E6>)
# >>(<Cell 'Sheet'.C7>, <Cell 'Sheet'.D7>, <Cell 'Sheet'.E7>)
# Set cell values by breaking them down into individual cells
for cell in row:
cell.value = 'iter_rows'
# 【D】------------------------------------------------------------------
# Adding Cell objects by iter_cols() method
for col in ws.iter_cols(min_row=6, max_row=7, min_col=7, max_col=9):
print(col)
# >>(<Cell 'Sheet'.G6>, <Cell 'Sheet'.G7>)
# >>(<Cell 'Sheet'.H6>, <Cell 'Sheet'.H7>)
# >>(<Cell 'Sheet'.I6>, <Cell 'Sheet'.I7>)
# Set cell values by breaking them down into individual cells
for cell in col:
cell.value = 'iter_cols'The result of running is as follows.
Figure6([A]:green, [B]:red, [C,D]:blue)
2.2 Set Formula in Cells
You can also apply Excel functions to Cell objects.
As with normal Excel functions, write “= (equal sign)” followed by a calculation formula (Operator).Then enclose the entire expression, including the “=”, in “(double quotation marks) or ‘(single quotation marks).(If the expression contains a ” (double), enclose the entire expression in ‘ (single).)
Finally, set the value directly to the Cell object, without going through the value property.
(If set to value, it is recognized as a string.)
【Sample(4)】
Let’s check a concrete example with the sample code .
Cell references also support absolute references ($).
from openpyxl import Workbook

wb=Workbook()
ws=wb.active


# Apply an Excel function to a cell

# Enclose the formula in "(double quotation marks)
ws["A2"] = "=AVERAGE(C1:C5)"

# Enclose the formula in '(single quotation marks)
ws["A3"] = '=AVERAGE(C1:C5)'

# References can be absolute references.
ws["A4"] = "=AVERAGE($C$1:$C$5)"

# If " (double quotation marks)is used in the formula,
# such as in a string, enclose the formula in '(single quotation marks)'.
ws["A1"] = '=IF(B1>=50,"50以上","50未満")'


wb.save('formula.xlsx')
2.3 Multiple Cell merge
Multiple cells can easily be combined and merged into a single cell.The merge_cells() method of the Worksheet object is used for merging, and the unmerge_cells() method is used for unmerging.
The argument can be either an A1 address range, such as ‘B2:F4’, or a matrix number.
<Merge Cells>
Worksheet Object.merge_cells(range_string, start_row, start_column, end_row, end_column)
arg: range_string: Specify the join range as cell address range string e.g.) ‘A1:C3’ (optional)
arg: start_row: Line number to start merging (optional)
arg: start_column: Column number to start merging
arg: end_row: Line number to end the join
arg: end_column: Column number to end the join
<Unmerge Cells>
Worksheet Object.unmerge_cells(range_string, start_row, start_column, end_row, end_column)
Arguments are the same as for the merge_cells method
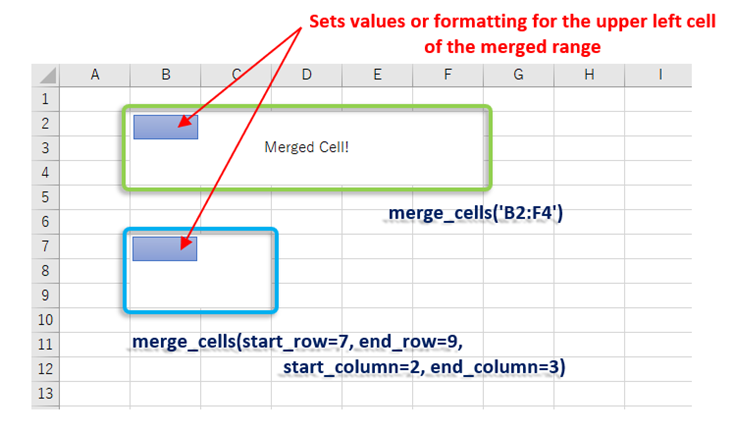
When applying values or formatting to merged cells, the settings are applied to the “top left-most cell” of the merged area. Attempting to access any other cell will result in an error.
In addition, note that if you want to apply a border (Border object※) around the merged area, you must set each outer cell individually.
(※How to apply ruled lines is explained in <here>.)
【SAMPLE(5)】
Now, let’s check it with actual code.
In [A], the merge_cels() method is used to merge the cell address range (‘B2:F4’).
Obtain the Cell object for cell “B2” and set the value and alignment in the attributes. If you access a cell other than “B2” cell, such as “C2” or “D3” cell, an error will occur.
In [B], the row and column numbers of the joined range are specified by the starting point (arg:start_row, arg:start_column) and the ending point (arg:end_row, arg:end_column).
from openpyxl import Workbook
from openpyxl.styles import Alignment

wb = Workbook()
ws = wb.active

#【A】-----------------------------------------------------------
# Merge multiple cells by merge_cells() method (A1 address specified)
ws.merge_cells('B2:F4')

# Acquisition of the Cell object (B2) in the upper left corner of the merged cell area
top_left_cell = ws['B2']

# Decorate entire merged cell
# The entire combined cell is decorated by setting the style formatting on the top left Cell object (B2)
# Note that specifying cells other than the upper left, such as B3, C2, etc., will result in an error.
# Also, borders, etc., cannot be set at once, but must be set for each individual cell.

top_left_cell.value = "Merged Cell!"
top_left_cell.alignment = Alignment(horizontal="center", vertical="center")

#【B】-----------------------------------------------------------
# Merge multiple cells by merge_cells() method (specify number of matrices)
ws.merge_cells(start_row= 7, end_row=9, start_column=2, end_column=3)


wb.save('sample_Merged-Cell.xlsx')
The result of running is as follows.
2.4 Name Range of Cells
Specific cell ranges can also be named and managed within a workbook or worksheet.
The defined cell range is managed by a DefinedName object that can be obtained in the following format
The DefinedName() class has a number of optional arguments, but at least the arg:name (the name to assign to the cell range (defined name)) and the arg:attr_text (the cell range address to define) must be set.
Note that the arg:attr_text must be specified as a named argument.
<DefinedName Object>
from openpyxl import workbook.defined_name.DefinedName(name, attr_text)
(There are many other optional arguments between the arg:name and arg:attr_text, such as comment, description, etc., which are specified with named arguments.)
arg: name: Definition name to assign to the cell range
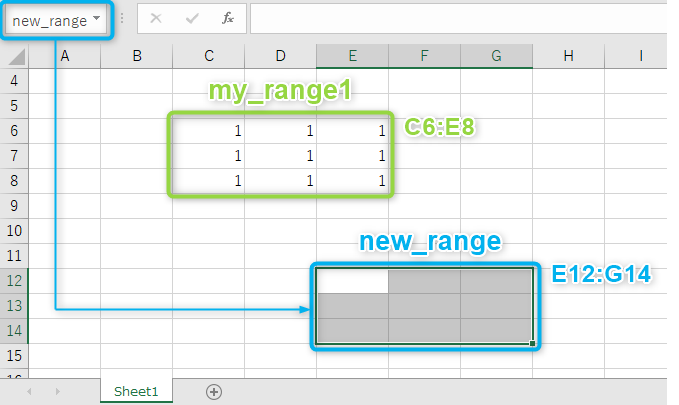
arg: attr_text: Cell range to be defined (ex. ‘Sheet1!$E$12:$G$14’)
return: DefinedName Object
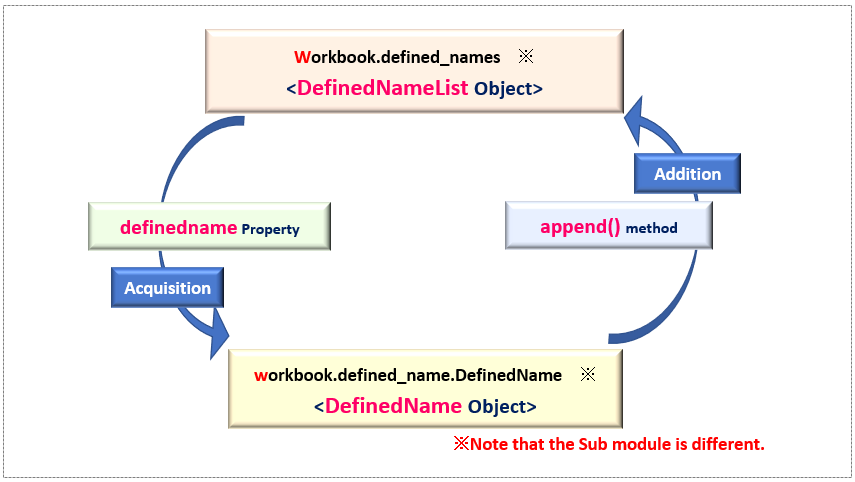
<DefinedNameList Object>
Workbook Object.defined_names property
return: DefinedNameList Object
<Add a DefinedName Object>
DefinedNameList Object.append(defn)
arg: defn: Set the DefinedName object to be added
<Obtain a DefinedName Object>
DefinedNameList Object.defineName property
return: List of DefinedName objects
It is also possible to a specific element (DefinedName object) by index.
A defined cell range can hold multiple cells in a workbook.They are grouped into DefinedNameList objects (lists).Use the append() method to add to the list, and the defineName property to retrieve the list. (Fig.8)
【SAMPLE(6)】
Now let’s check it with the actual code.
The outline of the code is to read a workbook, check the attributes of a predefined cell range and add a new definition.
Files (.xlsx) read by this program can be downloaded from
from openpyxl import workbook
from openpyxl import load_workbook

wb=load_workbook('sample_Defined_Names.xlsx')

#(A)------------------------------------------------------------------------------
# Check object type
print(type(wb.defined_names))                   # >><class 'openpyxl.workbook.defined_name.DefinedNameList'>
print(type(wb.defined_names.definedName))       # >><class 'list'>
print(type(wb.defined_names.definedName[0]))    # >><class 'openpyxl.workbook.defined_name.DefinedName'>


#(B)------------------------------------------------------------------------------
# Get the name of the defined cell range and the address of the region

for defined in wb.defined_names.definedName:
    print(defined.name)          # >> my_range1
    print(defined.attr_text)     # >> Sheet1!$C$6:$E$8

    # Numerous other attributes are available for the DefinedName object.
    # Comment, description, hidden … The default value for both attributes is 'None'.


#(C)------------------------------------------------------------------------------
# Add new cell range name definition

# Creation of DefinedName object
new_range=workbook.defined_name.DefinedName(name='new_range', attr_text='Sheet1!$E$12:$G$14')
print(type(new_range))  # >><class 'openpyxl.workbook.defined_name.DefinedName'>

# Newly defined in the append() method of the DefinedNameList object
# Add cell range (DefinedName object)
wb.defined_names.append(new_range)


#(D)------------------------------------------------------------------------------
# Get the name of the defined cell range and the address of the region

for defined in wb.defined_names.definedName:
    print(defined.name)          # >> my_range1,          new_range
    print(defined.attr_text)     # >> Sheet1!$C$6:$E$8    Sheet1!$E$12:$G$14

    # The newly added cell range name (new_range) is output

wb.save('sample_Defined_Names.xlsx')
Now, let me explain the key points.
Obtain a DefinedNameList object and extract its element DefinedName object. Since we are reading a book that contains one predefined cell range, we can retrieve the object at index “0“.
The For statement expands the list to obtain a DefinedName object, the name property is used to obtain the definition name, and the attr_text property is used to obtain the cell range. In addition to the above, many other attributes are available.
Create an instance from the DefinedName class. (definition name is “new_range”, definition range is “Sheet1!$E$12:$G$14”) and then appends it to the DefinedNameList object with the append() method. and managed in the entire workbook.
The result of running is as follows, with a new cell range (new_range) added.
3. SUMMARY

How was it?
In this article, we have covered the “openpyxl” library for manipulating Excel, focusing on how to handle cells (Cell objects).
Since work with Excel is basically done via cells, we hope that you will make use of the explanations in this paper.
Finally, I will summarize the contents of this article.
Now, in the next issue, we will cover “cell formatting“.Formatting cells allows you to make them look better with fonts, fills, decorations, etc.
We hope you will find the following article useful. The link will be here.↓

Thank you for reading to the end.