In this article, we will continue to introduce the “python-pptx” library, which allows you to manipulate “PowerPoint” in Python.
In the previous article, we explained the basic operations of “installing pytnon-pptx ~ creating files“, “adding slides” and “inserting content into the place folder“.
So we have omitted duplicated contents. We recommend that you read the previous article here.
Links to other articles in the series are also provided below.
In this second article in the series, we will focus on setting and editing the text of “Title“, “Heading” and “Body and Bullet Points“.
The existence of “text” is important in the creation of presentation contents, and is related to “ease of understanding” and “appeal”.
In the previous article, we mentioned how to set the text in the place folder (the template for the content), but you can also edit and set the “font,” “paragraphs,” “indentation,” and other details even further.
It requires an overview of the TextFrame object and its related object methods (properties). In this article, we will discuss the TextFrame object and focus on text editing.
Please stay with us until the end of this article as you will learn the following.
The next section will provide a detailed description of each object.
The usage of various classes and functions introduced in this article is just an example. Please refer to the “Official Documentation” below for details and clarifications.
Official documentation for “python-pptx”
https://openpyxl.readthedocs.io/en/stable/
1. TextFrame object to manage Slide Text

This section describes the “TextFrame” class, which is indispensable for setting text using python-pptx.
This section will start with an overview of what the “TextFrame” is, how to retrieve the object, and how to actually set the text.
1.1 What is TextFrame ?
As mentioned earlier, python-pptx places text (strings) in a framework called a “TextFrame“.
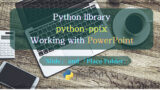
As shown in Fig1, PowerPoint is composed of various elements (*) such as place folder (TITLE, BODY, etc.), shapes (AutoShape), graphs, tables, etc.
(*All elements on the presentation are treated as Shape objects.)
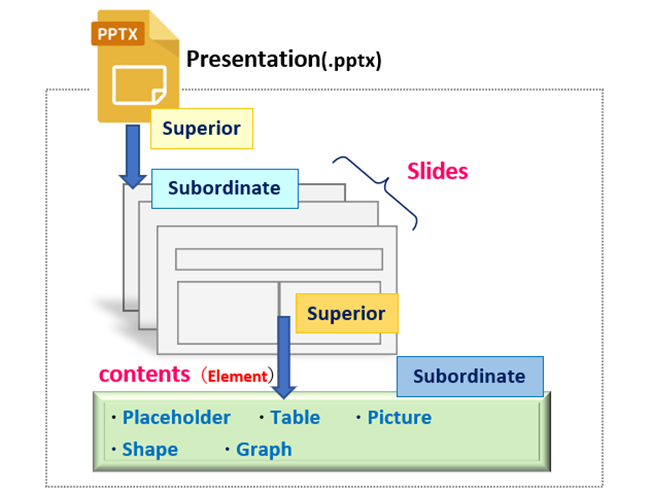
Each of these elements has an area where text can be inserted, and this area is called a “TextFrame”.
You usually enter text into these elements without much thought, but when you manipulate them programmatically, you must go through this TextFrame (object).
Further, we will deepen our understanding of the contents of this TextFrame.
If the TextFrame is a frame that manages text, it is composed of a collection of related subordinate objects, such as paragraphs and letters (words).
This makes it possible to support detailed text settings such as indentation and font formatting.
For example, you want to set up text with the following three styles.
- Case of setting a string for one line (one paragraph)
- Case of setting up a multi-line string by separating paragraphs
- Cases with advanced settings such as text color and indentation
Not all of ➀➁➂ can be handled by the TextFrame object alone. As shown in Fig3, they must be handled by linking related objects under the TextFrame object.

Fig4 illustrates the relationship of each object on the actual slide. This is an example of setting a string in a text box (Shape object).
As shown in the figure, each Shape object has one independent TextFrame object. Paragraph objects is placed inside the TextFrame object, and Run objects is assigned to each character.

- TextBox(Shape Object)… Red box line
- TextFrame (TextFrame Object) … Light blue box line
- Paragraph (Paragraph Object) … Green box line
- Characters/Words (Run Object) … Purple box line
In the next section, we will discuss the details of each object and its related methods and attributes.
1.2 Get and Set TextFrame object
The TextFrame object can be obtained from the text_frame property of the Shape object such as a text box or shape into which you want to insert text.※
(※ The Shape object is explained in detail in <Shape Object>.)
Shape Object.text_frame property
return: TextFrame Object
The main methods and properties of the TextFrame object include the following.
| 【TextFrame Object】 | 【Funtions】 | 【Other details】 |
|---|---|---|
| text property | Set/Get string in text frame | |
| autosize property | Automatic adjustment of font size | 【MSO_AUTO_SIZE】 ・.NONE(No auto-adjustment) ・.SHAPE_TO_FIT_TEXT(Fit Frame size to text) ・.TEXT_TO_FIT_SHAPE(Fit text to Frame size) |
| word_wrap property | Set/Get character wrapping | ・Specify True for wrap-around ・Default is False (no wrap) |
| vertical_anchor property | Character Vertical Position | 【MSO_VERTICAL_ANCHOR】 ・.TOP ・.MIDDLE ・.BOTTOM |
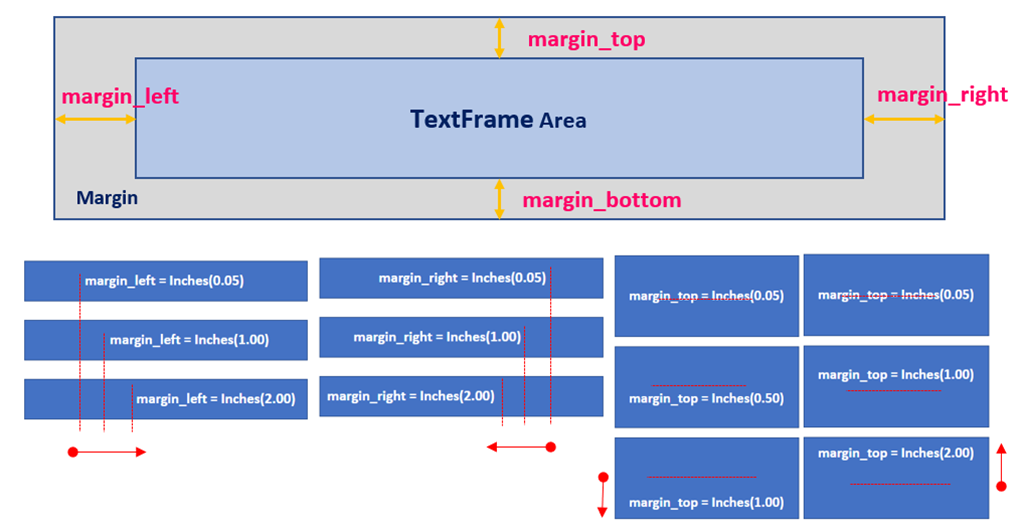
| margin_top(bottom) property | Adjust the top and bottom margins | |
| margin_left(right) property | Adjust left and right margins |
Use the text property to set text in a frame. Font size cannot be specified directly on the TextFrame and is handled by automatic size adjustment using the autosize property. Font size can be specified in the Paragraph and Run layers, which will be explained later.
In addition, the vertical_anchor property controls the position of text within the frame, and the margin_* property adjusts the margins of the frame. (Fig.5)
【SAMPLE(1)】
Here is an example related to the TextFrame object. The code outline is to examine the attributes of a Shape object in a slide. Then set the text to the TextFrame of each Shape object. Enable text size and wrapping within the frame.<List1>
Files (.pptx, .png) read by this program can be downloaded from
from pptx import Presentation
from pptx.enum.text import MSO_AUTO_SIZE # Import of MOS_AUTO_SIZE class
prs = Presentation('Art2_List1_sample.pptx')
sld0 = prs.slides[0]
for shape in sld0.shapes: # Extracts elements from slides and displays their types
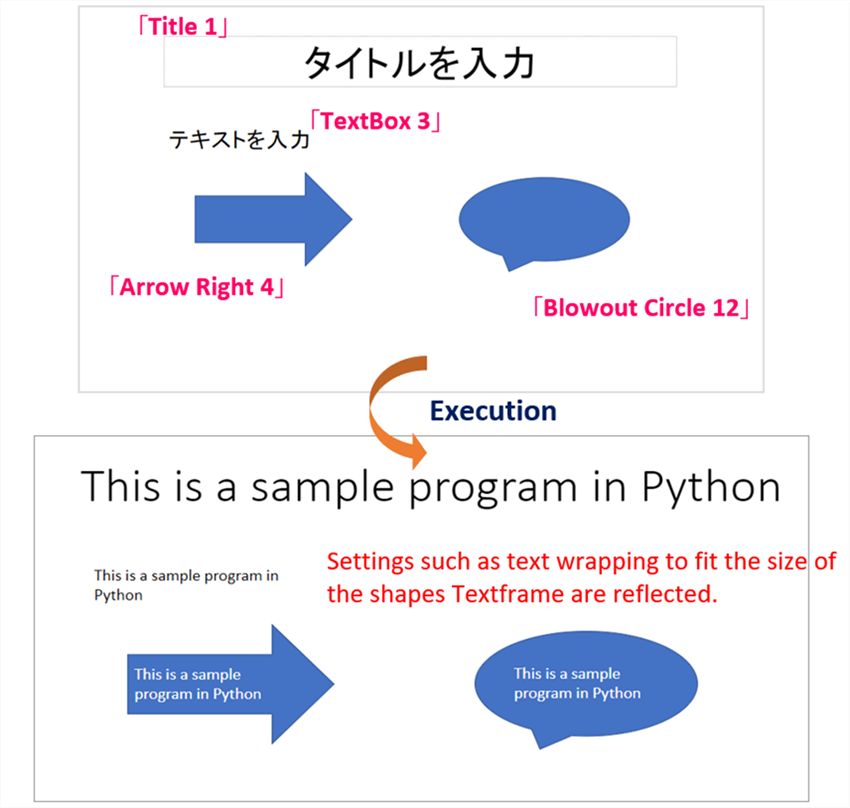
print(shape.name) # >> Title 1, Text box 3, Arrows: right 4, Callout: circular 12
if not shape.has_text_frame: # Check if the shape object contains a TextFrame
continue
textFrame = shape.text_frame # Get TextFrame from various Shape objects
textFrame.text = 'Pythonのサンプルプログラムです' # Set text in TextFrame
textFrame.autosize = MSO_AUTO_SIZE.TEXT_TO_FIT_SHAPE # TextFrame text size auto-adjustment
textFrame.word_wrap = True # Enable auto text wrapping
prs.save('Art2_List1_result.pptx')Now, let me explain the key points.
Not all shapes on a slide can have text inserted into them. If you try to get a TextFrame from a Shape object that has no text settings, an error will be issued.
Therefore, for all Shape objects, first check for the inclusion of TextFrame with the has_text_frame property.
Shapes have unique frame sizes. If you set text without thinking, the text may break off in the middle or may not display well.
Therefore, the autosize property is set to automatically adjust the text size to fit within the
frame, and the word_wrap property is set to “True” to enable string wrapping.
The result of executing the code is as follows.
The text “This is a sample Python program” has been set for the “Title Place Folder,” “Text Box,” and “Shape.” It also reflects the size and wrap settings that fit into the frame of each Shape object.
<List1>Execution results are available here
2. Add Paragraph (Paragraph object)

The unit that manages paragraphs in TextFrame object is the Paragraph object.
The TextFrame object has at least one paragraph by default. If you want to set up text that consists of multiple lines of paragraphs, you must add a Paragraph.
2.1 Add and Get the Paragraph Object
Use the add_paragraph() method to add a paragraph (Paragraph object) to a TextFrame object and the paragraphs property to get it.
Normally, paragraphs are assumed to have more than one, so they are managed as collections (iterable objects with Paragraph objects as elements) in the TextFrame object.
TextFrame Object.add_paragraph()
return: None( added to Paragraph Object collection)
TextFrame Object.paragraphs property
return: Collection of Paragraph Object
TextFrame Object.paragraphs[index] property
arg: inex: Index of collection elements
return: Paragraph Object
2.2 Method and Property of the Paragraph object
The following methods and properties are provided under the Paragraph object to operate on the paragraph layer.
| 【Paragraph Object】 | 【Functions】 | 【Other details】 |
|---|---|---|
| text property | Set/Get string in paragraph | |
| level property | Set/Get paragraph indentation level | ・Specify the level in the range of 0~8 |
| font property | Set the font (Get Font object) | 【Font Object】Related Attributes bold, size,i talic, color |
| alignment property | Specify the horizontal position of strings | 【PP_ALIGN Class】 ・.CENTER ・.LEFT ・.RIGHT |
| line_spacing property | Specify the height between lines | Specify by pt (point), etc. |
| space_after(before) property | Spacing between previous and next paragraphs | Specify by pt (point), etc. |
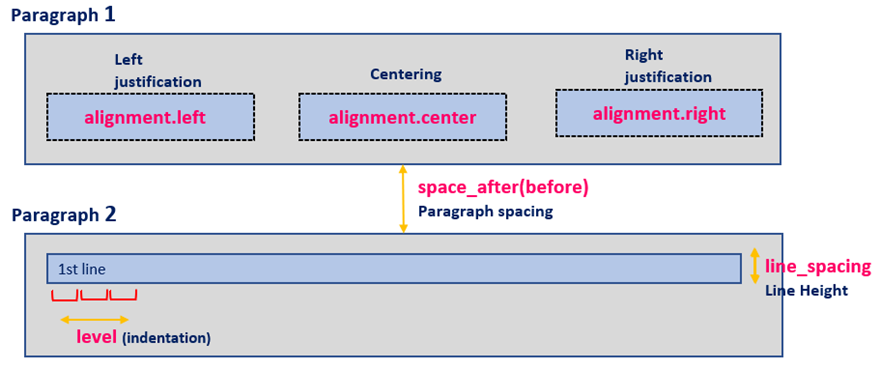
Font can be set by using the font property on the layer after the paragraph. There is also the level property, which allows you to specify indentation of paragraphs in nine levels, and other properties that specify spacing between lines or paragraphs. (Fig7)
【SAMPLE(2)】
Now, let’s check an example of operation on the Paragraph layer using sample code.
The code summary is to add a paragraph to the Shape object (text box) on the slide to see the effect of the attributes of Table2.
Files (.pptx) read by this program can be downloaded from
from pptx import Presentation
from pptx.enum.text import PP_ALIGN       # Enume the horizontal position of the paragraph
from pptx.enum.dml import MSO_THEME_COLOR # Enume in theme color
from pptx.util import Pt                  # Definition of units (points)

prs = Presentation("Art2_List2_sample.pptx")
sld0 = prs.slides[0]


# Examining the attribute information of a Shape object (text box)
# TextFrame objects can be included if the has_text_frame attribute is "True
for sp in sld0.shapes:
    print(sp.shape_type, sp.name, sp.has_text_frame)
    # >> TEXT_BOX (17)  1 True
    # >> TEXT_BOX (17)  2 True
    # >> TEXT_BOX (17)  3 True
    # >> TEXT_BOX (17)  4 True


# Add two paragraphs to the TextFrame object
for dumy in range(2):
    sld0.shapes[0].text_frame.add_paragraph()
    sld0.shapes[1].text_frame.add_paragraph()
    sld0.shapes[2].text_frame.add_paragraph()
    sld0.shapes[3].text_frame.add_paragraph()


# Paragraph indentation adjustment -----------------------------------------------
paras = sld0.shapes[0].text_frame.paragraphs

for i, para in enumerate(paras, 0):
    para.text = "Specify indentation for each paragraph"
    para.level = i


# Horizontal Positioning --------------------------------------------------------

List_PP_ALIGN = [PP_ALIGN.LEFT, PP_ALIGN.CENTER, PP_ALIGN.RIGHT]
paras = sld0.shapes[1].text_frame.paragraphs

for i, para in enumerate(paras, 0):
    para.text = "Specify the horizon-alignment (left/center/right) for each paragraph"
    para.alignment = List_PP_ALIGN[i]


# String font settings ---------------------------------------------------------

List_MSO_THEME_COLOR = [MSO_THEME_COLOR.ACCENT_1, MSO_THEME_COLOR.ACCENT_2, MSO_THEME_COLOR.ACCENT_6]
paras = sld0.shapes[2].text_frame.paragraphs

for i, para in enumerate(paras, 0):
    para.text = "Adjust text font at paragraph level"
    para.font.color.theme_color = List_MSO_THEME_COLOR[i]  # Font color
    para.font.bold = True  # Font size


# Paragraph spacing ------------------------------------------------------------

paras = sld0.shapes[3].text_frame.paragraphs
for para in paras:
    para.text = "Adjusted by Pt(15) for spacing between paragraphs"
    para.space_after = Pt(15)


prs.save('Art2_List2_result.pptx')
The following is an explanation of key points.
For statement loop adds two paragraphs to each Shape object. Use the add_paragraph() method of the TextFrame object to add a paragraph.
Also, as mentioned above, the Shape object contains one paragraph from the beginning, so the number of loops is the number of paragraphs you need minus one.
Expand a collection of Paragraphs with For statement and the Enumerate function. For individual paragraphs, set the text and paragraph level with the level property. The indentation level is set to the index obtained from the Enumerate function.
Subsequent processes follow the same procedure to obtain indexes.
The horizontal alignment of each paragraph is set by the alignment property.
The setting value specifies the Enume option of the PP_ALIGN class as “LEFT (left-align)”, “CENTER (center-align)”, or “RIGHT (right-align)”.
Each detailed font setting for an entire paragraph is configured via the font property. Here, the text color is set with the Enume option of the MSO_THEME_COLOR class and the font is bold. The Font object is described below.
Finally, the space adjustment between paragraphs is specified with the space_after property.
In this case, we have adjusted the spacing to 15 points.
The result of executing the code is as follows.
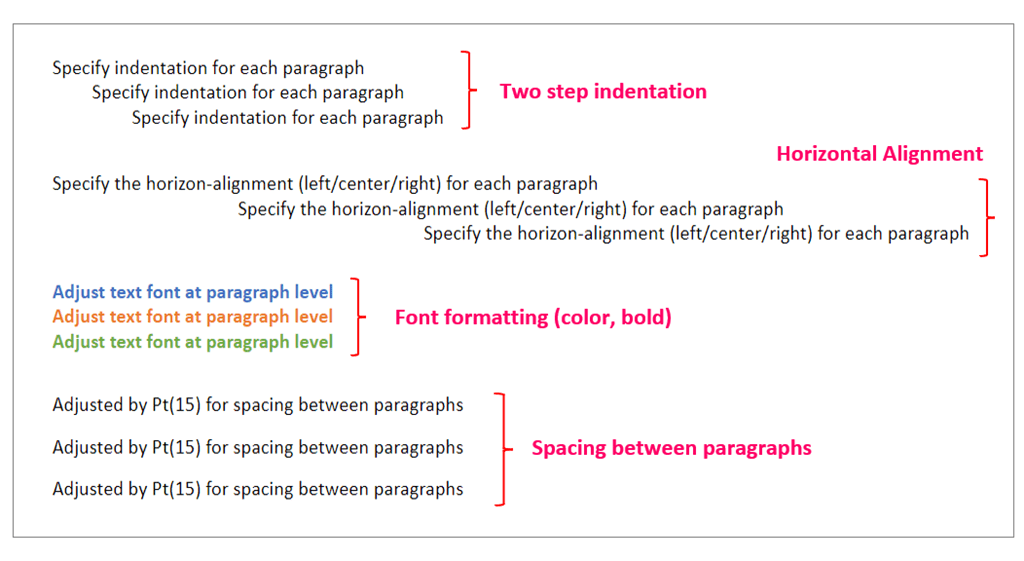
The paragraph level attributes “indentation,” “horizontal alignment,” “font setting,” and “spacing” are reflected. (Fig.8)
<List2> Execution results are available here
3. Character(Run object) setting

The Run object is a unit that manages individual characters (words) within a paragraph. By managing them separately as Run objects, font formatting can be specified for each character.
3.1 Add and Get Run Object
To add a word (Run object) to a Paragraph, use the add_run() method. Also, use the runs property to get it.
Since text is usually composed of multiple words, Run objects are managed together as a collection (an iterable object whose elements are Run objects) within a paragraph.
Paragraph Object.add_run() method
return: Run Object(Also added to collection)
Paragraph Object.runs property
return: Collection of Run Object (iterable)
Paragraph Object.runs[index]
arg: inex: Index of element
return : Run Object Get specific Run object by index
The parent-child relationship between various objects and key methods and properties can be organized as follows. (Fig9)
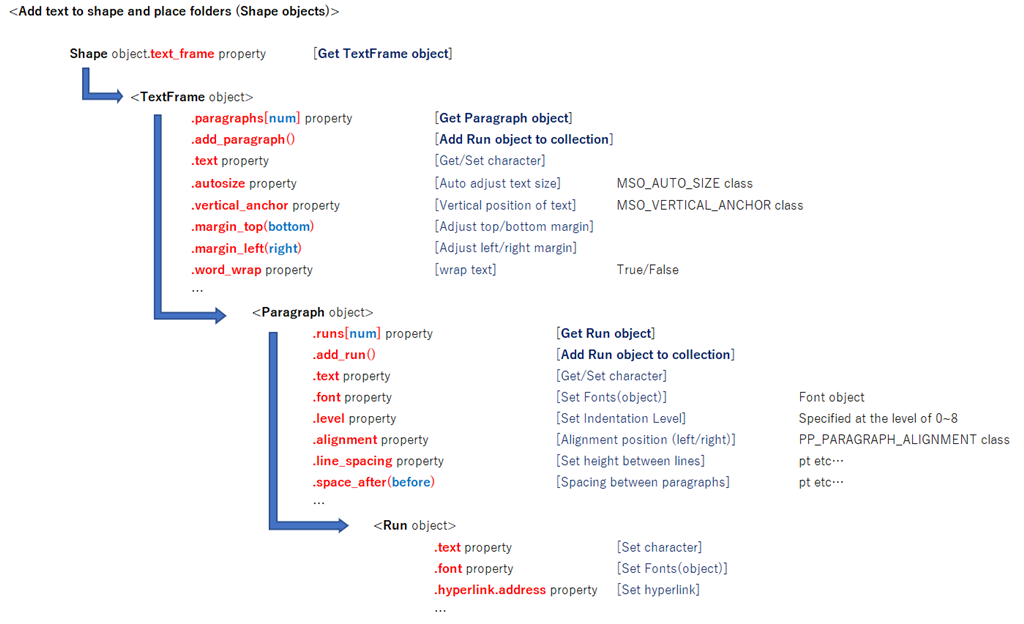
3.2 Properties of the Run object
The following properties are provided under the Run object to allow operation on character units. Attributes are provided to set the character (text property) and font (font property).
| 【Run Object】 | 【Functions】 | 【Other Details】 |
|---|---|---|
| text property | Set/Get character | |
| font property | Set the font and Getting a Font object | 【Font Object】Related Attributes bold,size,italic,color |
| hyperlink.address property | Assign hyperlinks | Website URL, etc. |
【SAMPLE(3)】
Check the code for an example of adding and editing text using the Run object.
The code summary is to set the text in a paragraph using the Run object and specify the text color.<List3>
from pptx import Presentation
from pptx.dml.color import RGBColor
prs = Presentation()
#------------------------------------------------------------------------------------------------------
title_slide_layout = prs.slide_layouts[1] # Get layout object for "Title and Content"
sld0 = prs.slides.add_slide(title_slide_layout) # Add new slide
for s in sld0.shapes: # Extract elements in slides, display types
print(s.name) # >> Title 1 Content Placeholder 2
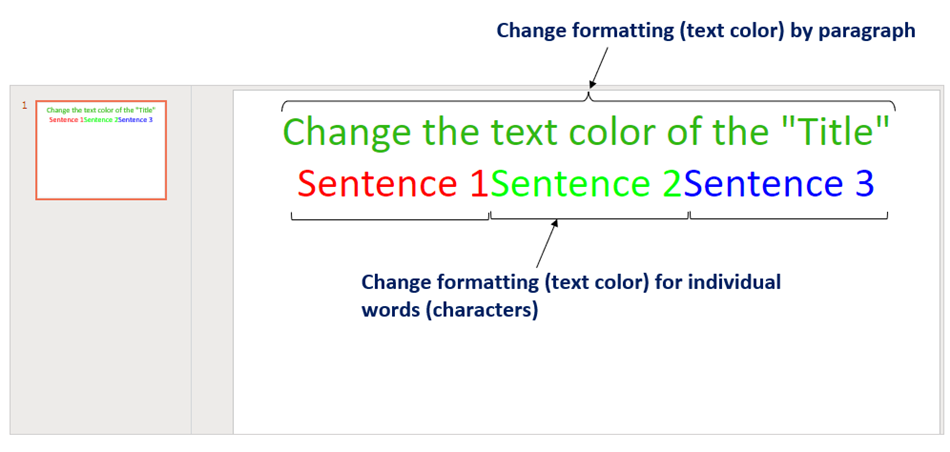
sld0.shapes[0].text = 'Change the text color of the "Title"'
pg = sld0.shapes[0].text_frame.paragraphs[0]
rn = pg.runs[0] # Get a Run object to manipulate the paragraph
rn.font.color.rgb = RGBColor(50, 185, 20) # Specify character color for font.color.rgb property of run object
#------------------------------------------------------------------------------------------------------
tf = sld0.shapes[0].text_frame
tf.add_paragraph() # Adding a paragraph
pg = sld0.shapes[0].text_frame.paragraphs[1] # Get paragraphs added
rn0 = pg.add_run() # Add run object to collection
rn0.text = 'Sentence 1' # Set text in paragraphs
rn0.font.color.rgb = RGBColor(255, 0, 0) # Set color (red) for paragraph text
rn1 = pg.add_run()
rn1.text = 'Sentence 2'
rn1.font.color.rgb = RGBColor(0, 255, 0) # Set color (green) for paragraph text
rn2 = pg.add_run()
rn2.text = 'Sentence 3'
rn2.font.color.rgb = RGBColor(0, 0, 255) # Set color (blue) for paragraph text
prs.save('Art2_List3_result.pptx') The following is an explanation of key points.
In line 14, the text property is used to set the string directly to the new ”Place Folder TITLE” (Shape object).
At this point, TextFrame, Paragraph, and even Run objects are automatically generated and can be referenced. Since there is only one character added, there is only one Run object in the paragraph, which can be accessed with runs[0].
The font property of the Run object is used to apply the font formatting.
This example further uses the color property to set the text color. The key point is that formatting can be applied to individual characters, rather than to entire paragraphs.
The add_run() method is used to add and retrieve the Run object, and the text property (of the Run) is used to add a string. (Lines 29~31, 33~35 are also appended with strings in the same way)
The result of executing the code is as follows.
The Run object allows font formatting at the character level. (Fig10)
<List3> Execution results are available here
3.3 Font Formatting
This section summarizes the properties related to the Font object that can be set in the paragraph and text layers.
| 【Font Object】 | 【Functions】 | 【Other details】 |
|---|---|---|
| color.rgb property | Font color setting (RGB) | 【RGBColor class】 ex)RGBColor(255, 255, 255) |
| color.theme_color property | Font color setting (Theme color) | option of the【MSO_THEME_COLOR clsss】 |
| italic property | Italic text setting | True(valid)/False(Invalid) |
| bold property | Bold text setting | True(valid)/False(Invalid) |
| name property | Set/Get font name | ex) ‘Calibri’ |
| size property | Set/Get Font Size | Specify by Pt(point), etc. |
| underline property | Underline setting | True(valid)/False(Invalid) or option of the【MSO_UNDERLINE class】 |
The above properties allow you to set a series of font formatting settings. In addition to the above, the fill property seems to be also provided, but it is omitted because it has no effect (cannot be confirmed).
Also, font formatting is inherited from higher level objects unless otherwise specified.
In other words, it is inherited in the order of “TextFrame object” → “Paragraph object” → “Run object”, but you can update the formatting by setting the font on the current layer.
4. Summary

How was it?
In this article, we explained how to edit text on a slide using the “python-pptx” library.
As mentioned earlier, text editing is always necessary in the creation of PowerPoint documents with figures and tables as the main content. We hope this article will be of some help to you.
Finally, let us summarize the contents of this article.
➀. In “python-pptx”, text is managed in units of frame areas (TextFrame object) and paragraphs (Paragraph object).
➁. To add new text, get and add the Paragraph object, set the text and style with the attributes under it.
➂. To edit by character, add or get another Run object. By doing so, you can append characters (words) and set fonts.
The next article will explain how to insert “Graph” into the slide.
By organizing numerical data using graphs, you can make your presentation easier to understand and more persuasive.
Please refer to the next article. The link will be here. ↓
Thank you for reading to the end.