How was this series【Python×PowerPoint】?
We have explained the following topics with the aim of improving efficiency the creation of PowerPoint presentation through the use of “python-pptx”.
Now, we have covered “Text Editing,” “Graphs,” and “Tables” in order, and the last article in this series will show you how to insert “Shapes“, “Images” and “Text Boxes” on a slide.
These are essential elements in creating so-called “captivating PowerPoint presentations“.
Shapes and images encourage effective eye catching.
Of course “python-pptx” can handle these!
For example, the following troublesome tasks can be completed instantly.
- To insert a figure in the same place on all pages of a presentation
- To change the size or text of all shapes on the slide
- To replace the image on the slide with the latest one
By reading this article you will learn the following.
The usage of various classes and functions introduced in this article is just an example. Please refer to the “Official Documentation” below for details and clarifications.
python-pptx Official Documents(API Document)
https://openpyxl.readthedocs.io/en/stable/
1. Components of Slide (Shape object)

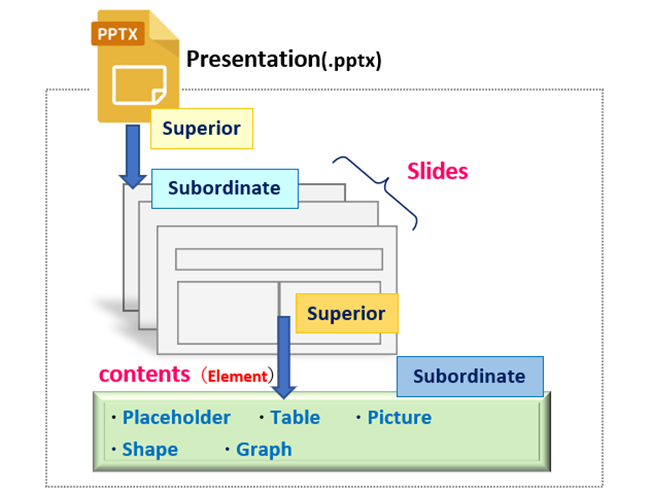
As shown in Fig1, PowerPoint is composed of various elements such as Place folders(TITLE, BODY, etc.), Shapes, Graphs, and Tables.
Each of these elements is managed as the Shape object in “python-pptx”. Shapes (AutoShape), images, and text frames, which are the main topic of this article, are also types of Shape objects. (Fig2)
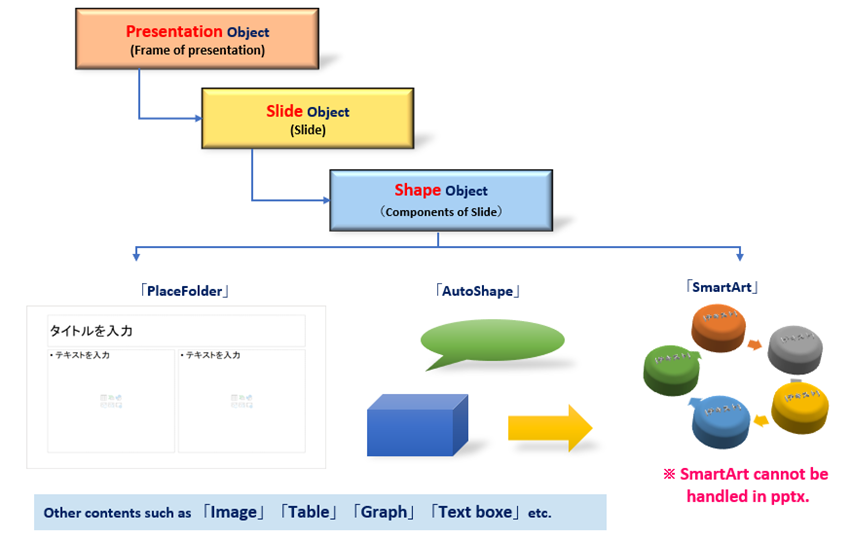
However, “python-pptx” is not able to manipulate all of PowerPoint’s content (as of 2021/10) and cannot handle some of it. (Fig3)
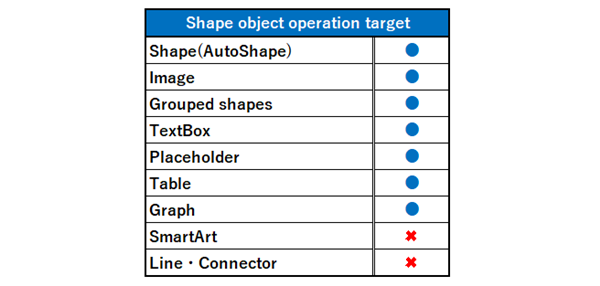
Unfortunately, “SmartArt” and “Connectors” (connections between AutoShapes) seem to be unsupported. Expect the operator to respond in the future. The following is a quote from the official document
These aren’t supported yet either so I don’t know much more about them. I’d better get to these soon though, they seem like they’d be very handy.
<Official Document>Understanding Shapes — python-pptx 0.6.21 documentation
2. Inserting Shape, Image, and Text Box

All elements on a slide are managed in python-pptx as Shape objects.
Therefore, when accessing the content of slide, it must be through the Shape object.
To access (get) the shape object, use the shapes property for the target slide (Slide object).
What you can get with the shapes property is Shapes Collection (iterable object) that manages all the elements (shape objects) in the slide.
You can get a specific element (Shape object) by specifying its index, as in the following format.
Slide Object.shapes property
return : Shapes Collection (Iterable object containing the Shape object as element)
Slide Object.shapes[index] property
arg: index : Index of element in slide
return: Shape Object
From the next section, methods for adding Shape objects for shapes, images, and text boxes will be explained.
2.1 Add Shape object (AutoShape)
To insert a shape (AutoShape) on a slide, use the add_shape() method with the following format.
Shapes Collection.add_shape(autoshape_type_id, left, top, width, height)
arg: autoshape_type_id: Specify the type of shape (MOS_SHAPE class)
arg: left: X coordinate of the upper left of the shape
arg: top: Y coordinate of the upper left of the shape
arg: width: Shape Width
arg: width: Shape Height
return: Shape Object(<AutoShapes>)
For the arg:autoshape_type_id, select the type of AutoShape to be added from the definition of the MSO_SHAPE class. Arguments 2 and 3 specify the placement position, and arguments 4 and 5 specify the size of the shape.
The following is an illustration of the add_shape method argument specification. Methods for adding images and text boxes are also described below, but in a similar style.
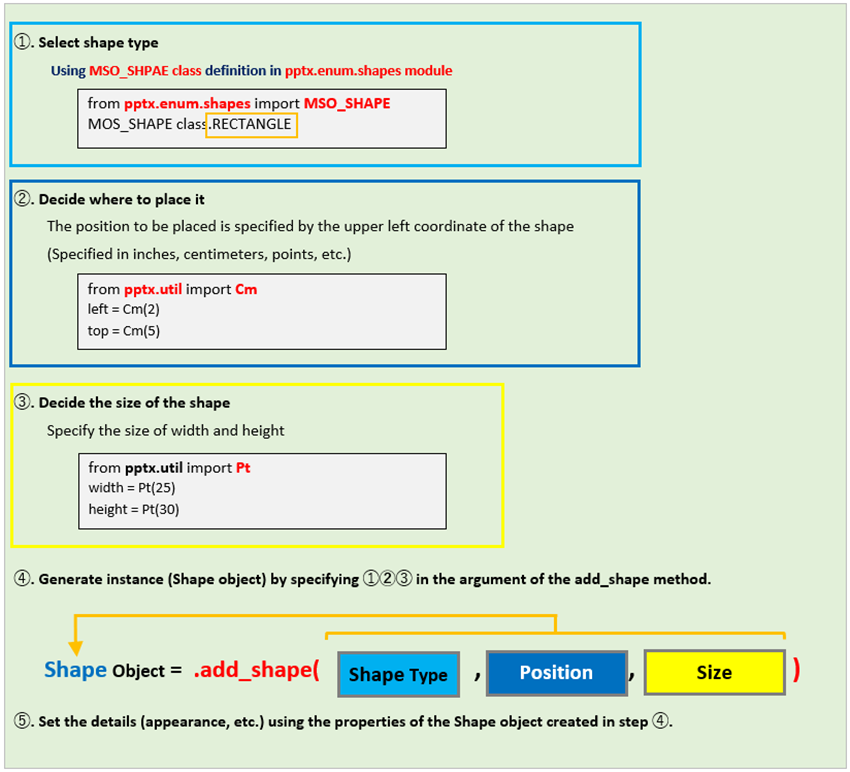
Shape type corresponds to all AutoShapes in PowerPoint’s menu list. See 「MSO_SHAPE class」 for a list of options.

Once the shape has been selected and positioned, set the attributes under the Sahpe object (shape), such as Fill, Text, other settings.
The main attributes include the following.
| 【Shape Object(AutoShape)】 | 【Function】 | 【dependent property】 |
|---|---|---|
| text property | Setting text | Need to confirm whether TextFrame can be included in advance. |
| text_frame property | Get the TextFrame object | 【TextFrame Object】 Adding paragraph(add_paragraph()), text string(text), blank space(margin_*), wrap(word_wrap)…etc |
| has_text_frame property | Checking for inclusion of text frames | Read-only (True:Include/False) |
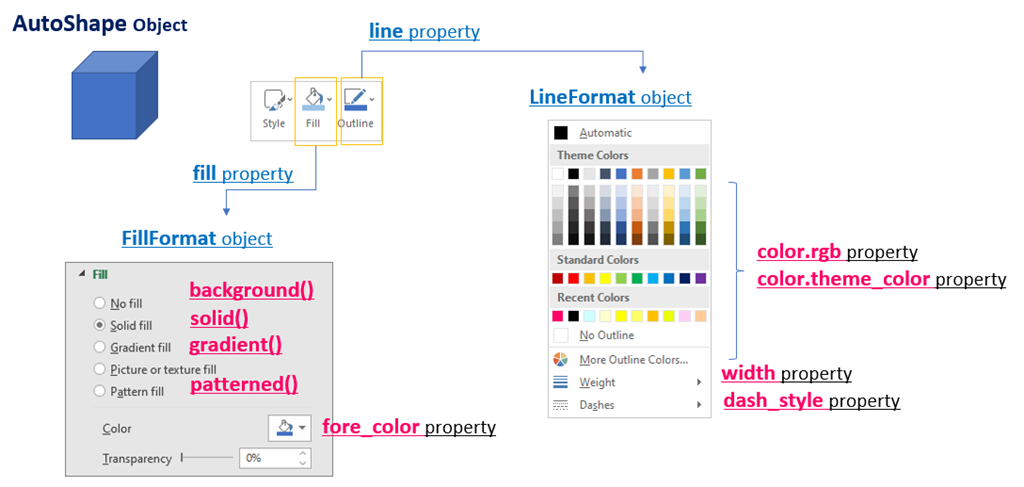
| fill property | Get the FillFormat object (Applying fill effect) | 【FillFormat Object】 Foreground (fore_color) Background color (back_color), Fill-in(solid()), Pattern setting, …etc. |
| line property | Get the LineFormat object (Border setting) | 【LineFormat Object】 Line color(color), linestyle(dash_style), Fill-in (fill), Line width (widh), …etc |
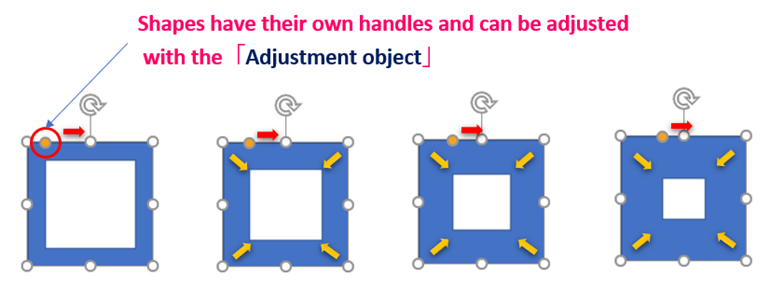
| adjustments property | Get the Adustment Collection (Fine-tune shapes) | 【Adjustment Object】 Set a real number from 0 to 1.0 for 0~8 handles (the number of handles varies depending on the shape) |
Under the FillFormat object using the fill property and the LineFormat object using the border line property, attributes such as those shown in Fig6 are also used to configure detailed settings.
In addition, there is a type of AutoShape that provides taps to adjust the shape. The number of taps depends on the shape, but you can use the adjustments property to get and set the adjustment values. (Fig7)
【SAMPLE(1)】
Here is a sample code to insert a shape (AutoShape) into the slide.
The code outline adds a blank slide to a new presentation and adds three different shapes. Shape, fill, and text settings for the AutoShape.
from pptx import Presentation
from pptx.enum.shapes import MSO_SHAPE    # Class in which the shape type is defined
from pptx.dml.color import RGBColor       # Color management class
from pptx.util import Cm,Pt               # Class to specify units (centimeters, points)

prs = Presentation()
sld0 = prs.slides.add_slide(prs.slide_layouts[6]) # Add blank Slide


# [A]Add and deform "Shapes"
#-----------------------------------------------------------------------------------------------
rect0 = sld0.shapes.add_shape(		  # Add Shape object➀
    MSO_SHAPE.ROUNDED_RECTANGLE,   	# Specify the shape type as "Rounded Rectangle"
    Cm(2), Cm(2),                  	# Insertion position is specified as the upper left coordinate of the shape
    Cm(5), Cm(3))                  	# Specify the width and height of the inserted shape

for i in range(3):

    rect1 = sld0.shapes.add_shape(     	# Add Shape object➁
        MSO_SHAPE.DECAGON,              #  Specify [Hexagon] as the shape type
        Cm(2+i*5), Cm(7),
        Cm(3), Cm(3))

    rect1.adjustments[0] = 0.5*(i+1)   # Transform shape of figure (height direction)


for i in range(3):
    rect2 = sld0.shapes.add_shape(     	# Add Shape object➂
        MSO_SHAPE.STAR_10_POINT,        # Specify [star(10)] as the shape type
        Cm(2+i*5), Cm(12),
        Cm(3), Cm(3))

    rect2.adjustments[0] = 0.21*(i+1)   # Transform shape of figure


# [B]Shape Fill and Text Settings
#-----------------------------------------------------------------------------------------------
rect0.fill.solid()                                   # Fill Shape object➀ with single color
rect0.fill.fore_color.rgb = RGBColor(250, 100, 100)  # Specify color by RGB

pg = rect0.text_frame.paragraphs[0]   	# Getting TextFrame of Shape object➀.
pg.text = 'ROUNDED_RECTANGLE'         	# Set text in TextFrame
pg.font.size = Pt(10)                	  # Set text font size to 10 point


prs.save('Insert_Shape_list1.pptx')
Now, let me explain the key points of the code.
The add_shape() method is used to add a shape to the slide by specifying the shape type (ROUNDED_RECTANGLE), placement location, and size.
The Shape object is stored in a variable as “rect0” and used in later processing.
Insert three new figures (hexagons), shifting their positions. The adustments property on line 24 is used to change the shape of the adjustment handles by setting their values.
This Autoshape included only one adjustment handle.
Lines 27, 28, and 33 insert “Shape3″(10 stars) as well. This shape has two adjustment handles, one of which is adjusted.
Get the FillFormat object with the fill property for a shape➀. Applies “Solid fill” to the shape using the methods and attributes under the object. The color is specified by setting the RGBColor object.
For a shape➀, use the text_frame and paragraphs properties to get a paragraph, and specify the text and font size.
The result of running is shown below.
Three different shapes were inserted into the slide, and the Fill Effect, Text Settings, and Adjustments could be applied.

The execution result of <List1> can be downloaded below.
2.2 Add Shape object for「Text Box」
To insert “TextBox” on the slide, use the add_shape() method with the following format.
Shapes collection.add_textbox(left, top, width, height)
arg: left :Upper left corner(x) of the text box
arg: top :Upper left corner(y) of the text box
arg: width :Width of text box
arg: width :Height of text box
return: Shape object (text box) / added to the Shapes collection
Only “text (string)” can be set in the text box. Therefore, the mainly attribute to be used with the Shape object is the text_frame property.
This is the same as the handling of TextFrame objects when setting text in the place folder, as explained in the second article in the series.
| 【Shape Object(Text Box)】 | 【Functions】 | 【Properties(Mainly)】 |
|---|---|---|
| text_frame property | Get the TextFrame object | 【TextFrame Object】 Adding paragraph (add_paragraph()),text string(text),blank space(margin_*),wrap(word_wrap)…etc |
For paragraph and text editing, please refer to the following as well.
【SAMPLE(2)】
Here is a sample code to insert a text box on the slide.
The code summary is to add a blank slide to a new presentation, get a text frame, add a paragraph and set the text and its formatting.
(This will be a review of the second in the series)
from pptx import Presentation
from pptx.util import Inches, Pt
prs = Presentation()
sld0 = prs.slides.add_slide(prs.slide_layouts[6])
left = top = width = height = Inches(1)
txBox = sld0.shapes.add_textbox(left, top, width, height) # Adding Shape object (Text Box)
#----------------------------------------------------------------------------------------------------
tf = txBox.text_frame # Setting TextFrame Object
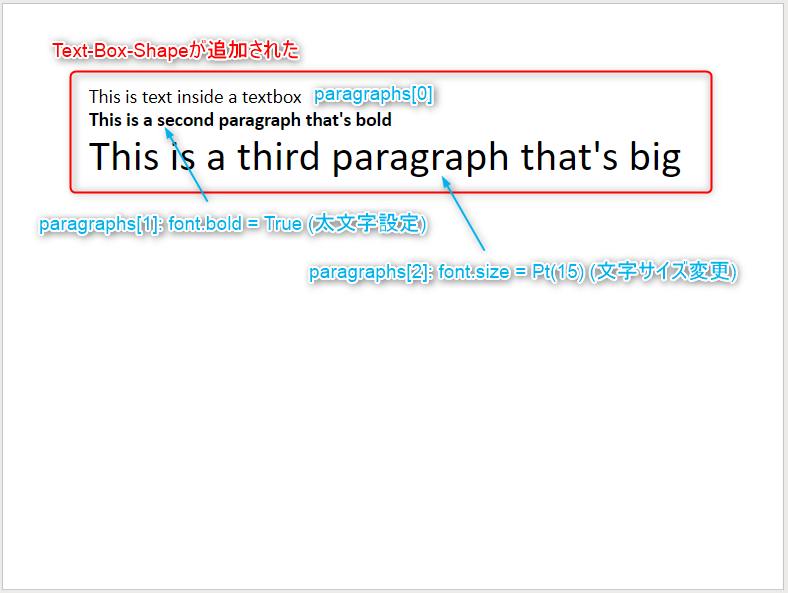
tf.text = "This is text inside a textbox" # One paragraph is included by default
p = tf.add_paragraph() # Add Paragraph object (second paragraph)
p.text = "This is a second paragraph that's bold" # String setting by text property
p.font.bold = True # Bold character setting by font.bold property
p = tf.add_paragraph() # Add Paragraph object (third paragraph)
p.text = "This is a third paragraph that's big" # String setting by text property
p.font.size = Pt(40) # Font size setting by font.size property
prs.save('Insert_TextBox_list2.pptx')Now, let me explain the key points of the code.
The add_textbox() method is used to add a textbox to the slide, specifying the location of the box and the size of the frame. The returned Shape object is stored in the variable “txBox” for later processing.
After getting a TextFrame object with the text_frame property, add a paragraph using the add_paragraph() method. (One paragraph is prepared in advance in a TextFrame.)
Other strings and formatting (bold and size) are applied to each paragraph.
The result of running is shown below.
You can see that the text box and paragraphs have been inserted and the text and its formatting have been applied.
The execution result of <List2> can be downloaded below.
2.3 Add Shape object for the「Picture」
Finally, we will explain how to insert images into slide. To place picture anywhere on the slide, use the add_picture() method with the following format.
Shapes collection.add_picture(image_file, left, top, width, height)
arg: image_file: Name of image file to be inserted (specify including path)
arg: left: X-position of the upper left corner of the image.
arg: top: Y-position of the upper left corner of the image.
arg: width: Width of image
arg: height: Height of image
return: Shape(Picture) Object/ Add to Shapes collection
The Shape (Picture) object contains attributes for cropping and rotating the picture.
| 【Shape(Picture) Object】 | 【Functions】 | 【Other/Details】 |
|---|---|---|
| crop_bottom(left/right/top) property | Image size cropping from top, bottom, left and right edge surfaces. | Setting ex) 1.0(100%), 0.25(25%) |
| rotation property | Rotating Image | -360 to 360 degrees to specify |
【SAMPLE (3)】
Here is a sample code to put an image on the slide.
The code outline is to paste 5 images (jpg), crop and rotate them.
from pptx import Presentation
from pptx.util import Cm # Class for unit designation
prs = Presentation()
sld0 = prs.slides.add_slide(prs.slide_layouts[6]) # Add blank slide
# <Paste Image> ----------------------------------------------------------------------
# Image-➀ X-Posi、Y-Posi、Width、Hight
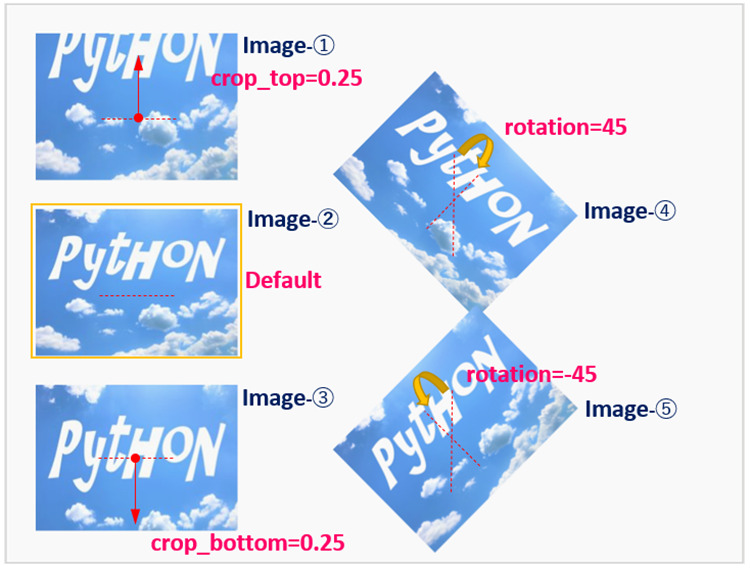
pic0 = sld0.shapes.add_picture('sample_picture.jpg', Cm(1), Cm(1), Cm(7), Cm(5))
# Image-➁
pic1 = sld0.shapes.add_picture('sample_picture.jpg', Cm(1), Cm(7), Cm(7), Cm(5))
# Image-➂
pic2 = sld0.shapes.add_picture('sample_picture.jpg', Cm(1), Cm(13), Cm(7), Cm(5))
# Image-➃
pic3 = sld0.shapes.add_picture('sample_picture.jpg', Cm(12), Cm(4), Cm(7), Cm(5))
# Image-➄
pic4 = sld0.shapes.add_picture('sample_picture.jpg', Cm(12), Cm(12), Cm(7), Cm(5))
# <Trimming, rotation> --------------------------------------------------------------
pic0.crop_top = 0.25 # 0.25 (25% elongation) from the top
pic2.crop_bottom = 0.25 # 0.25 (25% elongation) from the bottom
pic3.rotation = 45 # 45 degree rotation (clockwise)
pic4.rotation = -45 # -45 degree rotation
prs.save('Image_Insert_list3.pptx')Now, let me explain the key points of the code.
Specify the file name, location, and size of the image in the add_picture() method and paste it onto the slide. Units are specified in Cm (centimeters), but other unit systems such as Pt/Inchies are acceptable. The returned Shape object is stored in the variable pic*.
Crops (stretches) the Shape(Picture) object with the crop_top(bottom) property. The rotation property specifies the angle of rotation of the image.
The result of running <List3> is shown below.
Five images are pasted, cropped, and rotated.
The execution result of <List3> can be downloaded below.
3. SUMMARY

How was it?
We have explained the basic usage of “python-pptx,” a Python external library, in a series of five articles.
You have learned that you can add and edit elements on the slide with relatively short code.
Since it is an MS-Office type application, there is also a way to automate it using VBA. On the other hand, I think it would be interesting to add “Python,” which is gaining the most popularity and attention in AI and machine learning, as one of the options.
I am sure there may be opportunities for new synergies.
Also, the January/March 2021 issue of Nikkei Software has a feature article on interesting application cases utilizing web apps and python-pptx.
Please refer to this book to help improve your work efficiency.
This is the last article in this series, but we would like to introduce some application examples using “python-pptx” if we have a chance.
Thank you for reading to the end.
In addition to this PowerPoint article, we also have a series of articles on libraries for manipulating “Excel” and “Word”. Let’s make the three major software of Office more efficient by manipulating them with Python!
〇 Click here to learn more about “Excel“.↓
〇 Click here to learn more about “Word“↓