<Concept of our website “More Freedom with Python”>
This site aims to automate troublesome daily tasks and improve efficiency using Python, currently the most popular programming language. The goal is to introduce a variety of useful libraries (modules) in each issue.
Why? Why Python…
・Python provides a variety of libraries (modules) that allow us to manipulate and automate familiar applications.
It is a well-balanced scripting language that is easy for beginners to understand, yet has a full-fledged object-oriented aspect.
What? Automate…
When we think of the most familiar applications used in the business scene, the first ones that come to mind are probably MS-Office’s 「Excel」, 「Word」, and 「PowerPoint」.
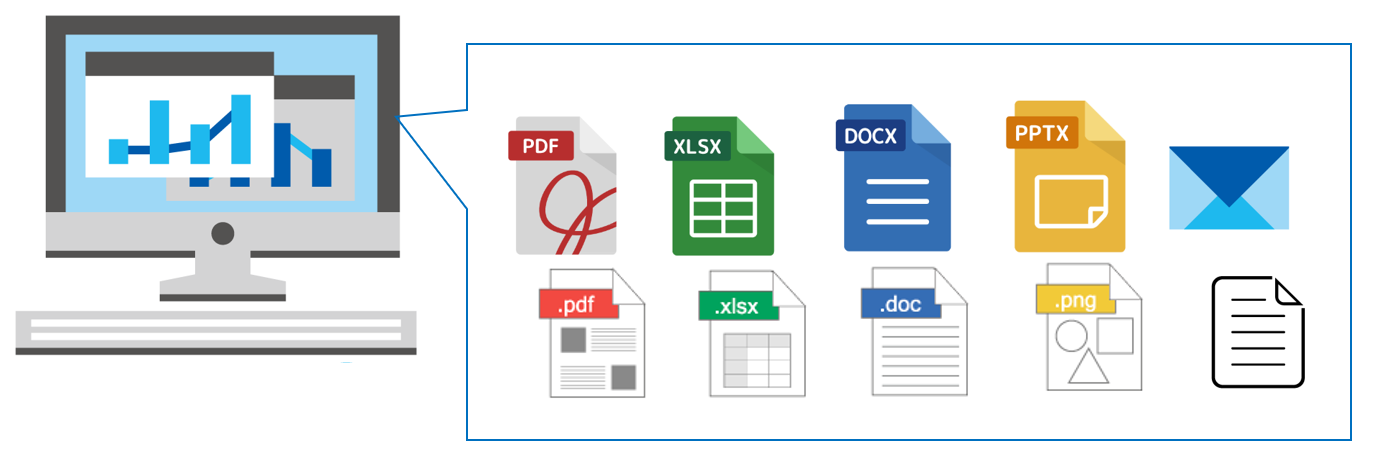
Because they are “standard indispensable tools” that are used daily, the impact of automating and improving the efficiency of these related tasks can be extremely large.
Therefore, in this series of articles, we would like to introduce a method and library for operating the spreadsheet software PowerPoint, which is considered to be the most frequently used of all Office applications, using Python.
Excel has so many features that it is impossible to cover them all in this article alone. We will provide detailed explanations over a series of articles on the following topics
Now, in this first article of the series, I would like to explain “How to Introduce Libraries and Create Files and Slides”.
Please stay with us until the end of this article as you will be able to “do and understand” the following.
1. Overview of “python-pptx” library

The standard way to manipulate PowerPoint from Python is to use an external library called “python-pptx“. Using ”python-pptx”, you can do most of the file creation and editing tasks without launching PowerPoint.
Other languages that can control Office applications. VisualBasic (including VBA) in .Net, and a library called 「Pywin32」 that has been ported to Python. The “Office Developer Center’s” 「VBA Reference」is a good reference for these.
On the other hand, the specification of python-pptx is completely different from them.
The official document of python-pptx is the following URL.
python-pptx Official Documents (API Document)
https://openpyxl.readthedocs.io/en/stable/
The usage of various classes, functions, etc. introduced in this article are examples.
Please check the official documentation for details and clarifications on optional arguments, etc., which can be omitted, if necessary.
1.1 Instal and Operation
Python-pptx is not bundled with ”Anacoda” and must be installed using “pip” or “setup.py”.
Install by entering the following command at the Anaconda prompt, etc.
pip install python-pptxNote that manual installation by “setup.py” does not check for other packages (PIL and xlswWriter) that have dependencies, so we recommend installing with the “pip” command if possible.
python setup.pyNext, import some classes from the pptx module and check its operation.
Try entering and executing the following two lines in an interpreter, etc.
from pptx import  Presentation
prs = Presentation()
If no error messages are displayed at this point, the installation is successful.
The development environment and version information confirmed in the article are as follows. Please keep this in mind when using different environments or versions of libraries.
・JupyterNotebook 6.0.3
・Python3.7.6(64bit)
・python-pptx 0.6.18
・PIL(Python Imaging Library) 7.0.0
・xlswWriter 1.2.7
In the next section, we will explain how to manipulate PowerPoint using classes and objects.
2. Basic of using python-pptx

In this section, we would like to explain the basic usage of python-pptx.
python-pptx follows an object-oriented style of writing code. Since it is object-oriented, it is necessary to always be aware of the hierarchical structure of objects, such as parent (Super) classes and child (Sub) classes.
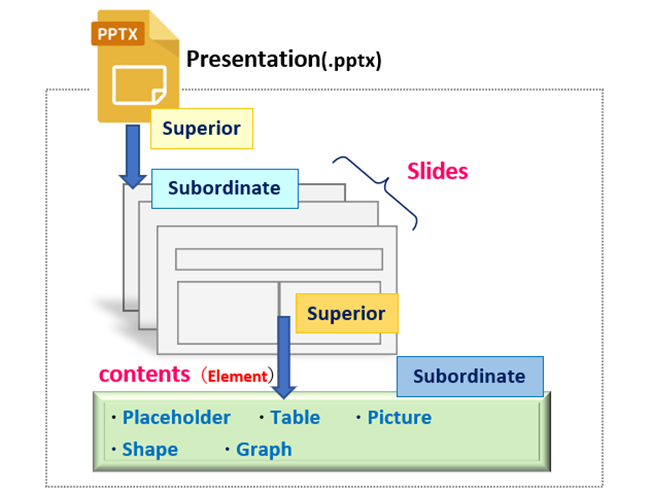
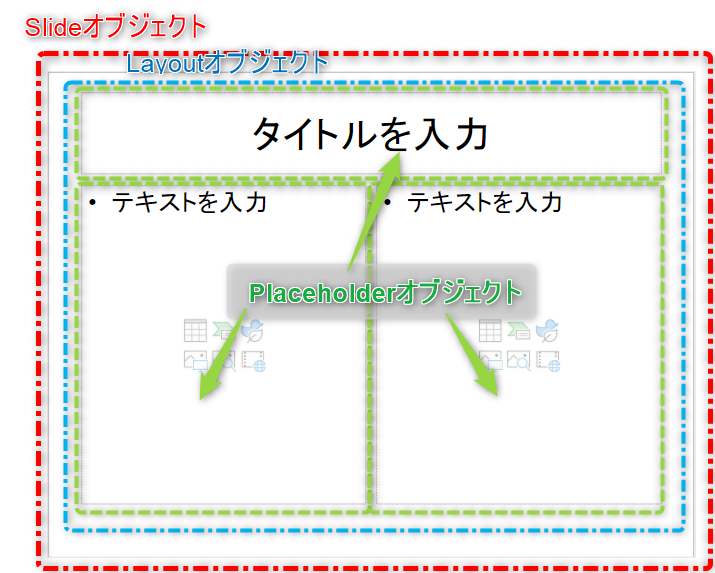
Object hierarchical structure… It is a little difficult to understand, but just as the various elements that make up a PowerPoint file (slides, place folders, contents, etc.) have parent-child relationships (Fig2), objects that are program components also have parent-child relationships and are related to each other.
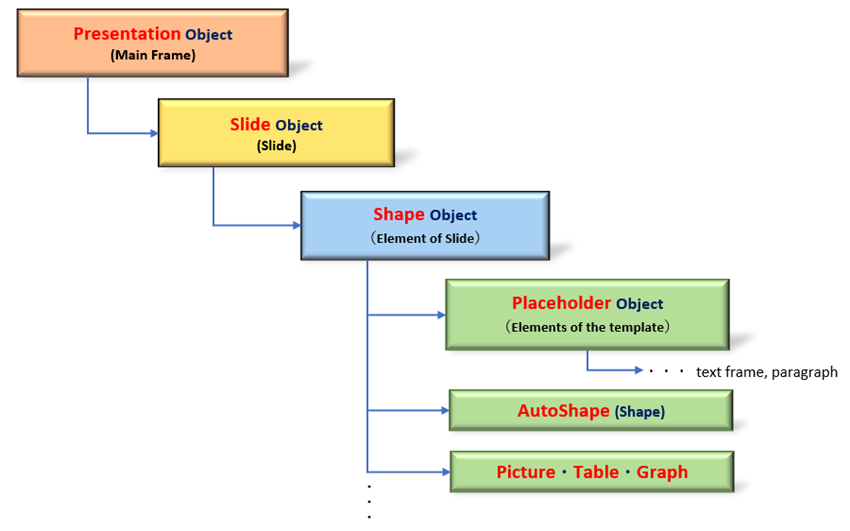
For example, the Root (top level) object is the Presentation object, which is the main body of the file, and below it is the Slide object, which manages each slide, and below that is the Shape object, which is the various types of content. (Fig3)
Details of each level are described below.
2.1 Create and Save Presentation
Python-pptx manages presentation file information as a Presentation object. Therefore, the first step is to obtain the Root (top-level) object, the Presentation object.
To retrieve the object, the Presentation class should be formatted as follows
from pptx import Presentation
Presentation(pptx)
arg: pptx : Specify the name of an existing pptx file to load, with path ※
return:Presentation Object
※The argument is specified when an existing pptx is to be loaded for editing, etc. To read files outside the current folder, specify with path. No argument is specified for new creation.
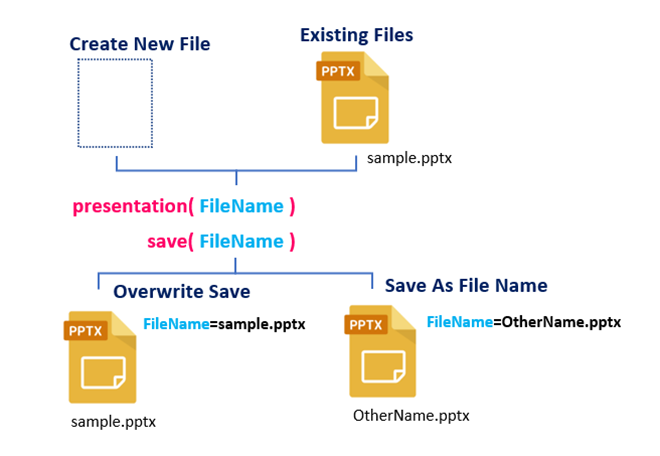
Furthermore, depending on the purpose of editing/creation, there would be two patterns: (1) creating a new presentation, and (2) reading and editing an existing presentation (pptx file). The former specifies no arguments, and the latter specifies the name of the file to be read with its path.
When you have finished creating and editing your presentation, save it for the last time. To save a file, use the save() method in the following format.
Presentation Object.save(file)
arg: file:Specify the name of the pptx file you want to save ※
Specify a file name, even for overwrite saving
If you want to save the file in a folder other than the current folder, specify it with a path.
The arg:file specifies the name of the file to be saved. To overwrite an existing file, specify the name of the loaded file. Note that overwrite saving does not specifically display a warning message.
An image of creating and saving a presentation is shown in Fig4 below.
2.2 Add and Get Slides (Slide Object)
Now that the Presentation object has been obtained, the next step is to add and obtain the slide (Slide object) that will serve as the foundation for the content.
The Presentation object manages all the slides that make up the file as the Slides collection(an iterable object whose elements are Slide objects).
Therefore, to add a new slide or retrieve an existing slide, you must first access the Slides collection (Fig5)
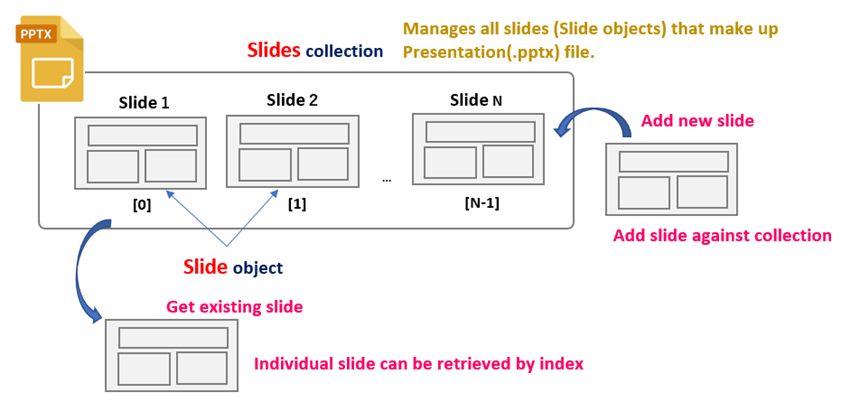
Slides Collection can be obtained with the slides property.(➀) Access to individual elements of a collection can be specified by index.(②) Also, use the add_slide() method to add a new slide. (➂) The format for each is as follows.
➀【Retrieving the Slides collection】
Presentation Object.slides
return:Collection (Slides Object)
➁【Get a specific slide】
Presentation Object.slides[index]
arg: index: Specify an index for a specific slide (starting from 0)
return:Slide Object
➂【Adding a new slide】
Presentation Object.slides.add_slide(slide_layout)
arg: slide_layout: Specify a SlideLayout object
return: Slide Object (Added slide)
Supplemental information about operations on the Slides collection.
This add_side() is the only operation on the Slides collection. It does not seem to support inserting slides at arbitrary positions, moving slides, or copying slides from another file.
The arg:slide_layout of the add_slide() method is set to a SlideLayout object that is the template for the slide to be added.
The SlideLayout object can be obtained by using the slide_layouts property.
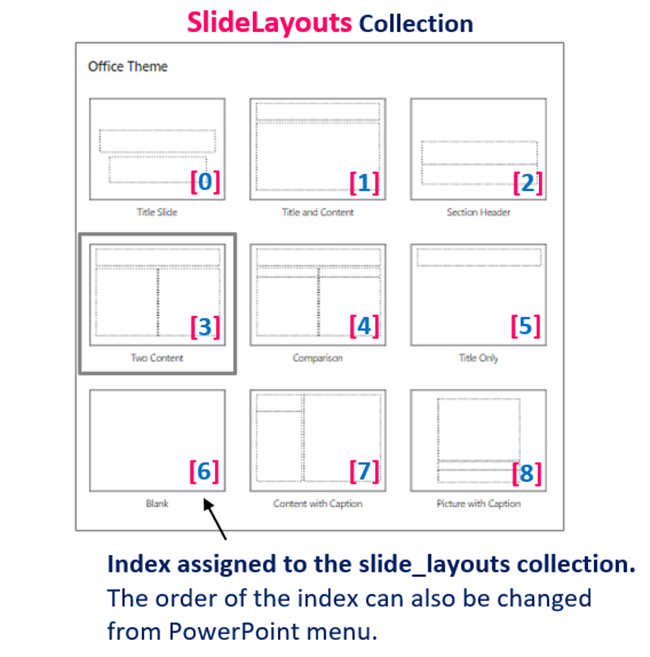
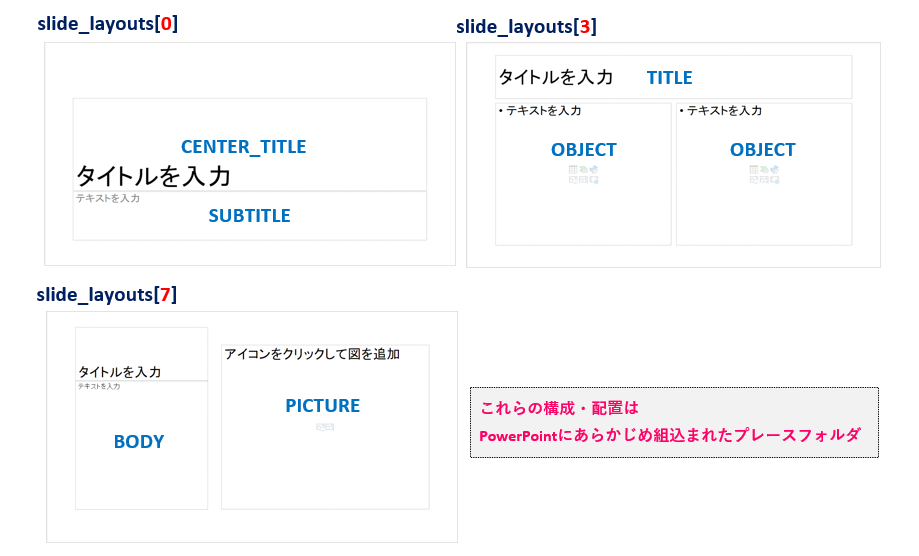
The SlideLayout object holds the layout template information as shown in <Fig.6><Table1>.
The desired object is obtained by specifying the index as in the following format.
Presentation Object.slide_layouts[num]
arg: num : Choose one of nine slide templates from 0 to 8 (see Fig6, Table1)
return: SlideLayout Object
There are 9 types of slide templates (place folders) pre-prepared in PowerPoint.
| Presentaion object.slide_layouts[num] | Content (place folder) type |
|---|---|
| slide_layouts[0] | Title and Slides |
| slide_layouts[1] | Title and Content |
| slide_layouts[2] | Section header |
| slide_layouts[3] | 2 contents |
| slide_layouts[4] | Comparison |
| slide_layouts[5] | Title only |
| slide_layouts[6] | Plain |
| slide_layouts[7] | Titled Contents |
| slide_layouts[8] | Titled image |
Note that the slide template and corresponding index can be freely changed from the “Slide Master View” (“View Tab” > “Slide Master”) in PowerPoint.
【SAMPLE (1)】
Let’s check what we have done so far with concrete sample codes.
The code summary is to create and save a presentation with only 3 template slides.<List1>
from pptx import Presentation

prs = Presentation()		# Obtaining a Presentation object

#---------------------------------------------------------------------------------------------------------------------------------------------------------------
title_slide_layout = prs.slide_layouts[0]	# Get the "Title and Slides" layout object
prs.slides.add_slide(title_slide_layout)	# Add new slide ("Title and Slide")

#---------------------------------------------------------------------------------------------------------------------------------------------------------------
two_title_layout = prs.slide_layouts[3]	# Get a "two-contents" layout object
prs.slides.add_slide(two_title_layout)	# Add new slide ("two content")

#---------------------------------------------------------------------------------------------------------------------------------------------------------------
comp_layout = prs.slide_layouts[4]	# Get layout object for "Comparison content"
prs.slides.add_slide(comp_layout)	# Add new slide ("Comparison Content")

#---------------------------------------------------------------------------------------------------------------------------------------------------------------
print(len(prs.slides)) 		# Number of elements in the collection of slide objects >>3

for slide in prs.slides:
    print(type(slide))			# Object type is Slide object >> <class 'pptx.slide.Slide'>
    print('slide_index [',prs.slides.index(slide), ']')		# Examine the index of the slide >> slide_index [ 0 ], slide_index [ 1 ], slide_index [ 2 ]

#---------------------------------------------------------------------------------------------------------------------------------------------------------------
prs.save('List1_sample.pptx')	# Save as pptx file with name
The following is an explanation of key points.
In lines 1 and 3, the Presentation class is imported and objects are created, which will be handled by the variable “prs”.
Obtains the SlideLayout object that will serve as the template for the slide. Here, the index is set to “0“, so the template will have “Title and Slides” content.
Next, in line 6, we add a new slide by setting the argument of slides.add_slide() to the SlideLayout object. 10, 11, 14, and 15 are similar.
The Len() function on line 14 checks the number of elements (3) in the Slides collection.
Iterate over the Slides collection with “For“statement and break it down into individual Slide objects.
The standard function type() and index() methods are used to check and display the type and index of an object, respectively.
Finally, the save() method saves the file as named and outputs the pptx file.
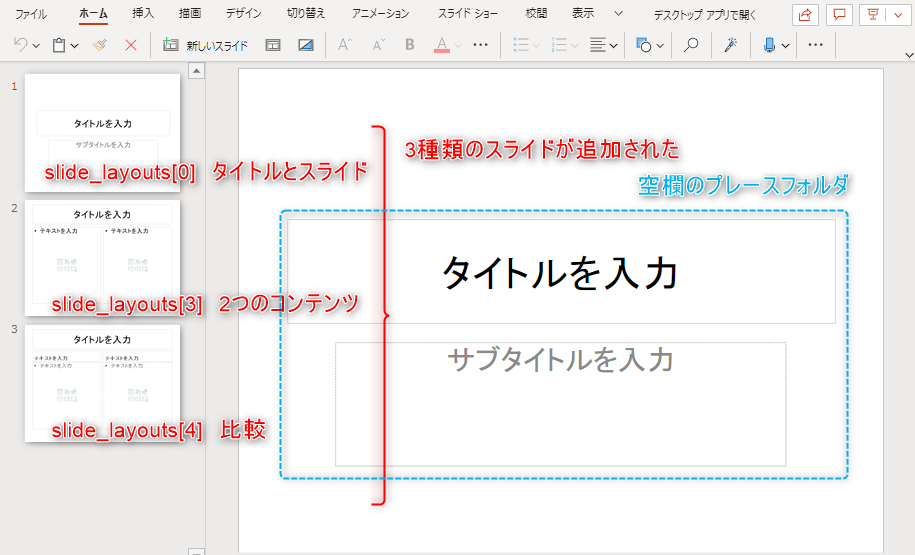
The execution result of <List1> will be as follows.
A presentation file with three blank template (place folder) slides has been output. (Fig7)
2.3 Get Placeholder and Set Content
In the previous section, we specified a SlideLayout object, which is the template for adding slides. In this section, we will discuss a little deeper into the placeholder object, which is a component of the SlideLayout object.
The hierarchical structure of objects between the Slide object and the Placeholder object is shown in Fig8.
By default, there are a total of 19 types of place folders. Among them, the following are some of the most commonly used ones.
For example, the default template for PowerPoint consists of the following place folders. (The combination and arrangement can be freely changed in the master slide settings.(Fig9))
To edit an individual placeholder, you must retrieve the target placeholder object, which can be done with the placeholders property. Get all place folders on the slide, so you can select the object to be edited by specifying its index.
Slide Object.placeholders property
return:Placeholder Collection (Placeholder Object)
Slide Object.placeholders[num]
arg: num:Index of place folder on slide
return:Placeholder Object
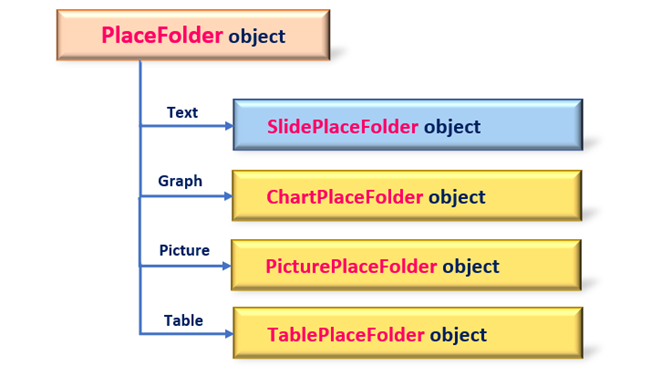
Placeholder objects are actually further classified into four types of objects depending on the content type (Text, Graph, Image, or Table).
The main properties common to these objects include the following.
| Placeholder Object. | Functions | Other/Details |
|---|---|---|
| .name proterty | Get the place folder name | |
| .placeholder_format.idx property | Get indexes | |
| .placeholder_format.type property | Get place folder type | PP_PLACEHOLDER |
The type attribute is for acquisition only, so the folder type cannot be changed.
In addition, object-specific methods include the following. Text, graphs, images, and tables can be inserted into the holder. <Fig.11>

【SAMPLE (2)】
Here is a concrete sample code that uses the Placeholder object.
The code outline will first create a new pptx file and add 2 slides. Next, after checking the attributes of the place folder in each slide, set the text to “TITLE“.
from pptx import Presentation

prs = Presentation()

#------------------------------------------------------------------------------------------------------
title_slide_layout = prs.slide_layouts[0]        # Get SlideLayout object for "Title and Slide"
sld0 = prs.slides.add_slide(title_slide_layout)  # Add new slide

for p in sld0.placeholders:  # Expand individual PlaceFolde objects in the slide
    print(p.name)  # Get the folder name
    # >>Title 1, Subtitle 2

    print(p.placeholder_format.idx, p.placeholder_format.type)  # Get the index and type
    # >>0 CENTER_TITLE (3), 1 SUBTITLE (4)

#------------------------------------------------------------------------------------------------------
title_slide_layout = prs.slide_layouts[3]        # Obtain a SlideLayout object with "Two contents"
sld1 = prs.slides.add_slide(title_slide_layout)  # Add new slide

for p in sld1.placeholders:  # Expand individual PlaceFolde objects in the slide
    print(p.name)  # Get folder name
    # >>Title 1, Content Placeholder 2, Content Placeholder 3

    print(p.placeholder_format.idx, p.placeholder_format.type)  # Get the index and type
    # >>0 TITLE (1), 1 OBJECT (7), 2 OBJECT (7)

#------------------------------------------------------------------------------------------------------
title = sld0.placeholders[0]                     # Obtaining the PlaceFolder object for slide1, Title1.
title.text = "Slide Title and Slides"            # Set text

title = sld1.placeholders[0]                     # Obtaining the PlaceFolder object for Title1 on slide 2
title.text = "Slide Two Contents"

prs.save('List2_add_slide_save_file.pptx')
Now, let me explain the key points.
Specify the SlideLayout object ([0]”Title and Layout“) and add a new slide with the add_slide() method.
A second slide ([3]”Two contents“) is added in lines 17 and 18 as well.
The placeholders property expands all folder information in a slide with a For statement.
Then, the folder name is checked with the name property for the individual object. Lines 20, 21, and 24 are similar.
From the folder name research, we know that the first folder of each slide is “TITLE”, so we set the text using the text property. Lines 31 and 32 are similar.
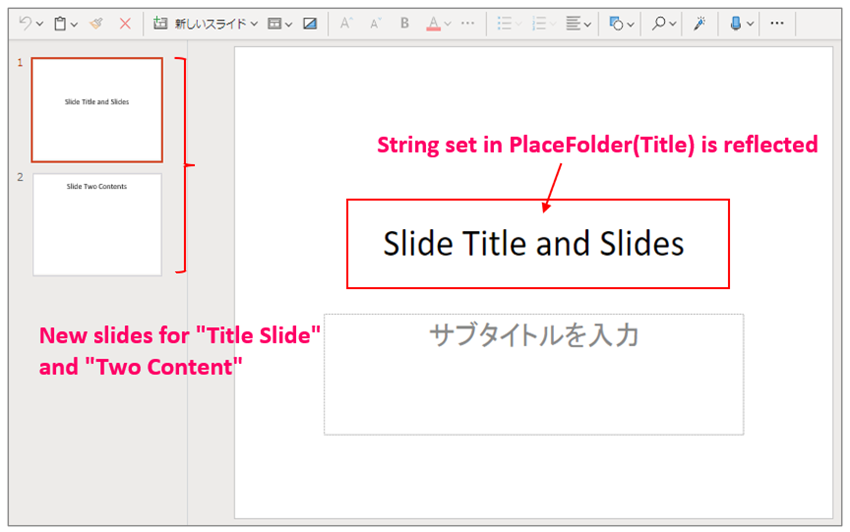
The execution result of <List2> is as follows
Two new slides (“Title and Slide” and “Two Contents”) were added and text was set for the title.
【SAMPLE (3)】
Here is one more sample code.
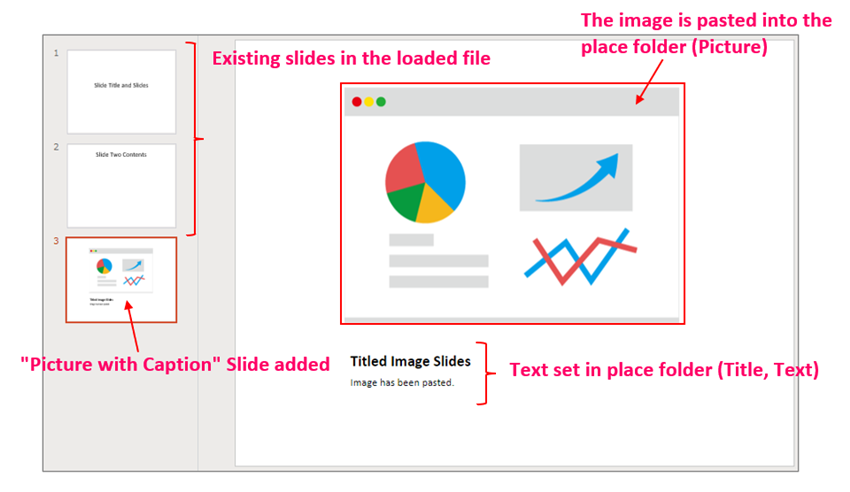
The code is outlined as follows. Load the output (pptx file) of <List2> and add a new slide (titled figure). And one that inserts the image into the “PICTURE” place folder, names it and saves it as.
Files (.pptx, .png) read by this program can be downloaded from
from pptx import Presentation

prs = Presentation('List2_add_slide_save_file.pptx')   # Load existing file
#------------------------------------------------------------------------------------------------------
title_slide_layout = prs.slide_layouts[8]                 # Get layout object for "Titled figure"
sld2 = prs.slides.add_slide(title_slide_layout)           # Add new slide
print(len(prs.slides))        # Number of slides >>3

for p in sld2.placeholders:   # Get the name of the place folder in the sheet
    print(p.name)             # >>Title 1 Picture Placeholder 2 Text Placeholder 3

#------------------------------------------------------------------------------------------------------
sld2.placeholders[0].text = 'Titled Image Slides'
sld2.placeholders[1].insert_picture('Bussiness_Icon.png')  # Paste image into the Image Place folder
sld2.placeholders[2].text = 'Image has been pasted.'

prs.save('List3_load_file_paste_image.pptx')              # Rename and save as
Let me explain the key points.
Loads an existing file by specifying its name as an argument of the presentaion class. Specify with Path (relative or absolute path) if you want to read files in a different location than the script.
Add a new slide ([8]”Figure with title”) using the add_slide() method.
Check the name of the place folder included in the slide at the name property on lines 9 and 10. (TITLE, PICTURE, BODY)
Text is set to the “TITLE” and “BODY” with the text property, and an image is inserted into the “PICTURE” with the insert_picture() method.
The execution result of <List3> is as follows.
A new slide is added to the existing file and the image is inserted into the PICTURE folder.
3. Sumary

How was it?
In this article, we have explained the basics of using the “python-pptx library” to manipulate PowerPoint: “creating a presentation“, “adding slides“, and “creating content using the place folder“.
You have realized that this is all you need to create a minimal presentation file.
Finally, let’s keep in mind the main points of this article.
➀. In python-pptx, the hierarchical structure is organized with the Presentation object at the top. Furthermore, under the Presentation object, it is followed by the Slide object, SlideLayout object, Placeholder object, and so on. In other words, it is an object-oriented library.
➁. PowerPoint is provided with pre-defined default slides (template and place folder).
This makes it possible to easily create presentation files. In python-pptx, the SlideLayout/Placeholder object will be utilized.
Now that you understand the basics of python-pptx, we will introduce “more practical use cases” from the following series.
In the next issue, we will show you how to insert text into PowerPoint.
The basic concept of PowerPoint is to create graphically appealing materials using figures and tables, but it is important to use “text” appropriately in areas where you want to emphasize and appeal, such as bullet points, conclusions, and supplementary text.
The following article summarizes such methods.
Stay tuned for my next post!
In addition to this PowerPoint, we also have a series of articles about libraries to manipulate “Excel” and “Word”. Let’s aim to improve work efficiency by using Python to manipulate the three major Office software!
〇 Click here for a series of articles on “Excel”.
〇 Click here for a series of articles on “Word”.
Thank you for reading to the end.