Python is now the most popular programming language. One of the reasons is that “libraries are provided in abundance”.
Do you find it tedious to install libraries and modules in the official Python (CPython) and IDE (Integrated Development Environment) each time you need to use them?
Python also has an option to use a tool called “Anaconda Distribution” which can install “development tools” and “various libraries” at once.
Anaconda Distribution has the following features (advantages)…
For these reasons, we strongly recommend Anaconda to beginners who want to start Python development.

Anaconda Official Site
https://www.anaconda.com/
In this article, we would like to introduce an overview of “Anaconda” and how it can be used.
1. What is Anaconda?

Anaconda is a “package” and “development environment” management tool managed and maintained by the Anaconda Foundation.
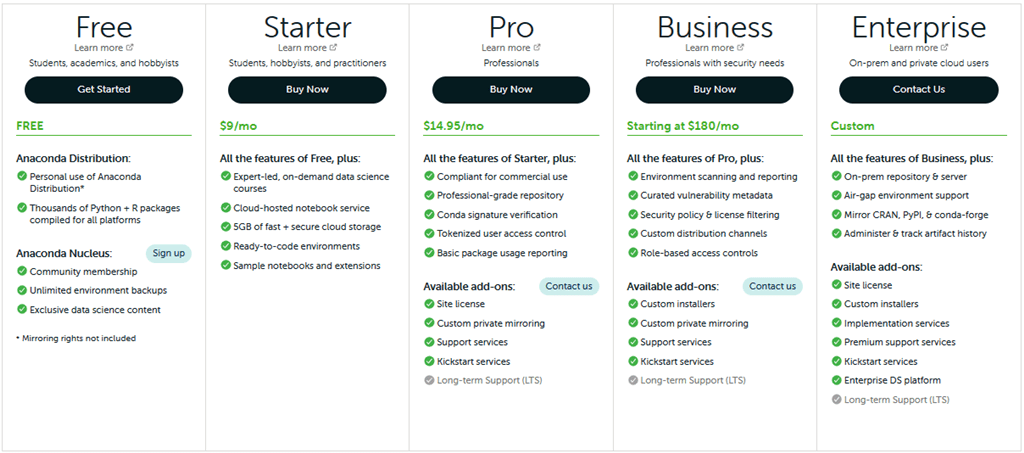
Windows, macOS, and Linux are supported. In addition, various lineups such as “Anacodna Distribution” (free and limited to personal use and hobbies) and “Anaconda Professional, Business” (available for commercial use for a fee) are also offered depending on the intended use. For more information on each, see also.
<Feature 1: Many libraries are already installed>
The following libraries are installed and ready to use with Anaconda. Data science, Scientific and Technical computing, and more.(Table.1) (According to the official website, there are hundreds to thousands of libraries available, depending on the plan.)
This saves you the trouble of installing individual libraries during Python development.
| Major Libraries | Functions and others |
|---|---|
| Numpy | Array and matrix operations |
| Pandas | Data frames, data matrix |
| Matplotlib | Data visualization such as graphs and tables |
| Tkinter | Provide GUI functions |
| openpyXL | Provide spreadsheet (Excel) functions |
In addition, many other libraries and modules have been installed.
<Feature2: Development tools and package management>
“Anaconda prompt prompt (Conda)” which allows interactive script execution at a prompt is available as an IDE. And “Jupyter Notebook” which allows users to input code and check its operation in a browser-based environment and “Spyder” which provides a debugger and step execution functions are also available.
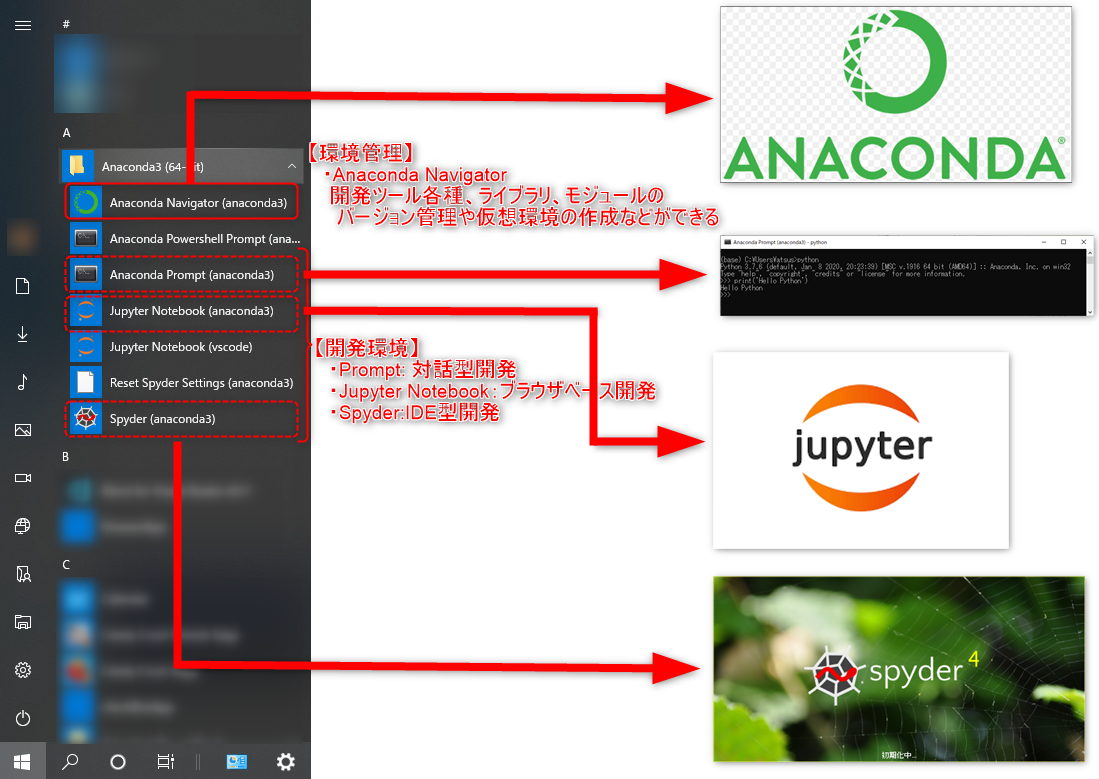
The “Anaconda Navigator” also provides an easy-to-understand UI for managing package (library) search and installation, as well as creating and switching virtual environments.
In this article, we will explain “Anacodna Distribution” which allows you to use these free of charge. From the next section, we will introduce specific installation procedures and the basics of how to use the bundled tools.
2. How to Install Anaconda

This section describes how to install the Anaconda Distribution.
First, go to the <Download>page on the official website. (Figure.4)
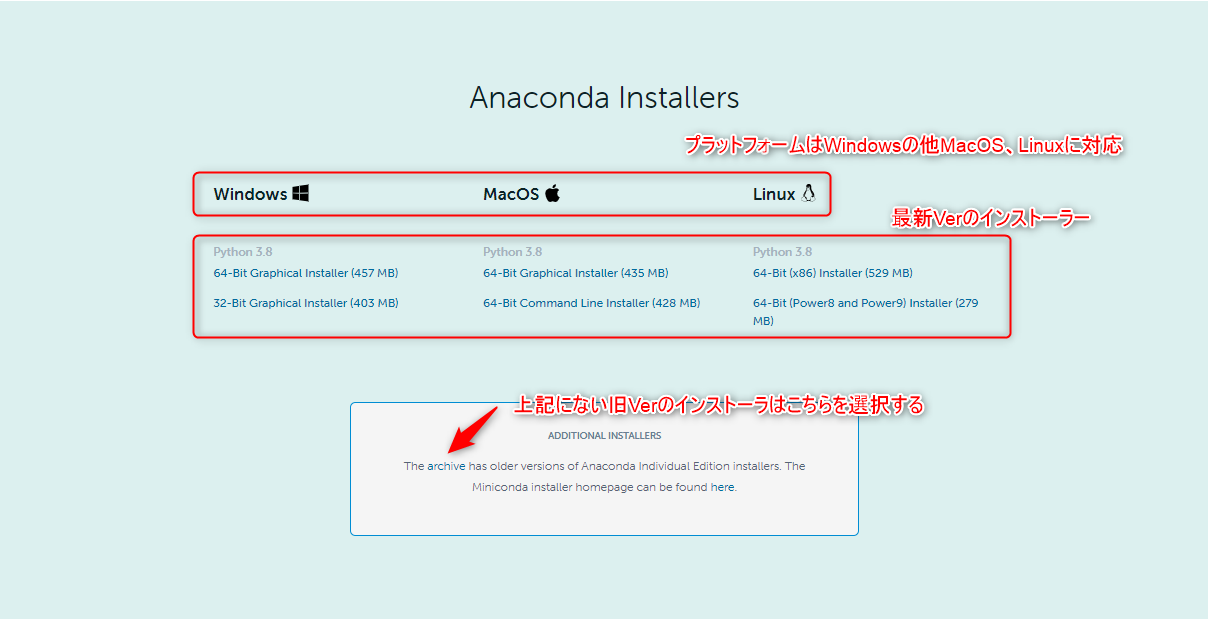
Installers can choose from three platforms: Windows/macOS/Linux. Basically, you can install the latest release Ver, but you can also specify a specific Ver installer from the “archive”. (Step 2)
The installation itself proceeds automatically and is completed simply by pressing the “Next” button. A decision is required as to whether to register the path of the executable file in step 7 (Fig. 10) to an environment variable. By registering, you will be able to operate the “Conda command” directly from the Winodws command prompt. If not required, uncheck the box.
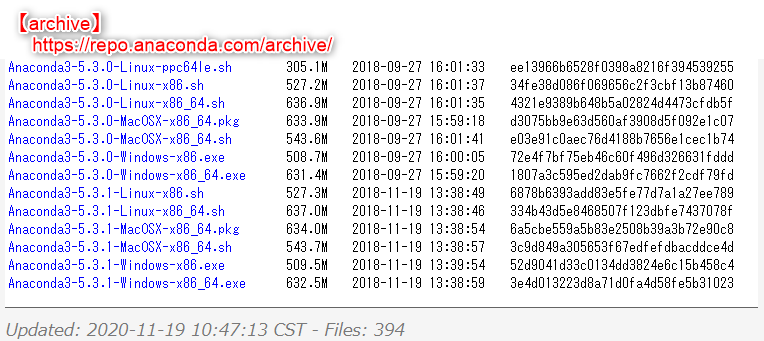
2. The installer of the previous version can be downloaded from the archive page.

3. After confirming Ver information, go to Next.
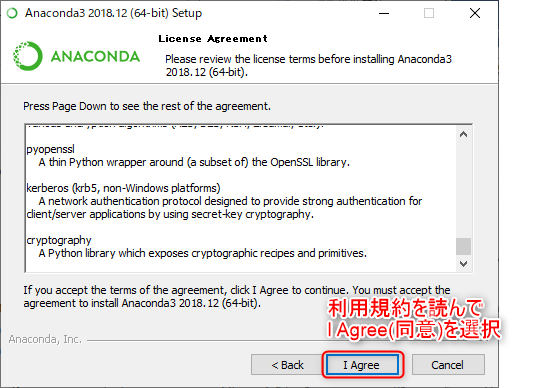
4. Review the Terms of Use and select I Agree.
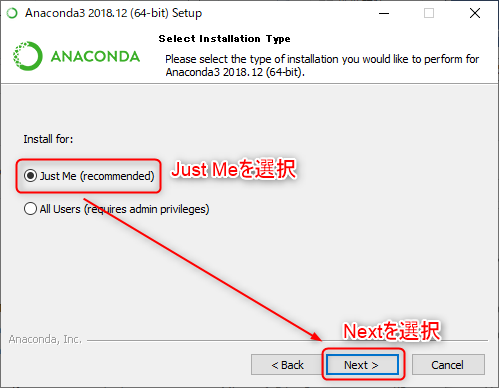
5. Check ”Just Me” and go to Next.
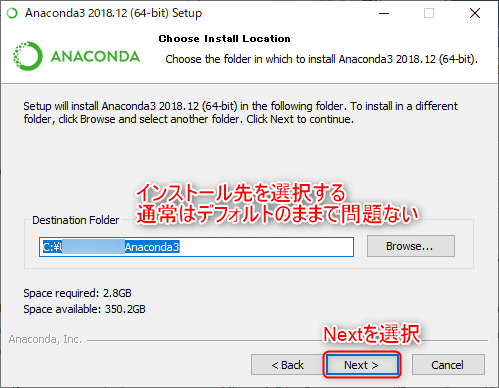
6. Select an installation location and go to Next.
(Normally, the default is fine.)
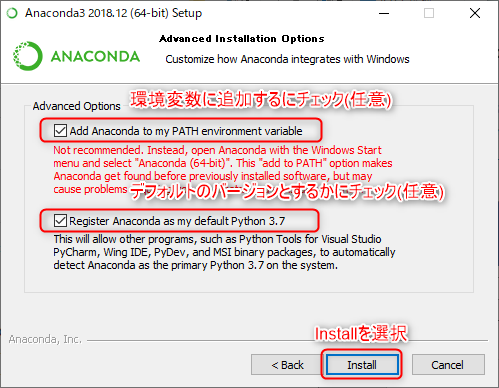
7. Check the “Add to environment variables” checkbox (*) and press the Install button to install the Anaconda.
Installation takes about 10 minutes.
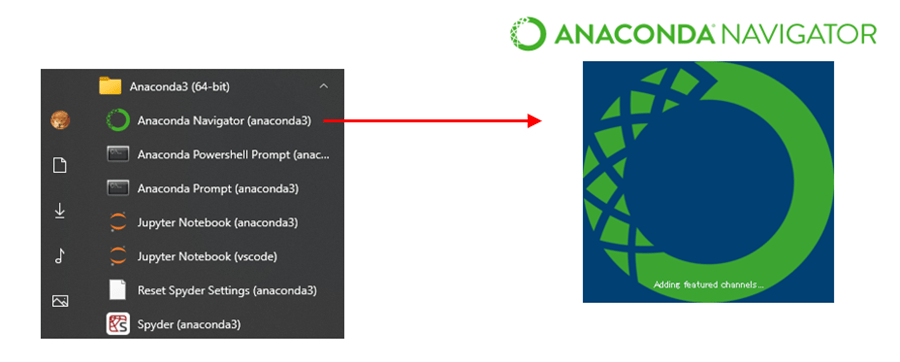
If the folder “Anaconda3(64bit)” appears in the Windows Start menu, the installation has been successfully performed.
3. Introduction to Anaconda Tool Features

This section provides an overview of the management tools (package and virtual environment) and development tools included with Anaconda.
Packages and virtual environments can be managed with “Anaconda Navigator” which can be operated with an easy-to-understand GUI and “Anaconda Prompt(Conda)” which can be operated with commands.
In addition, “JupyterNotebook” and “Spyder” are installed as standard development tools.
3.1 Anaconda Navigator (Management Tool)
Anaconda Navigator is started by “Anaconda Navigator(anaconda3)” from the Windows Start Menu. (Figure.11)
Navigator is a desktop application that allows you to centrally manage (show list, version control, new installations) all installed packages. It can also create manage and switch Vrtual environments.
This section summarizes how to use Navigator.
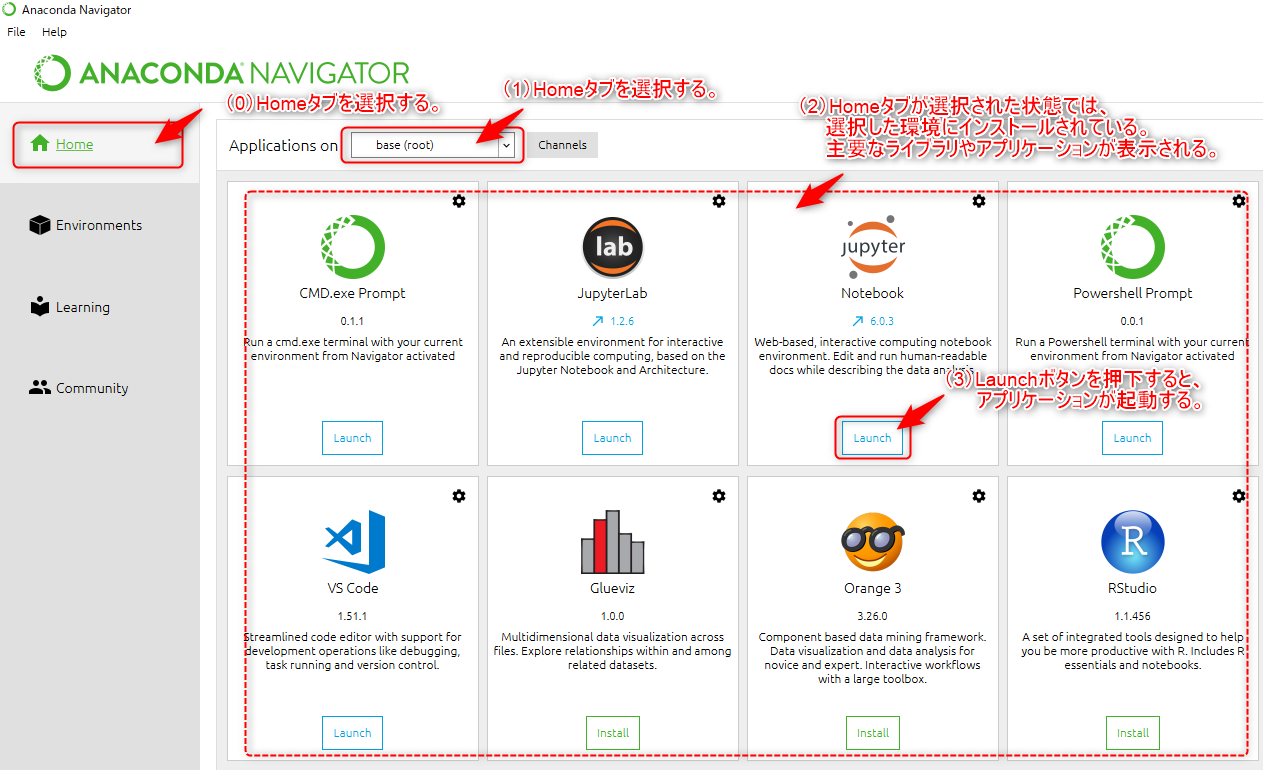
3.1.1 Home Tab
The “Home Tab” on the taskbar lists and launches major development tools and libraries such as “JupyterNotebook”, “VSCode” and “JupyterLab”.
【Application Launch】
- Select the Home Tab.
- If there are multiple virtual environments, you can select which environment to activate.
- The environment corresponding to 2. is displayed.
- Click the “Launch” button to start the tool.
3.1.2 Environment Tab
The “Environments tab” of the taskbar is for managing packages and (virtual) environments. (Figure 13)
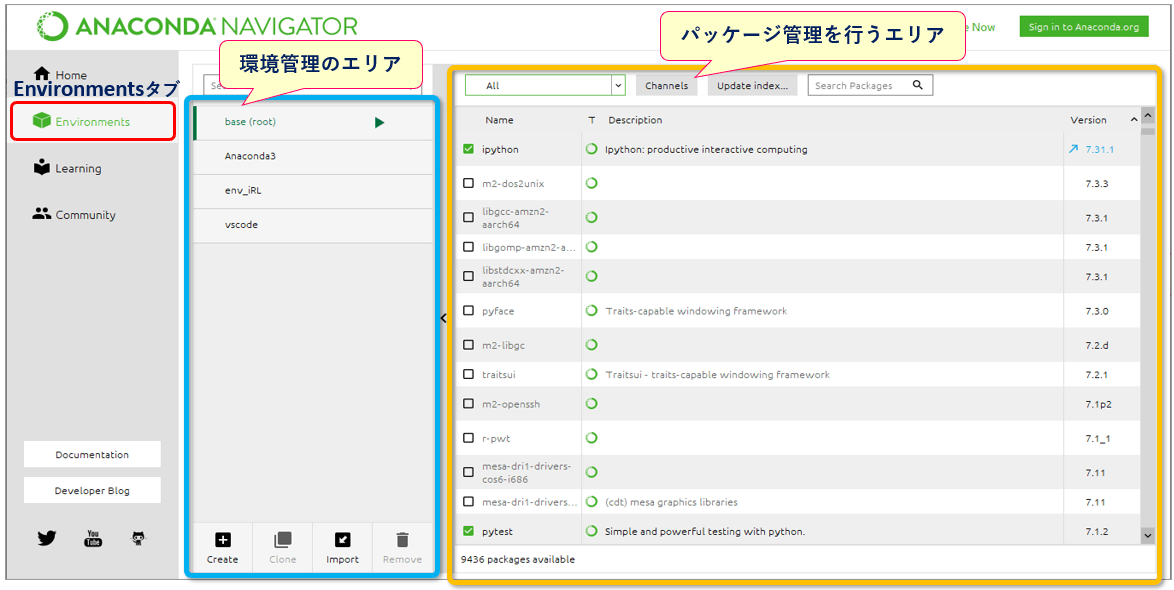
【Package Management】
This section describes the package management area.
The right side of the screen (orange box in Figure 13) shows the list of packages that can be managed by Anaconda. From the pull-down menu at the top, select “installed” “Updatable” “All” and other options. Figure 14 below shows the list when the “Installed” option is selected to display installed packages. (➀)
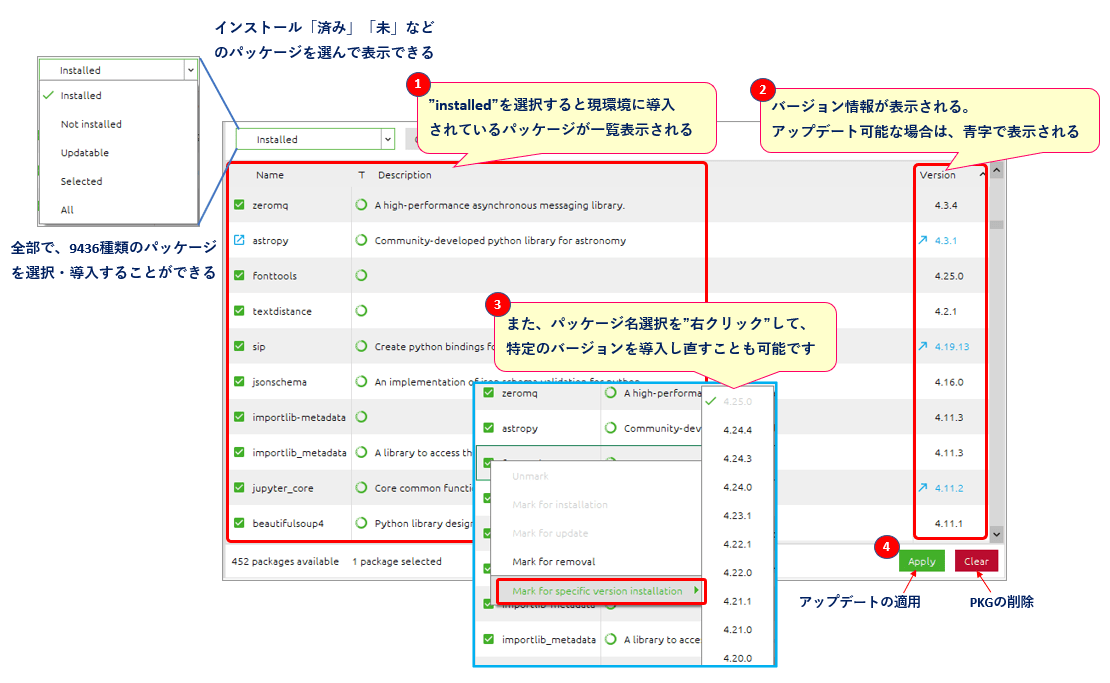
You can “Update (➁→➃)” or “Downgrade (➂→➃) to the desired version” by selecting the target package name. You can also install new packages that have not yet been installed. (Uninstalled PKGs are indicated by “All” or “Not installed”)
Then click the Clear(➃) button to uninstall.
The above list of packages is prepared and managed for each virtual environment.
【Environment (virtual) management】
Next, the environment (virtual) management area is described.
The center of the screen (light blue box in Figure 13) shows a list of environments (virtual environments) managed by Anaconda. Each environment can independently manage Python compilers (Python 2.X/3.X etc.), library types, versions, etc.
Different versions may not be reproducible. For example, you will be able to easily try out software with strong Ver-dependency, such as machine learning libraries (TensorFlow and scikit-learn). Development conditions (environment) should be preserved and managed as much as possible.
The following Figure 15 summarizes the functions of the environmental management area.
You can select and switch the environment to be used, and “Create New”, “Duplicate”, and “Delete” operations can be performed via the menu.
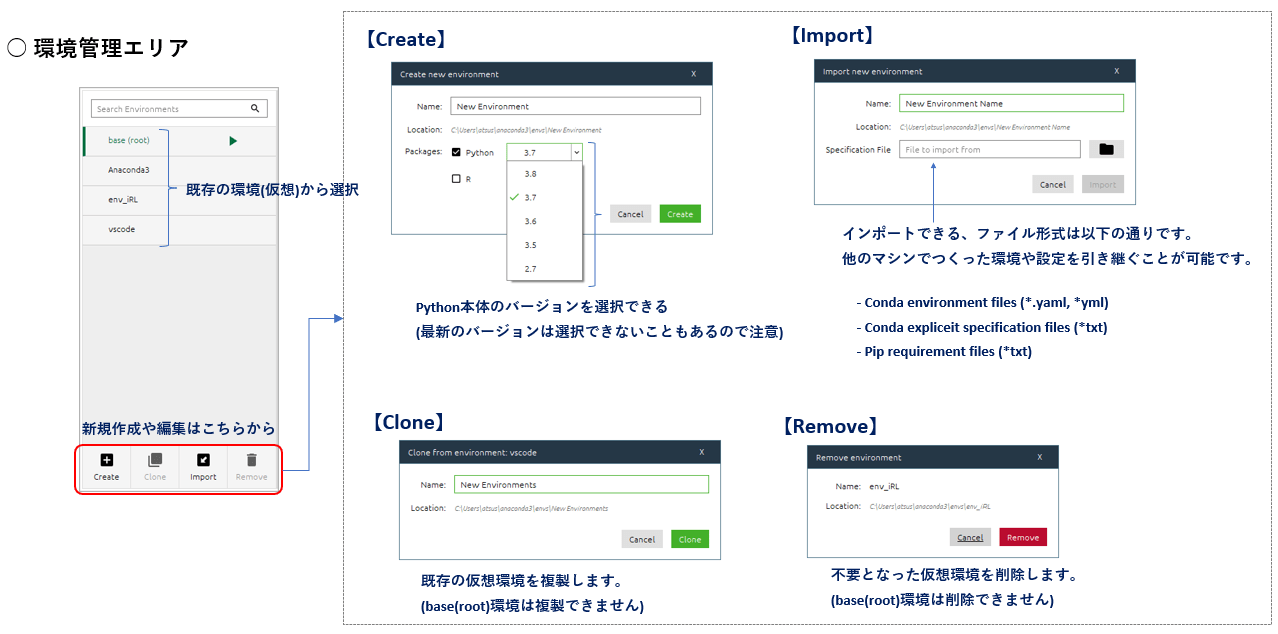
<Create>
Create a new virtual environment by selecting a Pytnon compiler version. However, it may not be compatible with the latest version of the Python compiler. The latest release version “3.9” or “3.10” was not available as an option.
<Import>
You can import environments and settings inherited from other PC. Supported file formats are as follows.
・Conda environment files (*.yaml, *yml)
・Conda expliceit specificationfiles (*txt)
・Pip requirement files(*txt)
<Clone>
You can duplicate an existing virtual environment. However, base(root) environment is not included.
<Remove>
You can delete a virtual environment when it is no longer needed. However, base(root) environment is not included.
This is an overview of Anaconda Navigator.
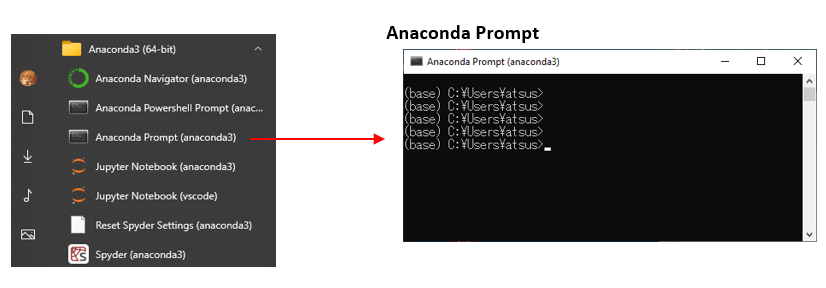
3.2 Anaconda Prompt
Anaconda also provides “a command-based Python execution environment”. Start with “Anaconda Prompt(anaconda3)” from the Windows Start menu “Anaconda3(64bit)”. (Figure.6)
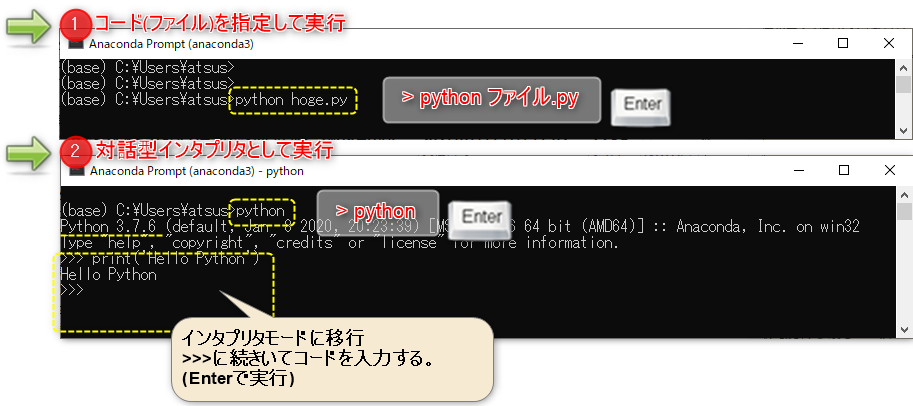
Use the “python” command to run Python scripts at the prompt. There are two ways to execute a script: by following “python” and specifying the file name (*.py) or by writing the script directly on the command line. Figure.17
- python + <FileName.py> + Enterキー
- python + Enterキー
Anaconda also includes a package and environment management tool called “Conda“. The “conda” command can be used to perform the same operations as the desktop application introduced in section 3.1.
There are many different “conda commands”, but here is a sampling of some of the most common options.
● Options for package management
| Conda command + options | Functions |
|---|---|
| conda list | Displays a list of installed packages |
| conda install -y <Package Name> | Install package ※1 |
| conda install -y codna-forge <Package Name> | Install package ※2 |
| conda remove -y <Package Name> | Uninstall package |
※1 Option “-y” is added when you want to allow all confirmations. (Optional)
※2 If the above fails to install, try this.
●Options for environmental management
The same thing can be done with the NAVIGATOR (desktop application) described in section 3.1.2. For example, the following options are available.
| Conda command + options | Functions |
|---|---|
| conda create -n <envName> python=<Version> | Define new environment |
| conda activate <envName> | Switch environment |
| conda deavtivate | Restore the original environment (※3) |
| conda remove -n <envName> -all | Delete environment |
※3 Default environment(base(root)).
● Conda upgrades and more
You can keep Anaconda up-to-date with the following commands.
| Conda command + options | Functions |
|---|---|
| conda update conda | Keep your Conda tool up to date. |
| conda update –all | Update the entire Anaconda |
| anaconda-navigator | Anaconda Navigator launches |
This is an explanation of Anaconda Prompt.
3.3 Jupyter Notebook
Anaconda also includes a development tool called “JupyterNotebook“.
It runs on a Web browser and displays results as soon as you enter and execute code in an area called a “cell”. Graphs and diagrams can be displayed inline to facilitate debugging. (Figure 18) This tool is very easy to handle for beginners.

For more information about JupyterNotebook, please refer to the following article.
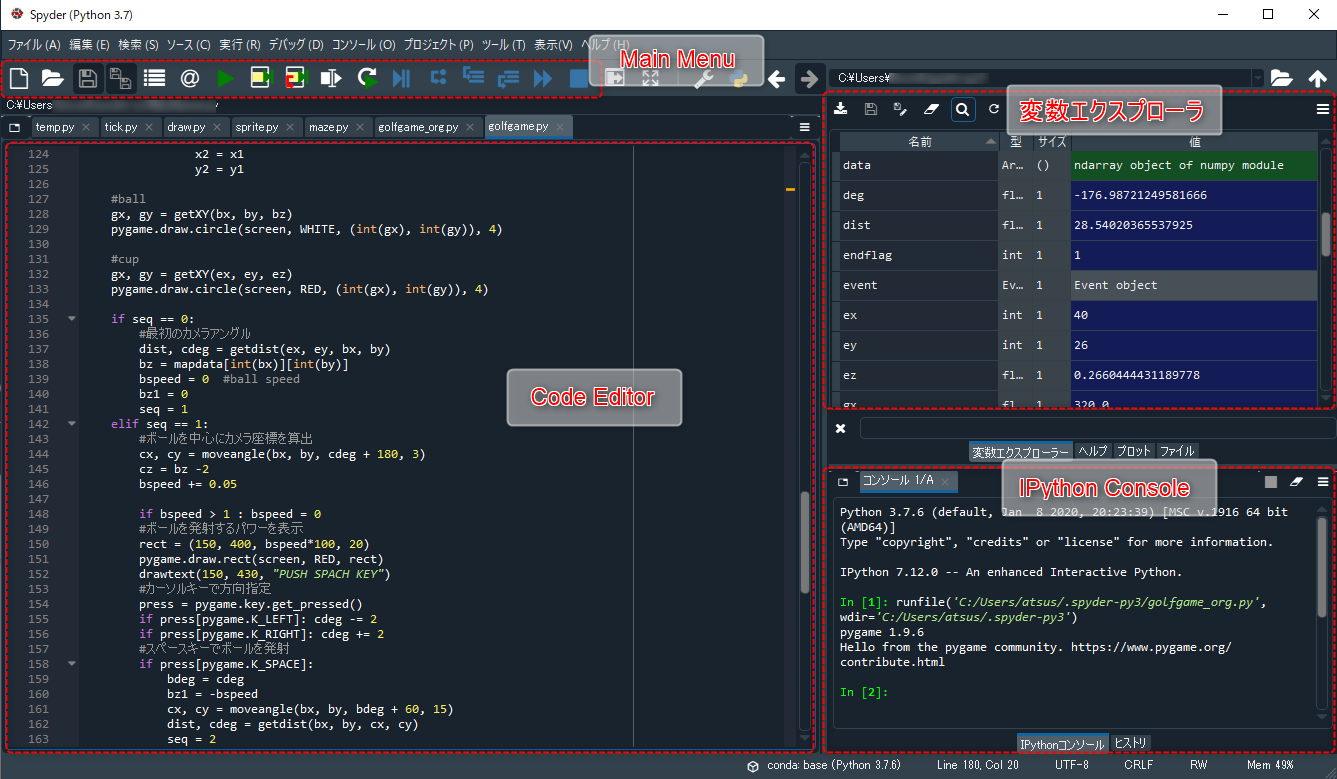
3.4 Spyder
development tool “Spyder” is introduced.
While the previous JupyterNotebook is for beginners, Spyder is a feature-rich tool for intermediate users. (Figure 19) If you are familiar with MS VisualStudio-like interface and its operation, you will be able to handle it without any difficulty.
It is a more development-oriented tool with code snippets, completion input and the IPython Console, in addition to debugging functions such as step execution and variable tracing.
This article will only introduce so far.
More information on Spyder will be covered in a separate article.
To learn more, please refer to the official website below.
Spyder Official Website
https://www.spyder-ide.org/
4. Summary

How was it?
We introduced “Anaconda Distribution” in Python environment, how to introduce it and its features.
Anaconda is a great development environment for beginners and advanced developers alike.
- Includes Python and development tools
- Many libraries for data science, scientific and technical computing etc.., are already implemented.
- Easy to create and manage packages and virtual environments
Anaconda” is a standard first step in Python programming
We hope you will refer to this article.
For other Python development environments, please refer to the following article.
●Integrated Development Environment「VisualStudioCode」

●Web browser-based and easy to try「JupyterNotebook」

●GPUs can be used in the cloud「Google Colaboratory」

Thank you for reading to the end.