
We will continue to introduce the “openpyxl” library to manipulate “Excel” from Python.
In the previous article (the third in the series), we explained “Font”, “Fill” and “Border” as methods of formatting cells. Please refer to the previous article here.

In this second part of “How to Format Cells,” we will discuss how to apply “Alignment” “Protection” and “Display Format” to cells.
We will also cover how users can define and register their own format styles (Custom Style) by combining multiple formats.Of course, openpyxl also provides pre-defined styles (Built-in Style), so we will also introduce examples of their use.
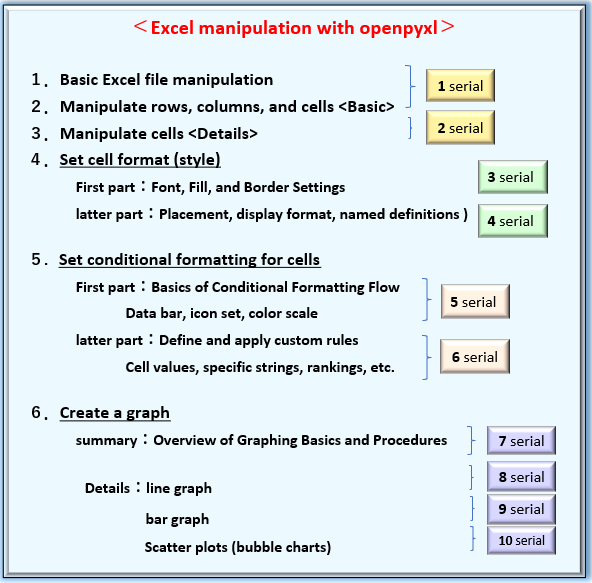
In addition, please refer to the content structure of this series [Python x Excel] as shown here.
Please stay with us until the end of this article, as you will be able to “do and understand” the following
The information presented on this site is only an example. Please refer to the official website for details and clarifications, if necessary.
【Official Site】:https://openpyxl.readthedocs.io/en/stable/
The next section will explain in detail how to define objects related to cell formatting.
1. Set Format(Style) of Cell

This section explains how to format a cell (Cell object).
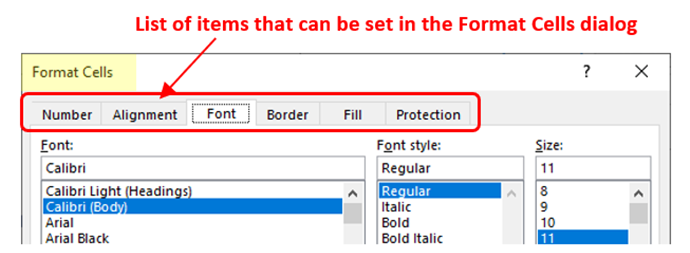
openpyxl has a number of classes related to formatting and can handle almost all items in Excel’s “Format Cells Dialog” (Fig2).
The following is a summary of the prerequisites you need to understand before using openpyxl to format a cell (Cell object).
➀. Objects are defined and generated from each format-specific class and set by properties (font/fill/arignment, etc.) under the Cell object.
➁. As a rule, it is not possible to format multiple cell ranges (rows/columns) at once.Must be broken down into individual cells and then applied.(※Supplementary information is available.)
➂. To format a merged cell, specify the upper left cell (one) of the merged range.
※➁Supplementary information on the scope of application. As the official documentation below shows, you can apply the format to a range of cells that has been created in Excel in advance, all at once.
Styles can also applied to columns and rows but note that this applies only to cells created (in Excel) after the file is closed. If you want to apply styles to entire rows and columns then you must apply the style to each cell yourself. This is a restriction of the file format:
引用元:https://openpyxl.readthedocs.io/en/stable/styles.html#applying-styles
In the following sections, we will explain the argument conditions and stipulated options to be specified when creating an object (constructor) from a format class.
1.1 Alignment (Alignment Object) settings
Alignment settings (horizontal, vertical position, wrapping, etc.) for values (numbers and characters) in cells are defined and managed by the Alignment object generated from the Alignment class.
The alignment property of the target Cell object is used to set the alignment object.The Alignment class has a variety of arguments, the main ones are listed below.
from openpyxl.styles import Alignmet
Alignment(horizontal, vertical, text_rotation, wrap_text, shrink_to_fit, indent)
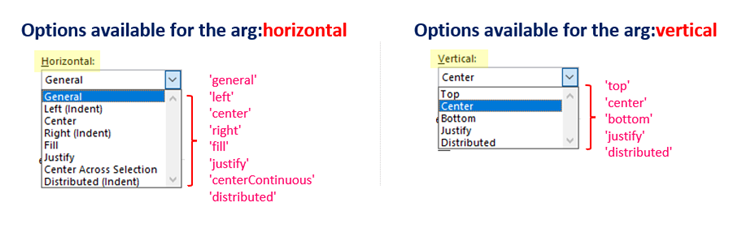
arg: horizontal : Specify horizontal position(default:‘general’) Choice of 8 optional constants
arg: vertical : Specify height position(default:’bottom‘) Choice of 5 optional constants
arg: text_rotation : Specify character rotation angle(default:0) Specified in 1 degree steps from 0 to 180
arg: wrap_text : String Wrapping Enabled(default:’False’ invalid)
arg: shrink_to_fit : Automatic Text Size Adjustment(default:’False’ invalid)
arg: indent : indent size(default:0)
return: Alignment Object
※All arguments are optional
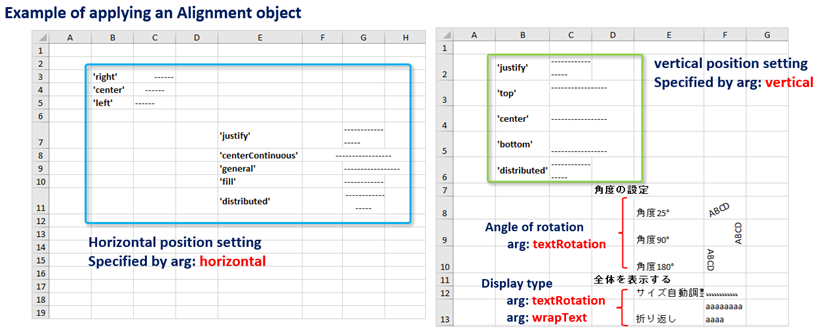
Most of the items that can be set in the cell formatting window (Alignment Tab) are covered. Fig4 contrasts which UI item each argument corresponds to.
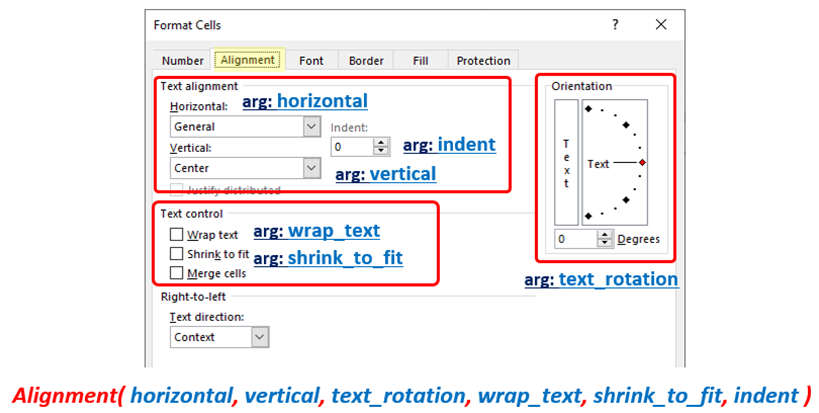
The values for the arg:horizontal (horizontal alignment) and arg:vertical (height position) are selected from the following optional constants. (Fig4)
Other options include: arg:text_rotation, arg:wrap_text, and arg:shrink_to_fit, which allow specifying rotation and number format (automatic adjustment of text size, wrapping within cells). Each argument may be specified in combination.
【SAMPLE (1)】
Here is a sample code that shows how to set cell alignment using the Alignment object.
A summary of the code is as follows
In [A], the arg :horizontal is an optional constant that changes the horizontal alignment position in the cell.
You can also specify the overall display as in [A]-➁ ‘justify‘, ‘distributed‘.
In [B], the vertical position is adjusted by specifying an optional constant for the arg:vertical.
Then, in [C], the rotation angle and automatic adjustment (shrink and wrap within a cell) of the string are specified at arg:textRotation, arg:shrinkToFit, and arg:wrapText, respectively.
※Symbols such as [A] correspond to comments in the code.
The file (.xlsx) used in this can be downloaded from
from openpyxl import load_workbook
from openpyxl.styles import Alignment    # Importing Alignment Classes

wb = load_workbook('styles_Alignment_En.xlsx') # Reading Excel files
ws1 = wb.worksheets[0]    # Worksheet 1
ws2 = wb.worksheets[1]    # Worksheet 2

# [A]-➀--------------------------------------------------------------
# Horizontal alignment setting ➀

# "horizontal" Example of application of argument ➀
ws1['C3'].alignment = Alignment(horizontal='right')  # right justification
ws1['C4'].alignment = Alignment(horizontal='center') # centering
ws1['C5'].alignment = Alignment(horizontal='left')   # left justification

# [A]-➁--------------------------------------------------------------
# Horizontal alignment setting ➁

# "horizontal" Example of application of argument ➁
ws1['G7'].alignment = Alignment(horizontal='justify')          # Wrap around (left justified)
ws1['G8'].alignment = Alignment(horizontal='centerContinuous') # whole display (centered)
ws1['G9'].alignment = Alignment(horizontal='general')          # Whole display (left justified)
ws1['G10'].alignment = Alignment(horizontal='fill')
ws1['G11'].alignment = Alignment(horizontal='distributed')     # Wrap around (center-aligned)

# [B]--------------------------------------------------------------
# Vertical alignment setting ➀

# "vertical" Example of application of argument ➀
ws2['C2'].alignment = Alignment(vertical='justify')      # Wrap around (left justified)
ws2['C3'].alignment = Alignment(vertical='top')          # Whole display (top-aligned)
ws2['C4'].alignment = Alignment(vertical='center')       # Whole display (centerd)
ws2['C5'].alignment = Alignment(vertical='bottom')       # Whole display (bottom alignment)
ws2['C6'].alignment = Alignment(vertical='distributed')  # Wrap around (left justified)

# [C]--------------------------------------------------------------
# Other settings related to alignment

#  Example of applying the "textRotation" argument
ws2['F8'].alignment = Alignment(textRotation=25)
ws2['F9'].alignment = Alignment(textRotation=90)
ws2['F10'].alignment = Alignment(textRotation=180)

# Example of applying the "shrinkToFit" argument
ws2['F12'].alignment = Alignment(shrinkToFit=True)

# Example of applying the "wrapText" argument
ws2['F13'].alignment = Alignment(wrapText=True)


wb.save('styles_Alignment_apply_En.xlsx')
The results of the execution of List 1 are as follows. (Fig5)
The blue box is the result of setting the horizontal position (arg:horizontal) and the green box is the result of setting the vertical position (arg:vertical).
Row and column widths are adjusted for ease of viewing. Please adjust them manually or by adding a separate code.
The results (.xlsx) of the <List1> run can be downloaded from
1.2 Protection (Protection Object) Settings
Each cell can be set to allow or disallow editing (protected).To protect a cell, it is defined and managed by a Protection object created from the Protection class of the styles module.
To apply, set the protection property of the target Cell object.
from openpyxl.styles import Protection
Protection(locked, hidden)
arg: locked :Editing availability settings (default:True[Protection])
arg: hidden :Setting to Hide (default:False[display])
return: Protection Object
※All arguments are optional
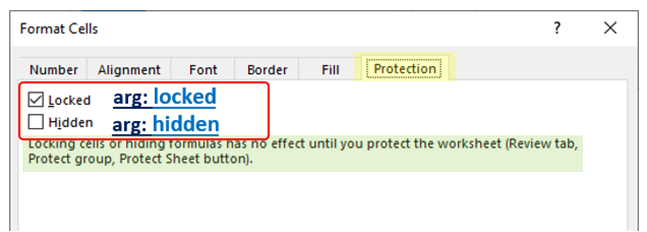
Corresponds to the items that can be set in the cell formatting window (protection Tab).
Fig6 shows the correspondence between UI items and arguments. (No need to explain, but…)
Note that even if cell protection is set in the Protection object, the setting will not be applied unless the protection function of the Worksheet object or Workbook object, which is the upper layer, is enabled.
Fig7 shows the sheet protection dialog window in Excel (Review tab->Protect Group->Protect Sheet).Protection is applied by checking the “Protect sheet and locked cell contents (C)” checkbox.

Worksheet layer protection is defined in the SheetProtection class provided by the worksheet.protection module.This article omits the explanation, so please refer to the official documentation below or set up manually as necessary.(This is also explained in the sample code that follows.)
Official Documents【worksheet.protection Module】
https://openpyxl.readthedocs.io/en/stable/protection.html#worksheet-protection
【SAMPLE (2)】
Let’s check a concrete example of protecting a cell with a “Protection object” with the sample code .
As mentioned earlier, in order to enable cell protection, you must also enable protection for the upper layer, the “workbook” or “worksheet”.
Workbook protection can be set with the security.lockStructure attribute of the Workbook object, as in [A].(Commented out in code)
Sheet protection can be set using the protection.enable() method of the Worksheet object or the password attribute as shown in [B].
Finally, [C] applies the Protection object to each Cell object.The protection is removed by setting the arg:locked of the “Protection Object” to “False“(Default is True).
from openpyxl import Workbook
from openpyxl.styles import Protection
wb = Workbook()
ws = wb.active
# [A] -----------------------------------------------------------------------
# Protect the entire workbook with WorkBook's lockStructure attribute
# wb.security.lockStructure = True # Enable book protection (commented out)
# [B] -----------------------------------------------------------------------
# enable() method of WorkSheet's protection object
# Or enable worksheet protection with password() method
ws.protection.enable() # Enable sheet protection
# ws.protection.password = '1234' # Sheet can be protected by password() method alone (commented out)
# [C] -----------------------------------------------------------------------
# Cell protection is activated after protecting a book with [A]
# or protecting a sheet with [B].
# When applying a Protection object to a range of cells,
# break it down into individual cells and apply it.
for row in ws['A1:B2']:
for cell in row:
# The argument locked is set to false (unprotected) to make it editable
# Default state is True (protection)
cell.protection = Protection(locked=False, hidden=False)
# When applying a Protection object to a joined cell range,
# set it only to the upper left cell of the cell range.
ws.merge_cells('A3:B4')
ws['A3'].protection = Protection(locked=False, hidden=False)
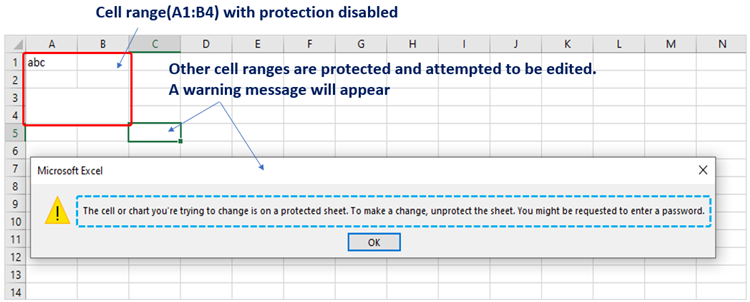
wb.save('styles_Protection.xlsx')The results of the List2 run are as follows.
We have confirmed that the A1~B4 cell range is no longer protected as configured and can be edited.Other cells are not edited because protection is enabled by default.
The results (.xlsx) of the <List2> run can be downloaded from
1.3 Number Format settings
User-defined number format can be set for a cell. Unlike conventional formatting settings, there is no need to define or create objects from a dedicated class.
The following is applied by setting the number format symbol (such as @, #, etc.) to the number_format property of the target Cell object. (Fig.9)
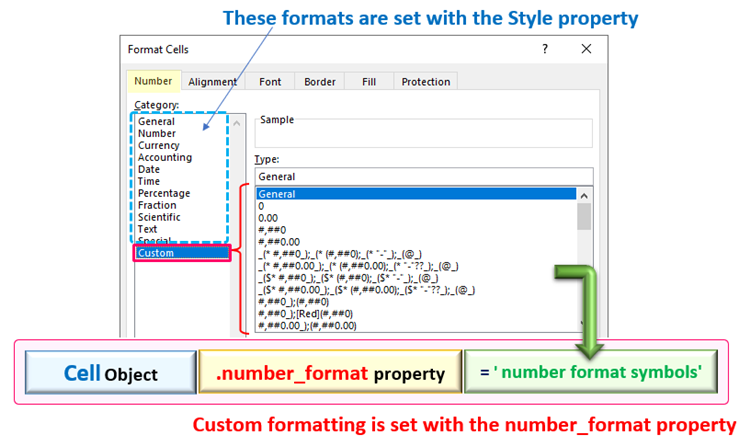
The number format can be freely customized by combining the following notation symbols.
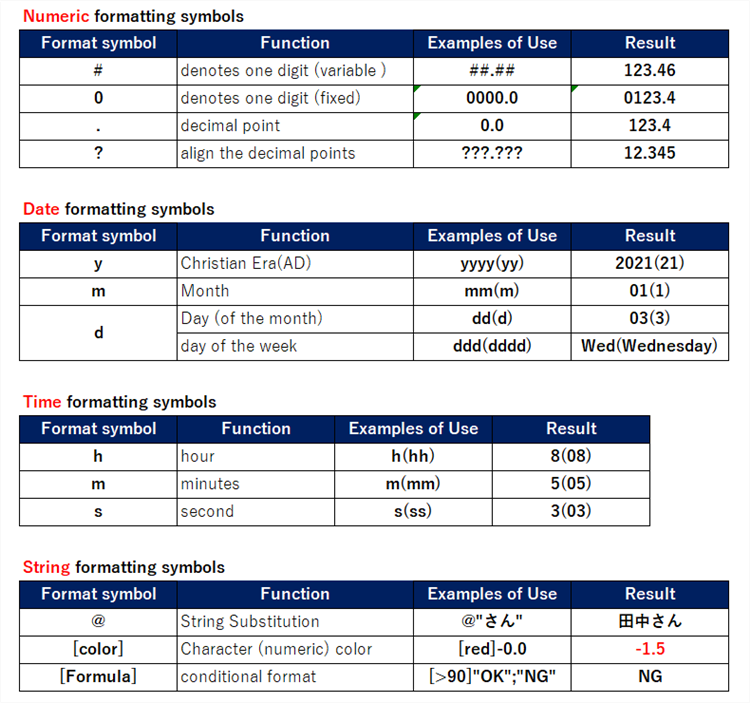
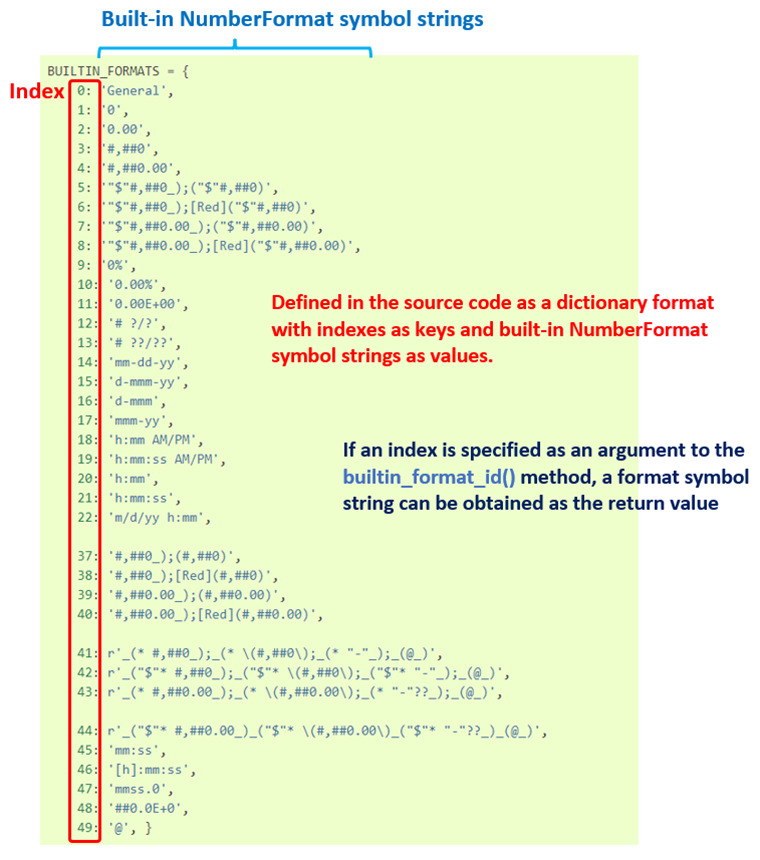
In addition, the list of notation symbols predefined in the “User Definition” in Fig.9 is defined in a dictionary format in the source code in the “styles.numbers module” as shown in Fig.11.
Each format can be accessed by specifying the key (an index) as an argument to the builtin_format_code() method. The actual usage is shown in the sample code that follows.
styles.numbers module Source Code Excerpt <from the official documentation>
https://openpyxl.readthedocs.io/en/stable/_modules/openpyxl/styles/numbers.html#NumberFormat
【SAMPLE (3)】
Now, let’s see an example of the application of the “Number Format” with the sample code .
The number format can be applied by the user using a string with a combination of notation symbols, as in [A].
Alternatively, as in [B], you can select from the list of prebuilt-in number format styles (Figure 11) and set them via “built-in_format_code()”.
In addition, the “styles.numbers module” provides several methods for number formats.
For example, the is_builtin() method checks for built-in formatting, the is_date_format() method checks for date format types, and the is_datetime() method checks for date and time types, which are imported at the beginning. [C]
The file (.xlsx) used in this code can be downloaded from
from openpyxl import load_workbook
from openpyxl.styles.numbers import builtin_format_code, builtin_format_id
from openpyxl.styles.numbers import is_builtin, is_date_format, is_datetime

wb = load_workbook('styles_Number_Format_En.xlsx')
ws = wb.active

# [A] -----------------------------------------------------------------------
# Apply a number format to a cell by combining notation symbols
# User-specific strings are also acceptable.

ws['C4'].number_format = '##.##'
ws['C5'].number_format = '0000.???'
ws['C7'].number_format = 'yyyy'
ws['C8'].number_format = 'dddd'
ws['C10'].number_format = 'mm:ss'
ws['C12'].number_format = '[red]@"さん"'

# [B] -----------------------------------------------------------------------
# Apply a number format selected from the default built-in formats

print(builtin_format_code(0)) # >> General
ws['E4'].number_format = builtin_format_code(0)

print(builtin_format_code(1)) # >> 0
ws['E5'].number_format = builtin_format_code(1)

print(builtin_format_code(2)) # >> 0.00
ws['E6'].number_format = builtin_format_code(2)

# [C] -----------------------------------------------------------------------

# Find out the identification ID of a numeric format.
id = builtin_format_id('0.00')
print(id) # >>2

# Check if it is an embedded format
print(is_builtin('#,##0')) # >> True  (built-in)
print(is_builtin('gggg'))  # >> False (Not built in.)

# Check if it is a date format
print(is_date_format('mm-dd-yy'))  # >> True (date)
print(is_date_format('0.00'))      # >> False (Not the date.)

# Check if it is a date/time format
print(is_datetime('m/d/yy h:mm')) # >> datetime(date and time)
print(is_datetime('mm-dd-yy'))    # >> date(date)
print(is_datetime('h:mm AM/PM'))  # >> time(time)
print(is_datetime('0.00'))        # >> None(Not in date/time format)

wb.save('styles_Number_Format_apply_En.xlsx')
The above is an explanation of the individual “Cell Formatting” settings.
Execution results can be downloaded here.
From Section 2 onward, examples of applying formatting by “Style” will be introduced.
2. Apply Style(Style Object) to Cell

So far, we have explained how to individually set “font,” “fill,” and “border” as cell formatting.
Excel has the concept of “applying styles” with respect to cell formatting and decoration.
A style is a “Design Type“ that is arranged to fit the “theme (appearance and unity) of the content,” either individually or in combination with other types of formatting.(Fig12)
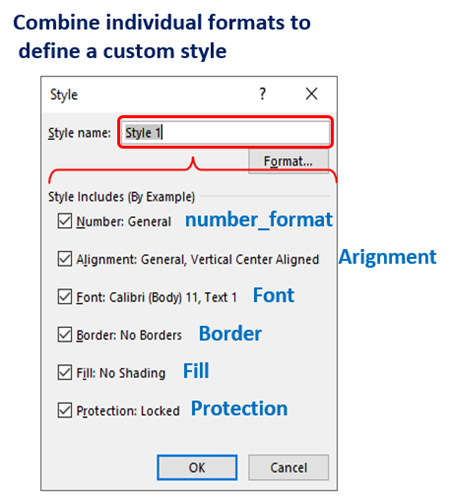
Once a style (“Design Type”) is defined, it can be reused any number of times. In other words, you no longer need to repeatedly define and retrieve formatting objects.
There are two types of styles: 「built-in styles」 and 「user-defined styles」.
2.1 Apply Built-in-Style
First, we will explain how to apply the “Built-in-Style” which is predefined in Excel.
The built-in style can be applied by setting the style property of the Cell object to “Style definition name(string)”.
Cell Object.style propery = ‘Style definition name(String)’
※ ‘Style definition name’:‘Normal’, ’Title’, ‘Comma’,…
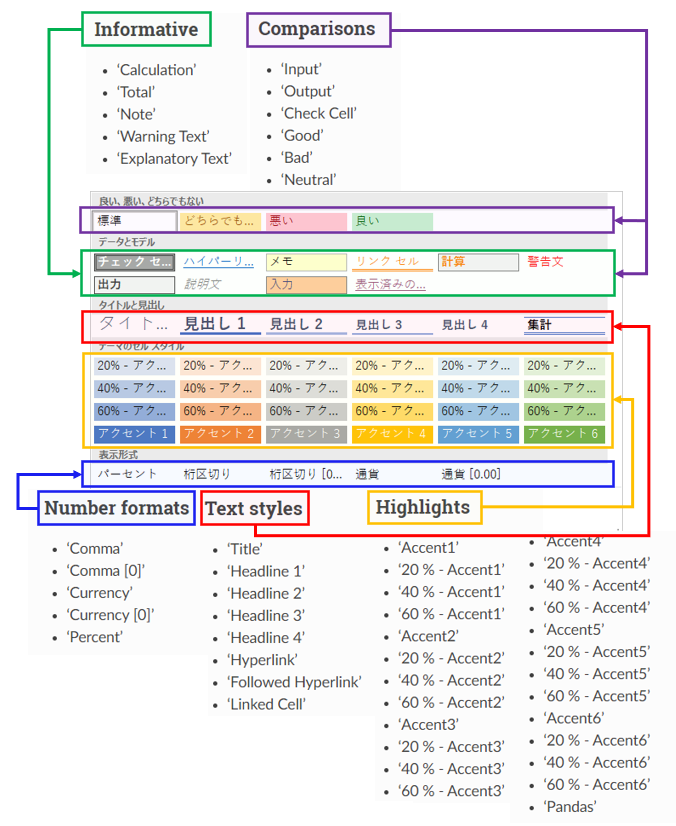
In the “Style Definition Name” section, you can choose from a categorized string as shown in Fig13. (You can find the list of styles in Excel’s Home tab -> Styles group)
You cannot specify a “Japanese style name” that appears in the Excel UI ※. It must be specified in standardized English notation, not in a country- or language-dependent local environment.(※ Except for user-defined styles in section 2.2.)
2.2 Create and apply User-Defined Styles
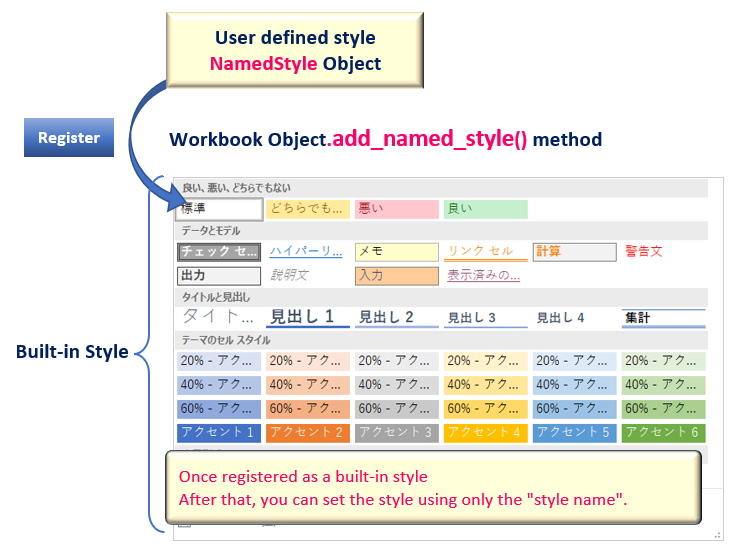
In addition to built-in styles, there are “user-defined styles” that allow users to define (customize) their own style formatting.
User-defined styles require an object to be defined and created from the NamedStyle class with the following format.
The arg:name specifies the name of the style to be added, and the other arguments such as “font” and “fill” are individual formatting objects (Font/Fill objects) that have been explained so far.If the argument is omitted, the default value (“None“) is inherited.
from openpyxl.styles import NamedStyle
NamedStyle(name, font, fill, border, alignment, number_format, protection)
arg: name : Set the format name to define
arg: font : Set the font with the Font object
arg: fill : Setting up a fill with a Pattern(Gradient)Fill object
arg: border : Setting up a border with the Border object
arg: alignment : Setting up alignment with the Alignment object
arg: number_format : Set the notation symbols
arg: protection :Setting up protection with the Protection object
return: NamedStyle Object
※All arguments are optional
NamedStyle objects are applied with the style property in the same way as “built-in styles”.
“User-defined styles” can also be registered in the Excel UI style list (Home tab -> Styles group) as shown in Fig14. Registration is done by the add_named_style() method of the Workbook object.
This allows “user-defined styles” to be treated like “built-in styles” with style names.
【SAMPLE (4)】
Let’s check an example of defining and applying a “user-defined style” with sample code <List4>.
Explanation of the outline of the code.
In [A], a NamedStyle object is defined. The arg:name is set to the style name “SampleStyle” and the other arguments (font, fill, alignment) are set to individual formatting objects.
In [B], the add_named_style() method is executed to register the NamedStyle object in [A] to the style list of Excel’s UI.
Then, set a user-defined style for the target cell with the style property in [C]. You can specify the style name (“SampleStyle”) since it has already been registered in [B], or you can set it directly with the “NamedStyle object”.
from openpyxl import Workbook
# Import NamedStyle class and other classes related to cell formatting
from openpyxl.styles import NamedStyle, Font, PatternFill, Alignment
from openpyxl.styles.colors import Color
wb = Workbook()
ws = wb.active
# [A] -----------------------------------------------------------------------
# Generate a user-defined style (NamedStyle object) by combining
# individual formatting objects
user_custum = NamedStyle( name='SampleStyle',
font=Font(name='Arial', size=14, color="FFFFFFFF"),
fill=PatternFill(patternType='solid', fgColor=Color(rgb='1e90ff')),
alignment=Alignment(horizontal='centerContinuous', vertical='bottom')
)
print(type(user_custum))
# >> <class 'openpyxl.styles.named_styles.NamedStyle'>
# [B] -----------------------------------------------------------------------
# Register the style you defined with the "add_named_style()" method
# of the Workbook object.
wb.add_named_style(user_custum)
# [C] -----------------------------------------------------------------------
# Applying a style with the style property
# Can be set by style name (due to the style name registered above)
ws['B4'].style='SampleStyle'
# Of course, objects can be set directly
ws['B2'].style=user_custum
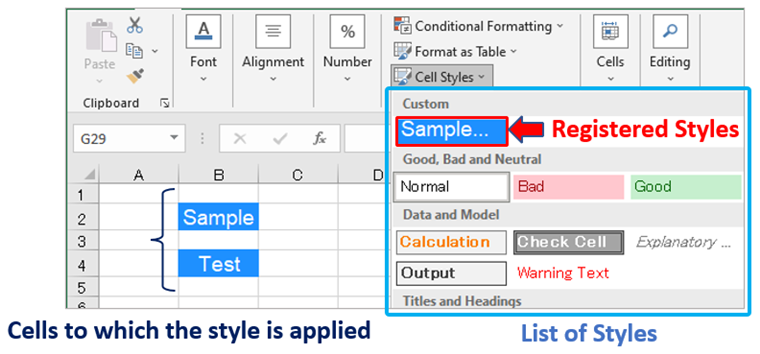
wb.save('styles_NamedStyle_En.xlsx')The results of the List4 run are shown in Fig15.
The newly defined style is now registered and displayed in the list, and the style has been applied to the “B2” and “B4” cells.
The above is an explanation of how to apply a style to a cell.
Execution results can be downloaded here.
3. Summary

How was it?
In this issue, we covered the “openpyxl” library for manipulating Excel, how to format cells (alignment, protection, and display formatting), and also introduced “styles” for managing various types of formatting together.
It is very important to keep sheets and cells looking good.The operations related to cell formatting described in this and the previous articles will always be performed.
We hope you will understand and make use of the contents of this article.
In addition, there are many optional arguments, methods, attributes, and other functions in the classes related to formatting that were not fully introduced in this article.
Please refer to the official documentation “openpyxl.styles module” page to find the function you are looking for.
Finally, we summarize the main points of this article.
➀. There are dedicated classes related to Excel formatting.The defined formatting object is set and reflected by each property of the Cell object.
The Alignment class is provided for cell alignment, and the Protection class for protection.
➁. To apply a number format to a cell, set the notation symbol to the number_format property.
➂. There are two types of styles: one is the Built-in Style provided by Excel and the other is the user-defined style (custom style).The latter is a user-specific style that combines cell formatting (objects) and is defined in the NamedStyle class.
Now that we have discussed each of the cell formats, Excel has some useful functions (tools) such as “apply a certain format to a cell if it meets certain conditions”.
In Excel, they are grouped in a menu group called “Conditional Formatting“.In the next issue, we will discuss conditional formatting, which makes more active use of cell formatting.
The link will be here ↓.
Thank you for reading to the end.